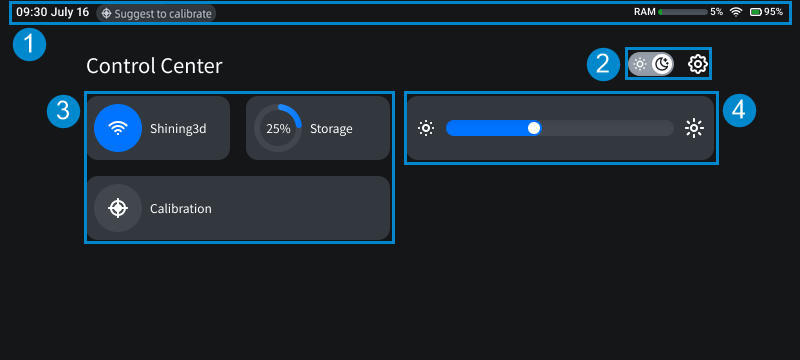
Control Center
To invoke the Control Center module, simply swipe down from the top of the screen.
Interface Overview

Note
- To close the Control Center, you can either tap on the empty space in the Control Center or use the upward swipe gesture.
- If you invoke the Control Center during the scan or calibration process, you will not be allowed to use the navigation buttons for jumping to different functions.
① Status Bar
| Status | Description | Icons |
|---|---|---|
| Time | The format is hh:mm, and it is displayed in the 12-hour format by default. You can enable the 24-hour format in the Setting > Date and Time. | |
| Version number | Display the current software version of the device (hided when the control center is invoked). | |
| Calibration prompt | Tap to enter the calibration process; if this is your first calibration, you will be directed to the Help interface. | |
| RAM | It indicates the device's used memory space. | |
| Wi-Fi | It indicates the current status of network connection. | |
| Battery | It indicates the current battery level. |
Note
If the battery level is below 20%, 10%, and 5%, a low battery notification will appear in the interface to remind you to charge the device.
② Widget Bar
: Light mode.
: Dark mode (default).
Note
- After switching the mode, the device will continue to use the selected mode after the next boot.
- You can also short press the scan button on the right side of the device to quickly switch the mode.
: The entrance to Setting.
Note
This entrance is not available during the process of scan or calibration.
Setting
Tap button in the ② widget bar to enter the Setting interface.
| Setting | Description |
|---|---|
| Account |
Account switch does not affect the files already in the device. |
| Software Update | Tap Check for Update to automatically check if the current software is the latest version.
|
| Calibration | Display the serial number of the calibration board; or please tap Scan to recognize the calibration board to bind the calibration board. Tap Start calibration to enter the calibration process; if this is your first calibration, you will be directed to the Help interface. |
| Wi-Fi | Enabled by default, and the switched status will remain after the next boot. When connected to the network, you can tap Network Diagnosis to open the pop-up window and automatically start diagnosing the network connection and SHINING 3D Cloud services. In the diagnosis results, For the use of Available Wi-Fi, please see connect network. |
| Date and Time |
|
| Language | The software language can be set as English, Simplified Chinese, Traditional Chinese or Japanese. |
| Display | Support adjusting Screen brightness and switching Theme to dark mode (default) or light mode. |
| Storage | Display the usage of device disk space, including the amount used, total storage capacity and the percentage occupied. |
| About | Display the basic information, including device name, serial number, warranty status, RAM, privacy policy, contact us, etc., as well as the certification information and the entrance into Factory Reset.
|
③ Function Panel
| Function | Description | Icons |
|---|---|---|
| Wireless network | The entrance to wireless network settings. Tap the icon area to quickly enable or disable the wireless network connection. |
|
| Storage | Display the percentage of device's used memory space. Tap to enter Setting > Storage. |
|
| Calibration | The entrance to calibration. |
④ Screen Brightness
Drag the slider to adjust the screen brightness of the device:
←  : Brighten down.
→  : Brighten up.
 search is supported).