Mesh Edit
After mesh, in the ![]() Mesh interface, you can
Mesh interface, you can ![]() clip the mesh,
clip the mesh, ![]() process the mesh,
process the mesh, ![]() map the texture and
map the texture and ![]() measure the model.
measure the model.
Interface Overview
Note
For the introduction to other information in this interface, please see interface overview.
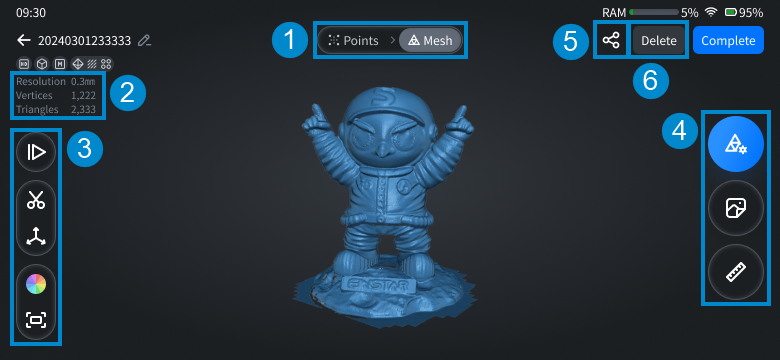
① Switch Data
Tap to switch the displayed data of the model to ![]() Points or
Points or ![]() Mesh.
Mesh.
② Project Information
Display the data information (resolution, vertices and triangles) of the current project; for more, see project information.
③ Mesh Editing Toolbar
Note
- For
 mesh clipping, Select Through can be enabled (by default), and only visible data can be selected when disabled; for more introduction to the clipping function, please see data clipping.
 - For the introduction to other editing tools, please refer to Data Edit.
Tap the ![]() button to align the model, which will help adjust the model's coordinate system more appropriately, facilitating subsequent measurements or further design work.
button to align the model, which will help adjust the model's coordinate system more appropriately, facilitating subsequent measurements or further design work.
The left main view (model operation area) is the front view, while the right small views (model preview area) represent the right view and the top view, arranged as shown in the following illustration:

Note
- You can tap the
 button to switch the view in the upper right corner or the bottom right corner to the left operation area. After switching, you can tap the
  button in the upper right corner again to restore the default view layout.
 - If you realign a mesh model that has already been uploaded to the SHINING 3D Cloud, you will need to re-upload it.
During model alignment, you can use a single finger swipe in the left main view area ![]() to rotate the model (default), and the model preview effect in the small views on the right will update in real-time. Additionally, you can use a single finger swipe in the main view area to
to rotate the model (default), and the model preview effect in the small views on the right will update in real-time. Additionally, you can use a single finger swipe in the main view area to ![]() pan the model, and a double-finger swipe to
pan the model, and a double-finger swipe to ![]() zoom the model.
zoom the model.
Note
- By default, the
 rotation gesture is used. You can tap other buttons to switch between different gestures.
 - The scaling operation only affects the current view and does not impact the actual model.
Tap the Complete button in the upper right corner to save the aligned data and return to the mesh editing interface. Alternatively, you can tap the ![]() button in the upper right corner to restore the model to its initial pose.
button in the upper right corner to restore the model to its initial pose.
④ Function Buttons
-
 Mesh edit: Tap this button and the window of Mesh Processing will appear in the right.
-
Texture Adjustment: Drag the slider
 to adjust the brightness, contrast, color temperature, and saturation (the default value is 0 and the range is -100 ~ 100); the texture adjustment effect can be previewed in real time, and you can tap Complete to save the settings.
Note
- Only the project with acquired texture supports texture mapping; if the Acquire Texture function is not enabled, it will prompt that "
 Non-texture scan, can not generate texture map".
 - When adjusting the texture,
 Texture Display is always enabled and can not be disabled.
 - When you enter this function settings again, the new texture adjustment effects will be layered on top of the effects applied last time.
- Only the project with acquired texture supports texture mapping; if the Acquire Texture function is not enabled, it will prompt that "
-
 Auto Hole Filling: You can set the hole perimeter by dragging the slider (the default value is 1). The edges of the holes on the mesh model that meet the criteria will be displayed in green (while the edges of other recognized holes will remain red). Tap Apply to preview the hole filling effect, and tap Complete to save the operation.
Note
It is recommended that you remap the texture after hole filling for optimal texture display.
-
-
 : Texture Mapping.
Note
- Only the project with acquired texture supports texture mapping; if the Acquire Texture function is not enabled, it will prompt that " Non-texture scan, can not generate texture map".
- You can manually exit the process by tapping the
 button in the upper right corner.
- Only the project with acquired texture supports texture mapping; if the Acquire Texture function is not enabled, it will prompt that "
-
 : Measure.
⑤ Share
![]() Share the mesh model to SHINING 3D Cloud; for more, please refer to save and share.
Share the mesh model to SHINING 3D Cloud; for more, please refer to save and share.
⑥ Delete
After tapping this button, a confirmation pop-up will appear. Selecting Delete will permanently remove the current scan project, and it cannot be recovered.