Import the Model
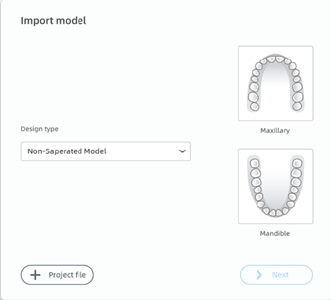
Enter the interface of Importing model and load a project suitable for standard 3D modeling printing ( the STL, OBJ, PLY, BEB files).
 Note
Note
- AccuDesign only supports importing the data of non-separated model, which contains upper jaw models, lower jaw models and complete teeth models.
- AccuDesign not supports importing the data of separated model so far, which refers to the model of single tooth in particular.
Steps
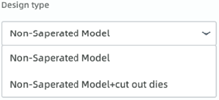
1. Select Design Type.
-
Non-separated Model type is suitable for the situation of orthodontics while it not supports generating extra teeth models.
-
Non-separated Model-Extra Tooth Model type is mainly chosen in the case of dental implant as it supports generating extra specially designed teeth models. Those teeth models' structure is similar to the real tooth except that they are added with an extra base for being taken and marked easily.
2. Select project type and load scanned data.
- Import data of model
· Load the data of single-jaw model:
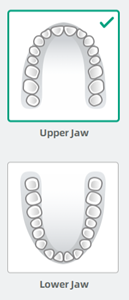
1)Select the illustration and click Next, then the dialog of Import Upper/ Lower Jaw Scan pops up.
2)To load the data of single-jaw model, Double click target item, or click Open after selecting the item containing data of upper/ lower jaw model on the pop-up.
 Caution
In the the dialog of Import Upper/ Lower Jaw Scan, always select the correct upper/ lower jaw model that matches the illustration.
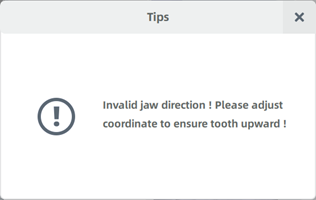
If not, the following pop-up will appear after adjusting coordinate, indicating that the automatic adjustment is invalid and it is needed to flip the model manually.
· Load the data of bimaxillary model:
1)Select both illustrations of upper jaw and lower jaw, click Next, then the dialogs of Import Upper Jaw Scan and Import Lower Jaw Scan pop up in sequence.
2)To load and piece together the data of 2 models, double click target item or click Open after selecting the item on pop-ups.
-
Load project file generated by SHINING 3D scanner
1)Click + Project File, then the dialog of Project File pops up.
2)To load project file generated by SHINING 3D scanner, double click target project file, or click Open after selecting the file on the pop-up.