Home
On the Home interface, check the current status of the printer and the related information of the resin tank.
Note
- When the activation prompt appears, please enter Settings > About > Activate License, follow the instructions to activate the printer for full permissions.
- When you are prompted that the remaining days are insufficient, please go to AccuWare > Settings > Printer Act and Auth interface to process online activation, or contact technical supporters to process activation with the activation file.
Switch columns to view the introduction to each field.
![]()
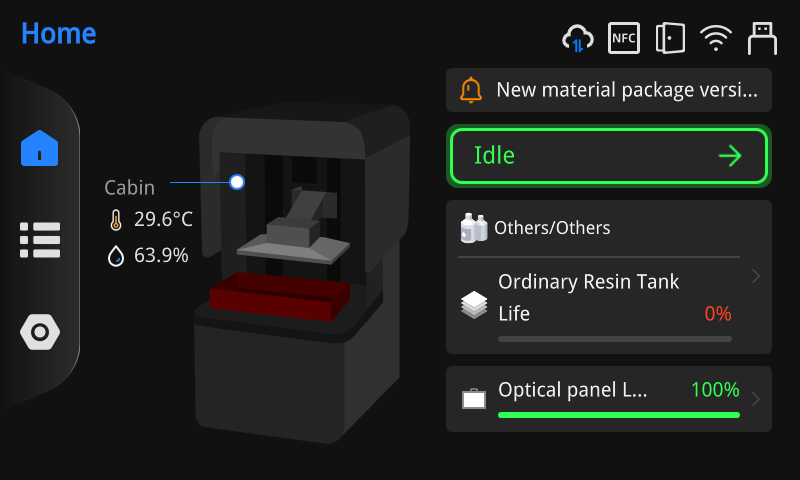
![]() : Displays the Air Temperature and Humidity inside the build chamber.
: Displays the Air Temperature and Humidity inside the build chamber.
Caution
-
Please ensure that the value displayed meets the environmental requirements.
-
If the solid lines representing the build platform in the diagram turn into red dashed lines, it indicates that the build platform is not installed or the printed model has not been removed.
Idle: Printing has not started or is completed. Tap the field to enter Queue interface to select the file for printing.
Note
- In idle status, the build platform and resin tank are temperature-controlled to maintain a constant temperature of 30℃.
- If the ambient temperature of the device is significantly lower than 30℃, the system will automatically heat up to 30℃, and the screen will display the heating status.
Printing: Tap the field to enter Printing Details interface to check the printing information and control the printing process.
Caution
Interrupting the printing process will lead to the slices' misalignment.
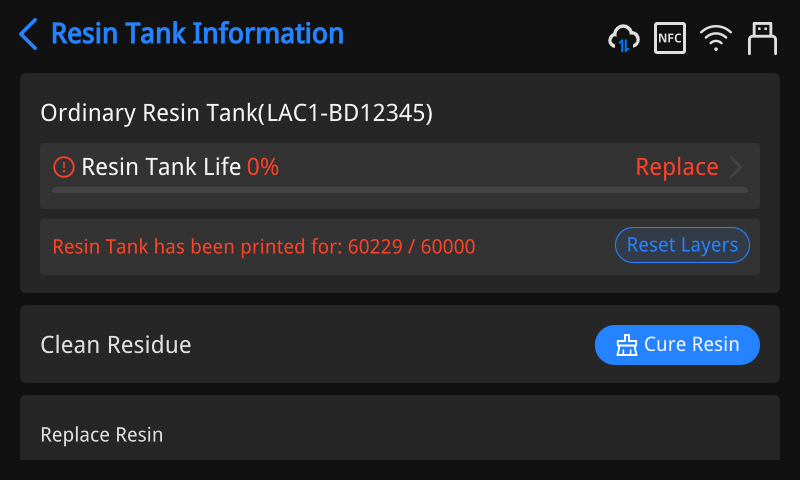
 : Displays the brand and type of the resin in the resin tank, as well as the cumulative number of printed layers (sensed by the chip on the back of the resin tank) and resin tank life.
Tap the field to enter the Resin Tank Information interface to set the resin tank.
Resin Tank Settings:
-
Resin Tank: Displays the current cumulative number of printed layers and the resin tank serial number.
-
Resin Tank Life:
- Green: No less than 30%
- Yellow: 10 ~ 30%
- Red: Less than 10%
- Tap Replace and you can scan the QR code to watch the tutorial video.
-
Tap the Reset Layers to reset the layer count to zero and start counting again.
-
-
Replace Resin: Tap the checkbox to select the brand and type of the alternative resin.
- Clean Residue: When cleaning the resin tank, tap Cure Resin. The UV light source projects LED light to cure the resin residue at the bottom of the tank.
Caution
- Please use the photosensitive resin independently developed by SHINING 3D or other certified resin materials.
- Ensure you select the correct brand and type of resin actually added to the tank in the software to achieve optimal printing results. If the resin type is not listed, select Others instead.
Displays the life of the optical panel. You can tap this module and scan the QR code to watch the tutorial video.
- Green: No less than 30%
- Yellow: 10 ~ 30%
- Red: Less than 10%
![]() : Connected to a wireless network. Operations such as select queue files and network update are available.
: Connected to a wireless network. Operations such as select queue files and network update are available.
![]() : Connected to a wired network. Operations such as select queue files and network update are available.
: Connected to a wired network. Operations such as select queue files and network update are available.
![]() : USB flash drive inserted. Operations such as select USB files, activate license, export logs and flash drive update are available.
: USB flash drive inserted. Operations such as select USB files, activate license, export logs and flash drive update are available.
![]() : Chamber door is not closed.
: Chamber door is not closed.
![]() : Connected to the SHINING 3D Dental Cloud.
: Connected to the SHINING 3D Dental Cloud.
![]() : Records the usage time of the resin tank, the number of printable layers, and the number of layers printed; synchronizes this data to SHINING 3D Dental Cloud and AccuWare.
: Records the usage time of the resin tank, the number of printable layers, and the number of layers printed; synchronizes this data to SHINING 3D Dental Cloud and AccuWare.
Warning
Keep the chamber door closed during the printing. Tap Settings > Software Settings and enable Activate Cover Sensor When Printing to ensure print quality and reduce safety risks.
Swipe down from the top of the screen to bring up the printer status menu, displaying the current network connection status of the printer (tapping this module will enter the Network Settings interface), connection status (tapping this module will enter the Bind to Dental Cloud interface), and curing box & cleaning machine connection status (tapping this module will enter the Connect FabCure / FabWash interface).
Note
Swipe up from the bottom of the screen or tap ![]() to collapse the printer status menu.
to collapse the printer status menu.