Create checking reports
The DentalCloud supports cloud-based editing of checking reports and one-click upload of intraoral scan models, effectively freeing up intraoral scan resources, improving report production efficiency, and allowing patients to access the latest report content in real-time.
Create reports
Start creating
You can start creating checking reports in two ways as follows:
-
Go to the Cases page, click one order column to go to the order details page; click the Preview tab, and click the highlighted
 Creating Reports button on the top right corner.
 Note
- Only orders with intraoral scan models which are uploaded from the authorized devices have the Creating Reports button enabled on the Preview page.
- If prompted with the message “The temporary preview file has been expired”, please click Regenerate before creating a report.
- If prompted with the message “The uploading device of this data does not have permission to create reports”, please check if the upload device for the intraoral scan model belongs to a third party or if it has received authorization.
-
Go to the Patient page, click one patient's name to go to the patient details page; click the
Creating Reports button in the area of basic information and select multiple data (Intraloral scan model is necessary and CBCT can not be selected) as needed and clickConfirm botton in the top left corner. Note
- To generate a health checking report, the intraoral scan data is required.
- If multiple sets of intraoral scan models are selected, the upper and lower jaw models will be selected by default. If multiple sets of face scan models are selected, the smiling face will be selected by default.
- If prompted with the message “The temporary preview file has been expired”, please click Regenerate before creating a report.
- If prompted with the message “The uploading device of this data does not have permission to create reports”, please check if the upload device for the intraoral scan model belongs to a third party or if it has received authorization.
Set reports
After Creating Reports, the Setting Of Health Checking Reports will pop up, where you are required to set the report object (Adult or Child), Template Type and Dental Notation (FDI World Dental Federation notation or Universal numbering system).
Note
Different objects correspond to different dental templates; the DentalCloud provides three default templates, but you can still go to ![]() Institution > Dental disease template to create your own templates.
Institution > Dental disease template to create your own templates.
Edit reports
When creating reports, only intraoral scan models supports adding symptoms. The demonstration of creating a report for intraoral scan is shown as follows:
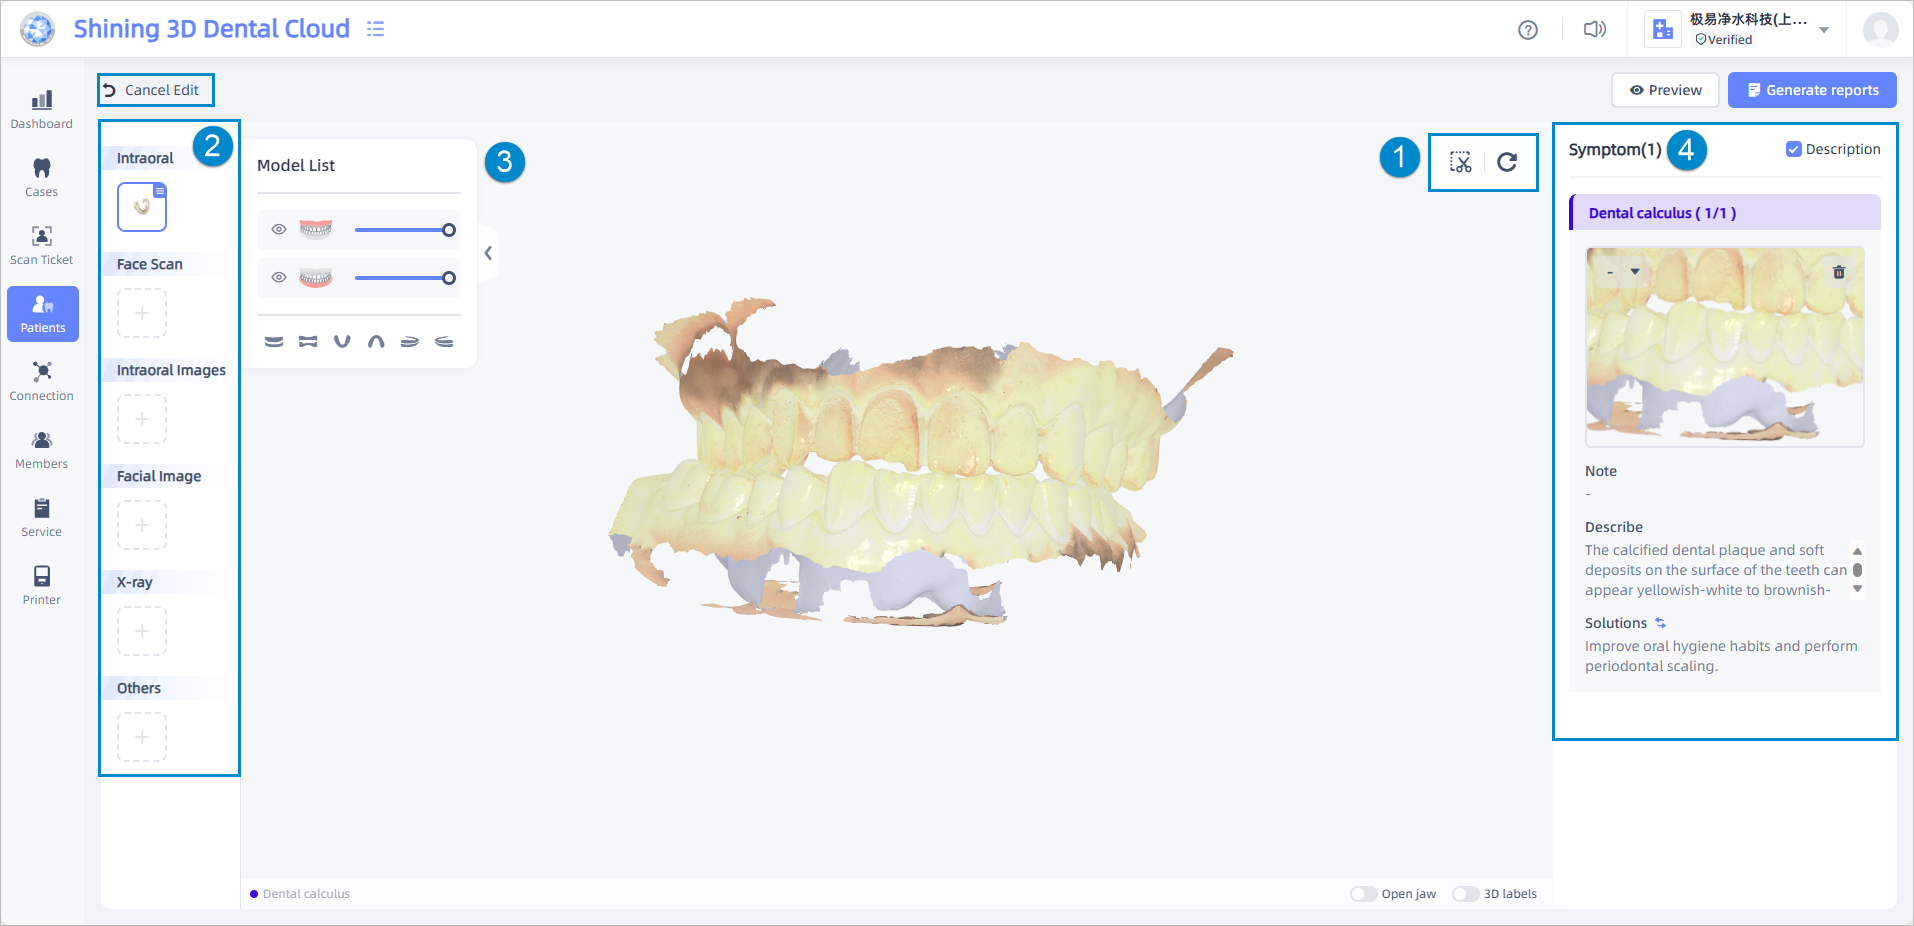
![]() Cancel editing:Editing records will not be saved after exiting, and it is recommended to exit after generating the report.
Cancel editing:Editing records will not be saved after exiting, and it is recommended to exit after generating the report.
![]() Take a screenshot: To edit the symptoms, take a screenshot and adjust the size of the editing panel by dragging the corners. You can also move the cursor inside the dashed box until it changes to the arrow-up-down-left-right
Take a screenshot: To edit the symptoms, take a screenshot and adjust the size of the editing panel by dragging the corners. You can also move the cursor inside the dashed box until it changes to the arrow-up-down-left-right ![]() , and add any necessary notes. Finally, click the confirm
, and add any necessary notes. Finally, click the confirm ![]() , and a new symptom will appear in the area marked ④ on the right.
, and a new symptom will appear in the area marked ④ on the right.
Note
It is suggested to move the dashed box until the middle + centers on the selected tooth, so that the displayed 3D labels will help report users understand better.
![]() Reset the model: Click the button to reset the model to the original status.
Reset the model: Click the button to reset the model to the original status.
Display thumbnails of intraoral scans, face scans, intraoral images, facial images, X-rays, and other model categories. You can click the + button to continue uploading image data (supports selecting from previous medical records or uploading local data directly).
Note
- Only uploaded categories are displayed by default, and arrow
 button can be clicked to unfold all categories.
 - Face scans can not be uploaded locally.
Drag the model to adjust perspectives or scroll mouse wheel to zoom in or zoom out.
Model list:
 Hide indicates that the model is displayed; you can click this button to hide the model, and now the status of the button changed to View
  .
.- Drag the slider to adjust the color intensity of the model; click view's buttons to switch the model perspective.
- Click Hide
 button to collapse the list; or click Unfold
  to unfold.
Note
Image data can only be repositioned rather than edited.
In addition, two viewing modes are supported for the models:
(1) Open jaw: models can be displayed in a tilted view (including the upper and lower jaw).
Note
If the uploaded intraoral scan model does not include both the upper and lower jaws, this button will remain grayed out.
(2) 3D labels: display the locations of all types of dental diseases. Click the solid dot will automatically position the symptom column in the ④ area on the right side, and the model will automatically switch to the (corresponding) perspective when adding labels.
Note
When the cursor changes to the arrow-up-down-left-right ![]() , you can move the solid dot to any place in the area of the designated tooth.
, you can move the solid dot to any place in the area of the designated tooth.
Symptoms support multiple edits, like clicking Select Teeth ![]() to reselect the teeth, clicking Delete
to reselect the teeth, clicking Delete ![]() to delete the symptom directly, click Note, Describe or Solutions (click Switch treatment
to delete the symptom directly, click Note, Describe or Solutions (click Switch treatment ![]() to change to official solutions) to edit the content manually.
to change to official solutions) to edit the content manually.
Note
- Click the image of the symptom will automatically switch the perspective of the model to the one captured in the screenshot.
- Tick the Description box to display the description and solutions (ticked by default) to enrich the final report.
Generate reports
Preview reports
On the edit reports page, click Preview button in the top right corner to preview the report.
- Patient information: the patient's name, gender and report time.
- Symptom list: the preview number and the specific type of oral health issues, and the teeth location (if there is).
- Intraoral: the preview image of intraoral scan models; click full screen
 to zoom in to check the teeth location, the name and the introduction of oral health issues; click Reset
  to reset the model to its original status.
Note
It is suggested to open 3D labels so as to display the marker points of teeth health issues.
- Patient data (if there is): other types of photographs.
- Diagnostic details: the introduction of oral health issues, screenshots and solutions.
- By clicking any column of the symptom list, you can be automatically guided to the corresponding question in the area of Diagnostic details.
- After moving the cursor into the area of scan models, you can drag the model to adjust perspectives or scroll mouse wheel to zoom in or zoom out.
- After clicking full screen to zoom into the preview image of the model, you can swipe left or right on the interface to switch between the preview images of teeth health issues.
- After scrolling down on the preview interface, you can click the "Top" button that appears on the right side to return to the top of the report.
- Clicking the Continue editing button will take you back to the report editing page, while clicking Generate reports will prompt a confirmation popup.
Note
- If the current view is a preview of a previously generated report, you can click Update Report
 to update the report.
 - By clicking Update Report , only the content will be updated, while the report sharing link and QR code will remain unchanged; or clicking
 to generate a new sharing link and QR code, and the original report will remain unchanged.
Generate reports
- On the report editing page, click the Generate reports button in the top right corner, or click Generate reports on the preview interface. After clicking confirm in the popup window, the report QR code and link will be generated.
- After generating the report, you can click on a specific patient in the Patients page to enter the patient details page, and switch to the Report tab to see all the inspection reports for that patient.
Click View to view the report in a new tab; click Edit
 to edit the report; click **View report QR code **
  to view the QR code.
Check reports (for the Mobile)
Use mobile devices to scan the report QR code to generate an H5 report. The report content includes basic information, intraoral scan models, patient data (if there is) and diagnostic details.
Display the patient's name and gender, report time and symptom list.
Note
By clicking any column of the symptom list, you can be automatically guided to the corresponding question in the area of Diagnostic details.
Use gestures to zoom in and zoom out or drag the model to adjust perspectives.
Tap full screen ![]() to check the corresponding location, name and introduction of the teeth health issue; tap Reset
to check the corresponding location, name and introduction of the teeth health issue; tap Reset ![]() button to reset the model to its original status.
button to reset the model to its original status.
(If there is, can be collapsed as needed) Display other types of photographs for the patient, and you can tap to zoom in.
(Can be collapsed as needed) Display the introduction of teeth health issues, the screenshots of scan models and solutions.