3D Mouse
This software is compatible with 3Dconnexion CadMouse. With the 3Dconnexion CadMouse, you can quickly rotate, pan, zoom, and perform other shortcut operations on models in a 3D scene.
For more operations, please refer to the 3Dconnexion user manual.
Connection

Steps:
- Take out the 3Dconnexion CadMouse from its packaging and insert the connecting cable into a USB port on your computer.
- Open the official website for downloading the software.
- Download and install the latest version of the 3Dconnexion software.
- Run the software and click
 Trainer for quick training and guide.
Interface
| Icon | Description |
|---|---|
| Learn how to quickly use the 3Dconnexion SpaceMouse. | |
| Here you can find the manuals for all 3Dconnexion products. | |
| Open the settings panel to customize your 3Dconnexion devices. | |
| Use the 3Dconnexion Viewer to review 3D models. Supported formats(.stp, .step, .igs, .iges, .obj, .stl, .ply, .jt, .glTF). | |
| You can create high-resolution picture collages with SpaceMouse by 3Dconnexion Collage. | |
| Test and practice your skills by assembling the landing gear of an aircraft. | |
| Register your product after the installation to benefit from 3Dconnexion services. | |
| Find instructive videos for your 3Dconnexion devices. | |
| Provide feedback to the 3Dconnexion product team. |
Buttons
Take SpaceMouse as an example, the instructions are as follows:
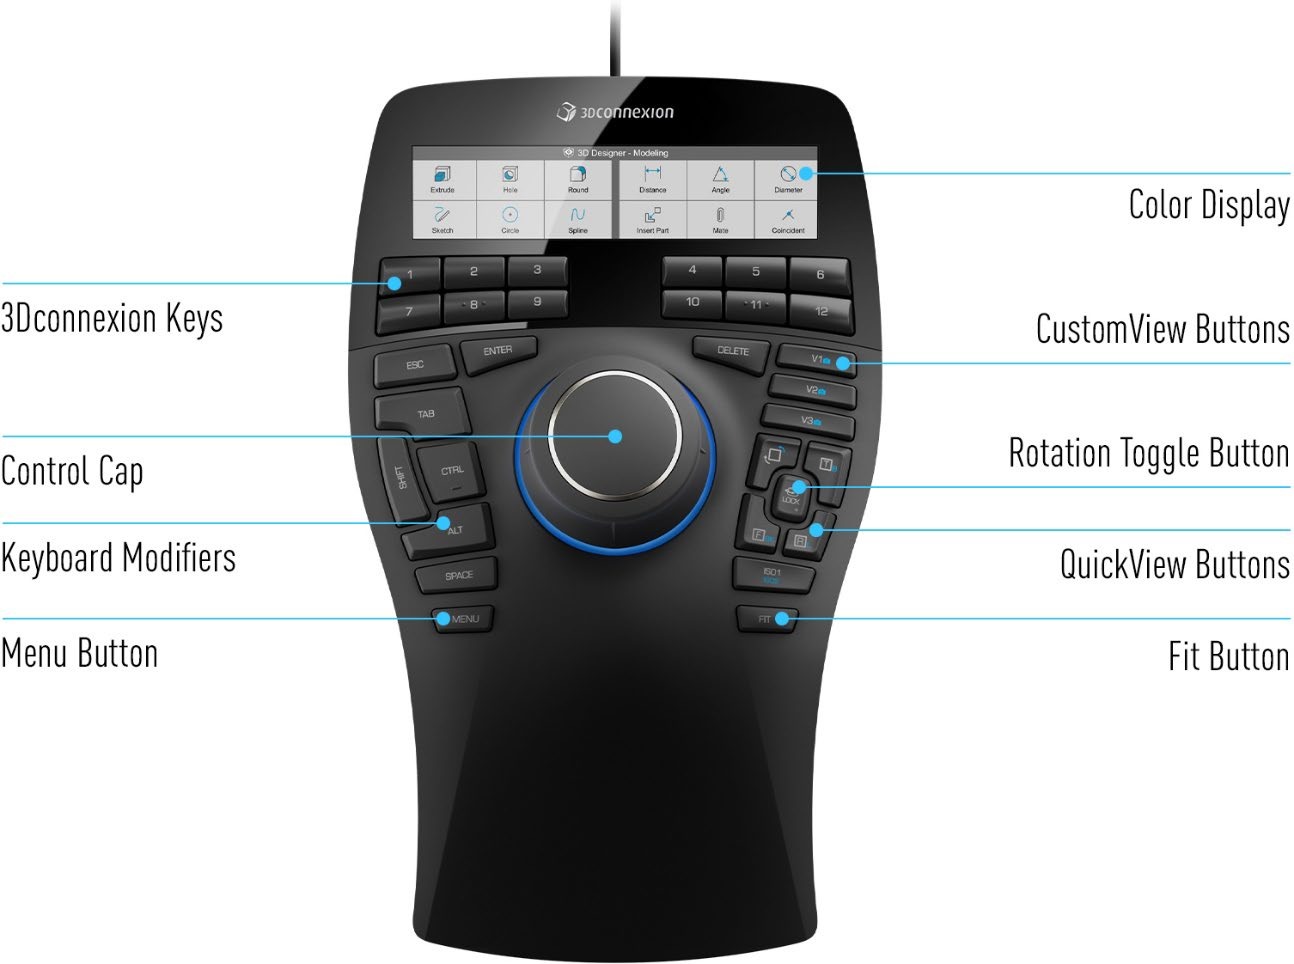
| Button | |
|---|---|
| Color Display | It provides visual feedback on the assigned commands.You have the option to adapt the display brightness, switch between text or icons, and change the text size on the LCD in the 3Dconnexion Settings. |
| 3Dconnexion Keys | The SpaceMouse Enterprise features twelve additional programmable function buttons. You can personalize commands assigned to the function buttons using the 3Dconnexion Settings. |
| CustomView Buttons | Above the QuickView Buttons, the SpaceMouse Enterprise also has 3 CustomView Buttons that allow you to store and retrieve your own views. To save a specific view, press and hold one of the CustomView Buttons until the message 3Dconnexion View saved appears on your screen. If you want to return to your saved view, just press the button once. |
| Control Cap | The Controller Cap is the heart of your SpaceMouse Enterprise. Its Six-Degrees-of-Freedom (6DoF) sensor allows you to push, pull, rotate,or tilt to pan, zoom and rotate your drawings and 3D models |
| Rotation Toggle Button | In the center between the QuickView Buttons is the Rotation Toggle Button. Pressing it once locks the rotation around all axes. The status LED will light up to indicate that rotation toggle is now active. |
| Keyboard Modifiers | The SpaceMouse Enterprise comes with eight Keyboard Modifiers that work like the corresponding keys on your keyboard. You can personalize the commands assigned to the Keyboard Modifiers using the 3Dconnexion Settings. |
| QuickView Buttons | The SpaceMouse Enterprise features five QuickView Buttons helping you to quickly bring your drawing or 3D model into the desired view. The buttons have a secondary assignment (blue font) that you can call up by a long press. You can program both the first assignment and the second assignment of the buttons in the 3Dconnexion Settings. |
| Menu Button | The Menu Button allows for fast and easy customization of your 3Dconnexion devices. Pressing it will take you directly to the 3Dconnexion Settings. Select the device you want to configure in the flyout window and customize it. |
| Fit Button | With the Fit Button, you will never lose sight of your drawing or 3D model. Press it to bring your drawing back to the center of your screen. |
| No. | Keyboard Shortcut | |
|---|---|---|
| 1 | Ctrl+M | Toggle functions between point cloud edit and markers edit (only works in Scan). |
| 2 | Ctrl+G | Toggle functions between select visible and select through (only works in Post-processing). |
| 3 | Ctrl+T | To toggle the method of selecting data. For more, please see Data Edit. |
| 4 | Ctrl+A | Select all |
| 5 | Ctrl+C | Unselect |
| 6 | Ctrl+R | Connected domain |
| 7 | Ctrl+I | Invert |
| 8 | Del | Delete selected data |
| 9 | Ctrl+Z | Undo |
| 10 | Ctrl+Shift+Z | Cancel edit |
| 11 | Enter | Apply edit |
| 12 | / | / |
| Figure | |
|---|---|
| Tilt cap left/right to rotate the model on its Z axis. | |
| Rotate the model on its Y axis. | |
| Tilt cap forwards/backwards to tumble the model on its X axis. | |
| Zoom the model in and out. | |
| Move the model up and down. | |
| Move the model left and right. |