Project and Project Group
Project Group
Create or open a project group before scanning.
Project group is the standard file structure of the EXScan H, and each project contains the scan data of its own; one project group can contain one project or multiple projects, the introduction of application scenarios is as shown in the table below:
Note
The "Scenario" mentioned below refers to the situation where all scanned objects are located within the same environment or setting.
Project group is mainly used in the following scenarios:
| Only one project in the project group |
|
One project can contain all scanned data of one or multiple objects. |
| Multiple projects in the project group |
|
It is recommended that you create multiple projects within one project group when need use multiple alignment modes, scan a large object or multiple objects. After scanning, you can align these projects. |
 New Project Group
To create a project group, please refer to two ways as follows:
-
In the navigation bar, enter the Scan step and click New project group. In the file dialog that appears, enter the name and path for the project group, then click Confirm. All data related to this project group will be saved to the specified path.
-
In the Scan step interface, click the
 Project Group button in the right-side function bar. In the pop-up window, click New project group. The following steps are the same as mentioned above.
Note
- The default name for the project group is the content entered during the last creation of the project group, followed by "_1" (if it is the first time, the default name is ProjectGroup_1). The default save path is the path selected during the last creation of the project group (if it is the first time, it will be saved to the default location: "C:\Users\Administrator\Documents\EXScanH").
- If the remaining disk space in the selected path is less than 50 GB, it is recommended that you switch to another save path to avoid potential issues subsequently.
Additionally, you can also create an individual project within the current project group:
In the Scan step interface, click the  New Project button in the left Project List panel. In the pop-up New Project window, configure the project settings and click Confirm. All data related to this project will be saved in the current project group's path.
Note
If the current project is still in the scan process, please create after generating point clouds.
 Open Project Group
Note
The current project group (if there is) will be saved automatically when you open another one.
Caution
The software of latest version does not support importing software projects from version 1.0.5.3 or earlier.
To open a project group, please refer to two ways as follows:
-
In the navigation bar, enter the Scan Mode step and click Open project group. In the file dialog that appears, choose the specified project group or search for it, then click Open.
-
In the Scan step interface, click the
Project Group button in the right-side function bar. In the pop-up window, click Open project group. The following steps are the same as mentioned above.
Additionally, you can also open an individual project within the current project group:
In the Scan step interface, click the ![]() Open Project Group button in the left Project List panel. In the pop-up file selection dialog, choose a project file by directly clicking or searching, and click "Open".
Open Project Group button in the left Project List panel. In the pop-up file selection dialog, choose a project file by directly clicking or searching, and click "Open".
Project
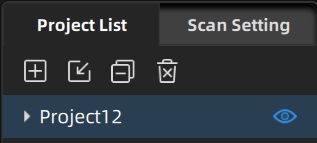
Consider each project as a part of the project group. All operations of project can be done using the following buttons.
| Create new project | Click this button will create a new project within the current project group. | You can only create a new project when a device is connected. The last project in the project list is the current project, and only the current project can continue scanning. |
|
| Open project | Click this button will open the selected project within the current project group. | ||
| Remove project | Click this button will remove the selected project from the current project group. | This operation will keep the data of the selected project and you can still open it again. | |
| Delete project | Click this button will delete the selected project and its data. | This operation will permanently delete the data of the selected project from your computer and cannot be recovered. | |
| Click this button will hide/show the point cloud or markers of the current project. You can also double-click on different projects to switch their visibility. |