Control Center
You can swipe down from the top of the screen to bring up the control center.
Overview
Note
- To hide the control center, use an upward swipe gesture.
- You cannot navigate to the corresponding position by tapping the buttons in the control center during scanning or calibration.
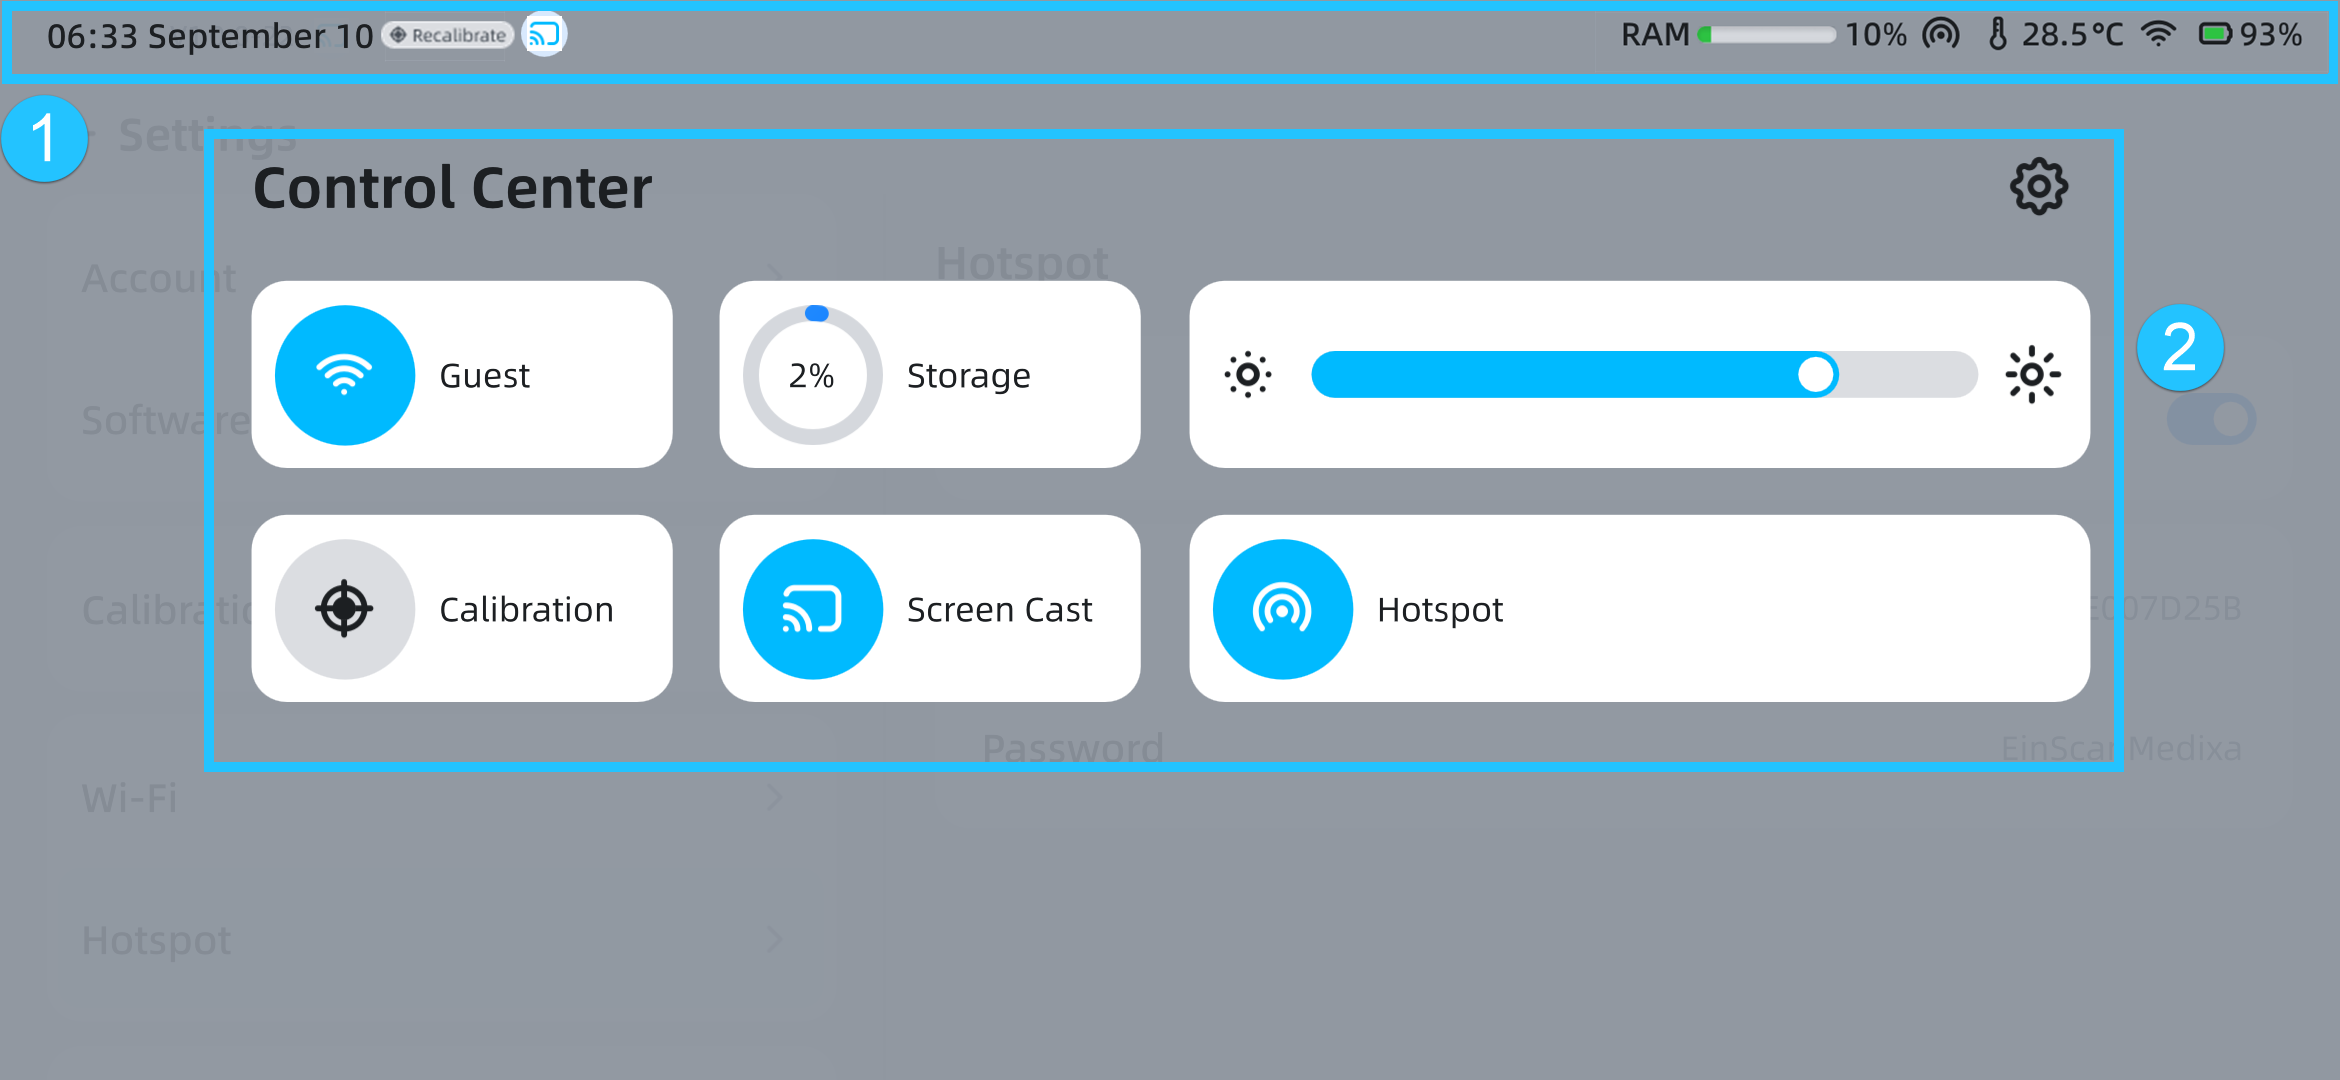
① Status Bar
| Status | |
|---|---|
| Time | The format is hh:mm, and it is displayed in the 12-hour format by default; You can enable 24-hour format in Settings > Date and Time. |
| Calibration Reminder | Tap to enter the calibration process; if it's the first calibration, it will enter the Help interface. |
Screen Cast |
The scanner is currently in casting. |
| RAM | Indicates the used memory space of the scanner.  Note NoteWhen it shows |
Hotspot |
The scanner's wireless hotspot is currently enabled. |
| Temperature | Displays the current temperature of the device. |
| Wi-Fi | The current network connection status of the scanner. |
| Battery | Displays the current battery level of the scanner. Note If the battery level is below 20%, please replace the battery in time or use the accompanying Type-C data cable and power adapter to charge. |
② Function Panel
| Function | |
|---|---|
| Tap to enter the Settings interface. You can set Account, Software Update, Calibration, Wi-Fi, Hotspot, Language, Display, Date and Time, Storage, About, etc.; for details, see the content below. |
-
Account
Tap here to view your account information and scanner's name.
If you are not logged in
- Tap Log in to enter the passort login interface.
- Tap Device Name to modify the scanner's name in the pop-up.
If you are logged in
- This will display the passport account and name information.
- Tap Device name to modify the scanner's name in the pop-up.
- Tap Switch account to enter the passport login interface.
- Tapping Log out will prompt a confirmation dialog box.
Note
Switching accounts does not affect the files already in the scanner.
-
Software Update
Tap Check for Update to automatically check if the current software is the latest version.
- If an update is detected, tap Download the update file to initiate the download process; if you do not wish to update at this time, tap
 to cancel the download.
 - After the download is complete, tap Install Now to proceed with the software installation.
- After the update (download and installation) is complete, the scanner will automatically restart.
Note
- During the download process, you can leave the current interface, and the update process will complete in the background, displaying as
 at the top of the interface.
 - Ensure the scanner has sufficient battery to avoid shutdown during the update process.
- If prompted "download update interrupted", please follow the instructions.
- Do not operate the scanner during installation.
- Software updates can not be performed if the batteries are not installed.
- If an update is detected, tap Download the update file to initiate the download process; if you do not wish to update at this time, tap
-
Calibration
-
If you are using the scanner for the first time, please bind the calibration board included in the box; after successful binding, the calibration board number will be displayed here.
-
Tap the corresponding button in the calibration status to enter the respective calibration process; if it is your first calibration, you will first enter the Help interface.
-
-
Wi-Fi
-
Wi-Fi is enabled by default; for the use of the Available Networks section, please refer to Connect to Network.
-
If you are connected to the network but the network status is abnormal, tap Network Diagnosis to open a pop-up, then tap Start diagnosis to diagnose the network connection.
-
-
Hotspot
Disabled by default. When enabled, the scanner will display the hotspot icon
 in the status bar; the hotspot name is fixed as "EinScanMedix_xxx" and the password is fixed as "EinScanMedixa".
-
Language
Default is the language selected at startup, supporting English, Simplified Chinese, Deutsch.
-
Display
Supports adjusting the screen brightness.
-
Date and Time
- Set time and date automatically: After connecting to the network and enabling it, the scanner will automatically synchronize the time of the time zone.
- Time zone: You can manually select the time zone; after that, the time displayed in the upper left corner of the scanner will be the time of selected time zone.
- 24-hour system: When enabled, the scanner will display time in 24-hour format.
-
Storage
Displays the scanner's disk space usage, including used amount, total storage capacity, and percentage.
-
About
Displays basic information such as scanner's name, serial number, warranty status, software version, RAM, WLAN address, privacy policy, contact us, and the Factory Reset entrance.
Note
- You can modify the scanner's name and view the specific content of the warranty status and privacy policy.
- Tapping Factory Reset will prompt a secondary confirmation pop-up; tapping Confirm will start the reset process (non-cancellable).
| Function | |
|---|---|
| Wi-Fi | Tap the icon to quickly enable |
| Storage | Percentage of used memory space of the scanner. Tap to enter Settings > Storage. NoteWhen it shows |
| Screen Brightness |  : Darken. : Darken.  : Brighten. : Brighten. |
| Calibration | |
| Screen Cast | |
| Hotspot | Tap the icon to quickly enable |