Scan Settings
You can set the scanning settings for the current scanning project in the scan interface.
Note
Once you officially enter the scanning process, you can still adjust the camera view and the data display mode, but you cannot change the parameters in the advanced settings.
Laser Mode
Camera View
Tap the ![]() button to enable the camera view, which will display a black-and-white camera view and a texture camera view.
button to enable the camera view, which will display a black-and-white camera view and a texture camera view.
Note
The texture camera view is only displayed when Acquire Texture is enabled.
The red dots in the camera view indicate overexposed areas. To improve scanning quality, it is recommended that you lower down the camera brightness when there are large overexposed areas, or increase the camera brightness when the camera view is too dark.
| Function | |
|---|---|
| When scanning regular objects, you can adjust the camera brightness in this mode. | |
| When scanning reflective objects, tap the |
|
| In bright environments (such as outdoors in sunlight), tap the |
Note
After officially starting the scan, you can adjust the camera brightness again based on the reality.
Brightness adjustment method: Tap the upper or lower part of the camera view or use the slider on the left side of the camera view to manually adjust the brightness.
To enhance scanning quality and texture effects, it is recommended that you adjust brightness based on the camera view before scanning.
| Function | |
|---|---|
| When enabled, the scanner can adjust the brightness automatically according to the actual situation. | |
| Enable it when the environment light is too dark; then manually adjust the brightness of the LED supplement light. |
Note
After officially starting the scan, you can adjust the camera brightness again based on the reality.
Brightness adjustment methods support automatic exposure or manual adjustment:
- Automatic exposure
 : The device automatically adjusts exposure based on the scanning environment; if the automatic exposure effect is not good, you can manually adjust the brightness.
 - Manual adjustment: Tap the upper or lower part of the camera view or use the slider on the left side of the camera view to manually adjust the brightness.
Data Display Mode
Tap ![]() to expand the list, and you can choose a data display mode:
to expand the list, and you can choose a data display mode:
-
 Data Quality Indicator: Enabled by default for non-texture scanning. When enabled, it will differentiate scan quality in colors: blue represents high-quality scanned data and yellow represents insufficient scanned data that requires further scanning.
 -
 Texture Display: Enabled by default when you choose Acquire Texture in Advanced Settings.
Note
You can enable only one of these two display modes; ![]() indicates that both modes are disabled.
indicates that both modes are disabled.
Light Source Mode
| Light Source Mode | Description |
|---|---|
| This mode is suitable for rapid scanning. | |
| This mode is suitable for detailed scanning. |
Advanced Settings
Tap ![]() in the right-side function bar to open the Advanced Settings window, where you can preset the Scan Steeings and Align Mode.
in the right-side function bar to open the Advanced Settings window, where you can preset the Scan Steeings and Align Mode.
Note
- If a project group contains more than one project, the status of Acquire Texture cannot be adjusted when creating a new project.
- If a project group contains more than one project, resolution adjustment is unavailable for the second and later projects.
- Resolution: Set the resolution manually. A smaller value results in a smaller point distance, increased data quality requirements, longer scanning times, and finer meshes generated.
- Acquire Texture: Disabled by default; if disabled Texture Display and Texture Mapping are also not available.
| Align Mode | Supported Marker Size | |
|---|---|---|
| Marker Alignment | Completes alignment using markers, suitable for objects with distinct geometric features, flat areas with minimal geometric features, and scenes requiring accuracy. Note NoteWhen enabled, |
|
| Global Markers | Completes alignment using markers, suitable for objects lacking rich and variable geometric features and requiring high accuracy. Note When enabled, |
IR Mode
Camera View
Tap the ![]() button to enable the camera view, which will display a black-and-white camera view and a texture camera view.
button to enable the camera view, which will display a black-and-white camera view and a texture camera view.
Note
The texture camera view is only displayed when Acquire Texture is enabled.
The red dots in the camera view indicate overexposed areas. To improve scanning quality, it is recommended that you lower down the camera brightness when there are large overexposed areas, or increase the camera brightness when the camera view is too dark.
| Function | |
|---|---|
| When enabled, the scanner can adjust the brightness automatically according to the actual situation. |
Note
After officially starting the scan, you can adjust the camera brightness again based on the reality.
Brightness adjustment methods support automatic exposure or manual adjustment:
- Automatic exposure : The device automatically adjusts exposure based on the scanning environment; if the automatic exposure effect is not good, you can manually adjust the brightness.
- Manual adjustment: Tap the upper or lower part of the camera view or use the slider on the left side of the camera view to manually adjust the brightness.
Col
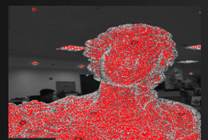
Brightness is too high
Col
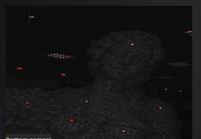
Brightness is too low
Col

Brightness is proper
To enhance scanning quality and texture effects, it is recommended that you adjust brightness based on the camera view before scanning.
| Function | |
|---|---|
| When enabled, the scanner can adjust the brightness automatically according to the actual situation. | |
| Enable it when the environment light is too dark; then manually adjust the brightness of the LED supplement light. |
Note
After officially starting the scan, you can adjust the camera brightness again based on the reality.
- Automatic exposure : The device automatically adjusts exposure based on the scanning environment; if the automatic exposure effect is not good, you can manually adjust the brightness.
- Manual adjustment: Tap the upper or lower part of the camera view or use the slider on the left side of the camera view to manually adjust the brightness.
Scanning Distance (DOF)
Tap the ![]() button to enable the scanning distance adjustment function. You can adjust the scanning distance using the arc slider based on the distance value prompt. The scanner scans only within the set distance. This function can effectively filter out unnecessary noise data.
button to enable the scanning distance adjustment function. You can adjust the scanning distance using the arc slider based on the distance value prompt. The scanner scans only within the set distance. This function can effectively filter out unnecessary noise data.
Remove Base
Tap the ![]() button to enable the function, which will automatically identify the base plane and mask the scanned data below it during scanning (if there are markers, they will be retained); you can effectively filter out unnecessary noise data through this function, improving data processing efficiency.
button to enable the function, which will automatically identify the base plane and mask the scanned data below it during scanning (if there are markers, they will be retained); you can effectively filter out unnecessary noise data through this function, improving data processing efficiency.
Once the blue base plane appears in the model preview scene, if you confirm that it is the desired plane, then tap ![]() to start scanning.
to start scanning.
Note
- This function is turned off by default; once it is enabled, the recognized base plane will be continuously displayed during the scanning preview and will be updated in real-time.
- You can enable or disable this function during the scanning preview; once you officially start scanning, you cannot switch the status of this function again.
- If prompted that the base plane is not recognized, please adjust the position of the scanner to align it with the object to be scanned.
Data Display Mode
Tap ![]() to expand the list, and you can choose a data display mode:
to expand the list, and you can choose a data display mode:
-
Data Quality Indicator: Enabled by default for non-texture scanning. When enabled, it will differentiate scan quality in colors: blue represents high-quality scanned data and yellow represents insufficient scanned data that requires further scanning.
-
Texture Display: Enabled by default when you choose Acquire Texture in Advanced Settings.
Note
You can enable only one of these two display modes; ![]() indicates that both modes are disabled.
indicates that both modes are disabled.
Advanced Settings
Tap ![]() in the right-side function bar to open the Advanced Settings window, where you can preset the Scan Steeings and Align Mode.
in the right-side function bar to open the Advanced Settings window, where you can preset the Scan Steeings and Align Mode.
Note
- If a project group contains more than one project, the status of Acquire Texture cannot be adjusted when creating a new project.
- If a project group contains more than one project, the scan mode (Object or Portrait) cannot be changed when creating a new project.
- If a project group contains more than one project, resolution adjustment is unavailable for the second and later projects.
-
Scan Settings:
-
Resolution: Set the resolution manually. A smaller value results in a smaller point distance, increased data quality requirements, longer scanning times, and finer meshes generated.
-
Acquire Texture: Disabled by default; if disabled
Texture Display and Texture Mapping are also not available.
Align Mode Description Supported Marker Size Feature Alignment Automatically completes alignment using the geometric features of the scanned object's surface, suitable for objects with rich geometric features or those that cannot have markers pasted. Note
When enabled, will be displayed in the project information at the top left.
/ Texture Alignment Automatically completes alignment using the surface texture of the scanned object, suitable for objects with rich surface texture patterns but lacking rich irregular geometric features. Note
When enabled, will be displayed in the project information at the top left.
/ Marker Alignment Completes alignment using markers, suitable for objects with distinct geometric features, flat areas with minimal geometric features, and scenes requiring accuracy. Note
When enabled, will be displayed in the project information at the top left.
- 6 mm and 12 mm markers for scanning medium to large objects.
- 6 mm markers for scanning small objects.
Global Markers Completes alignment using markers, suitable for objects lacking rich and variable geometric features and requiring high accuracy. Note
When enabled, will be displayed in the project information at the top left.
- 6 mm and 12 mm markers for scanning medium to large objects.
- 6 mm markers for scanning small objects.
Note
- At least one align mode must be used.
- It is recommended not to enable both Feature Alignment and Texture Alignment at the same time, as this may affect the scanning frame rate.
- If the object to be scanned is large and lacks rich geometric features, you can choose to paste 12 mm markers for scanning to improve scanning efficiency.
- If the object to be scanned is large and has rich surface features with few geometric features in flat areas, you can enable both marker point alignment and Feature Alignment simultaneously.
-
-
Scan Settings:
-
Resolution: Set the resolution manually. A smaller value results in a smaller point distance, increased data quality requirements, longer scanning times, and finer meshes generated.
-
Acquire Texture: Disabled by default; if disabled
Texture Display and Texture Mapping are also not available.
-
-
Align Mode:
Align Mode Description Feature Alignment Automatically completes alignment using the geometric features of the scanned object's surface. Note
When enabled, will be displayed in the project information at the top left.Texture Alignment Automatically completes alignment using the surface texture of the scanned object. Note
When enabled, will be displayed in the project information at the top left.Note
- At least one align mode must be used.
- It is recommended to use Feature Alignment when scanning faces or bodies, and not to enable Texture Alignment.