Software Interface
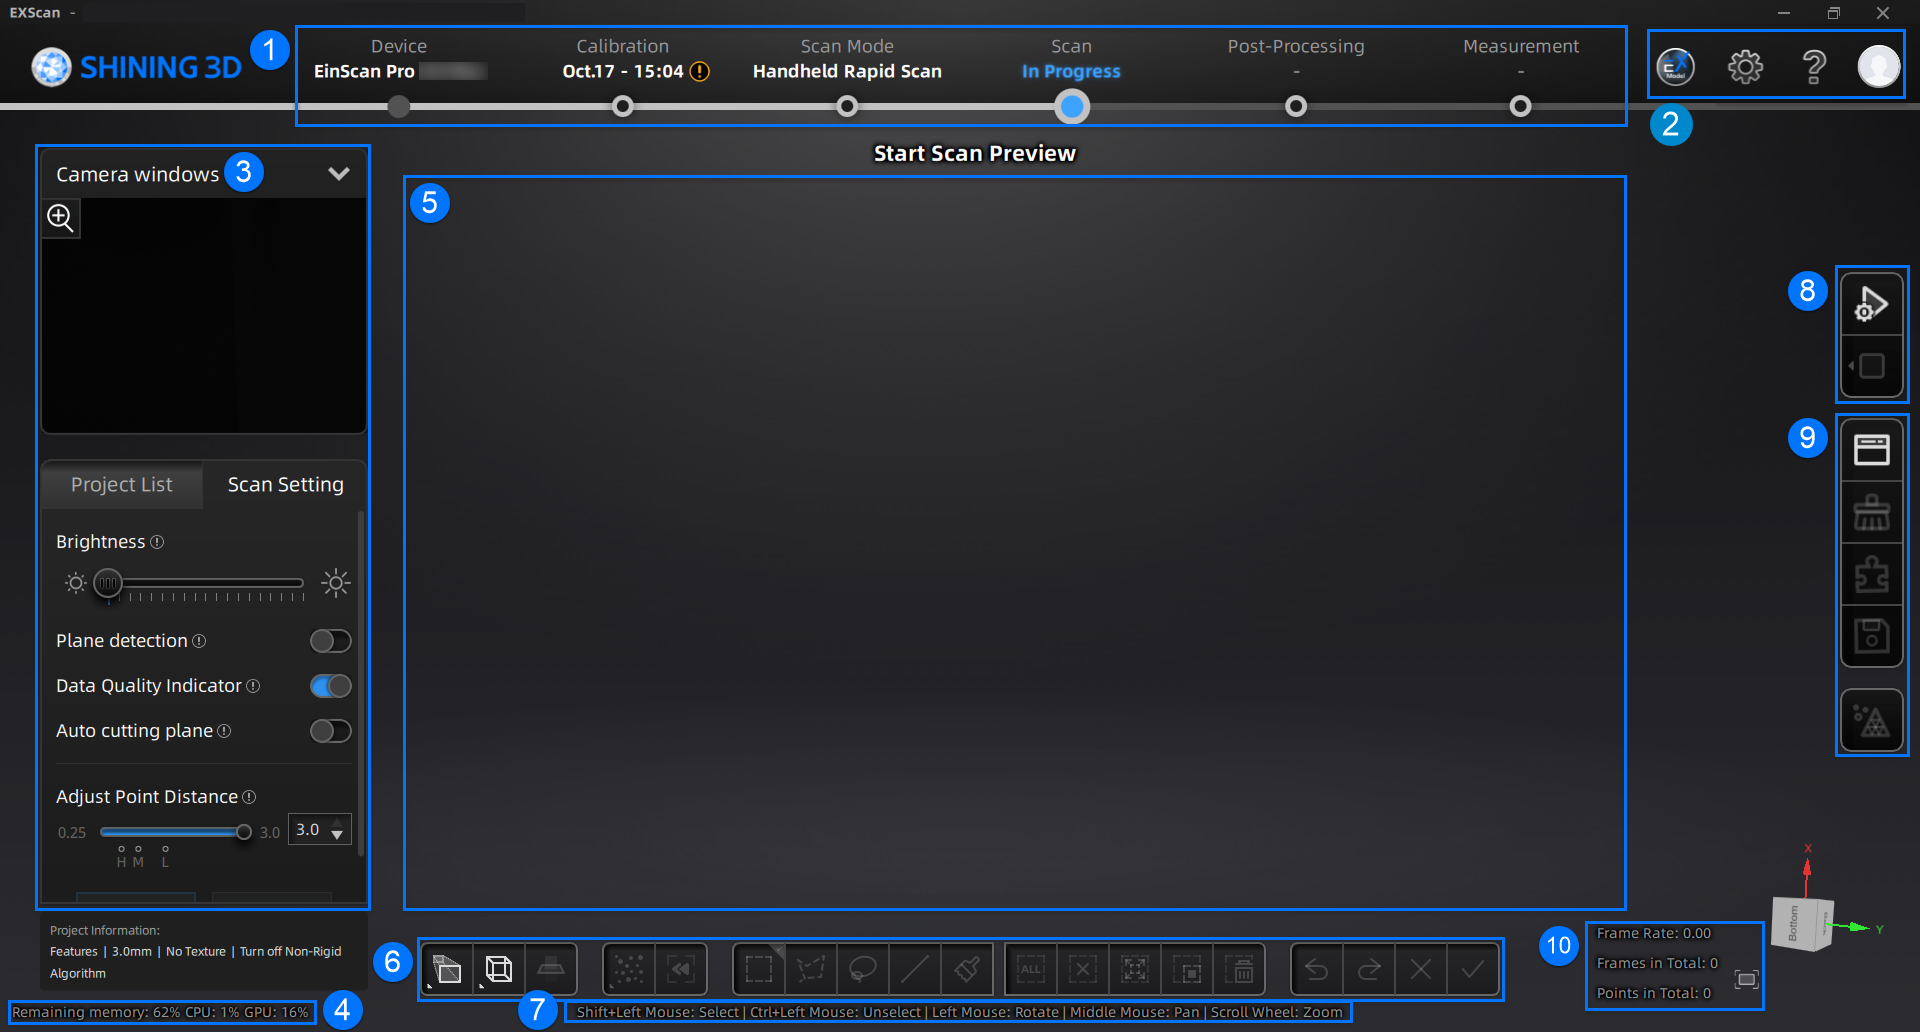
After installing, opening the software, and start scanning, you can see the software interface as shown in the following figure.
Note
If an error occurs during the software usage, it is recommended to troubleshoot based on the error code information. You can also contact technical support and provide the error code for assistance.
| Serial Number |
Function |
Description |
| 1 |
Navigation Bar |
- Device: display the device name when it is online, or you can click
 to reconnect when it is offline. to reconnect when it is offline. - Calibration: display the calibration time and click to enter the Calibration step.
- Scan Mode: choose the scan mode.
- Scan: Enter the scan process.
- Post-Processing:enter the Post-Processing procedure after generating point clouds, including mesh model and mesh editing.
- Measurement: measure your model in the software.
|
| Serial Number |
Function |
Description |
| 2 |
Settings and Feedback |
 EXModel (Only supported for the software version of V4.0.0.8 or above) EXModel (Only supported for the software version of V4.0.0.8 or above)- If you have not installed the EXModel, click this button to view the relevant information and our technical support contact.
- If you have installed the EXModel, click this button to directly start up the software.
 Settings Settings- General Settings:
- Compatible with 3D mouse: Open (default) to support connect and use of 3D mouse and related functions, including rotation axis and shortcuts.
- Mapping Assistant: Open (default) to show the entrance to the Texture Mapper software.
- Fixed Scan Settings:
- Real-time recognition: Open (as default) to display the real time marker recognition by the camera window.
- Data editing after scanning: Open (default) to automatically enter the editing interface after each scan.
- Factory Default: Click Recover to recover all settings to its original status and the software will restart itself.
 Help Help- About: display device and software information.
- System Diagnose: switch to this tab to automatically detect Memory, Graphics card, Remaining disk space, etc.; click Refresh to trigger detection again.
- Support: provide the entrance to check user manuals and start up the Teamviewer (for remote assistance), and contact information for technical support.
 Shining 3D Passport: provide the entrance to login/logout, My Shining 3D account, Official Website, Shining 3D Digital Cloud and official Facebook account page. Shining 3D Passport: provide the entrance to login/logout, My Shining 3D account, Official Website, Shining 3D Digital Cloud and official Facebook account page. |
| Serial Number |
Function |
Description |
| 3 |
Scanning Settings |
- Camera Window: accurately adjust the parameters by previewing the actual scene through the camera window in the scanning process.
- Project Group: project group management module, refer to Project and Project Group for more information.
- Scanning parameters: set scanning parameters, refer to Scanning Settings for more information.
|
| 4 |
Remaining Memory/CPU/GPU |
- Remaining memory: display the remaining memory space.
- CPU: the software program provides a prompt message indicating the amount of computer memory it occupies during runtime. If the program's memory usage is excessively high, it is recommended to close other non-scanner software and wait patiently.
- GPU:Graphics card usage.
|
| 5 |
Previewing/Scanning Window |
Window for viewing the pre-scan results and the scanned model effects in this window. |
| 6 |
Data Editing Toolbar |
Please refer to Data Editing. |
| 7 |
Shortcuts |
Quickly move the model, adjust the angle and select scanning data through shortcut keys. |
| 8 |
Scanning&Generating Point Clouds |
Please refer to Scan. |
| 9 |
Side Toolbar |
Please refer to right function panel. |
| 10 |
Other Information |
Display the Frame Rate, Frame in Total and Points in Total of the current project. |