Measure
After generating the mesh, in the interface of ![]() Mesh, you can tap the
Mesh, you can tap the![]() button in the right-side function bar to enter the Measure interface, where you can measure the
button in the right-side function bar to enter the Measure interface, where you can measure the ![]() surrounding box (default) and
surrounding box (default) and ![]() distance.
distance.
Note
When Texture Mapping is enabled,  Texture Display is enabled by default and can be disabled manually.
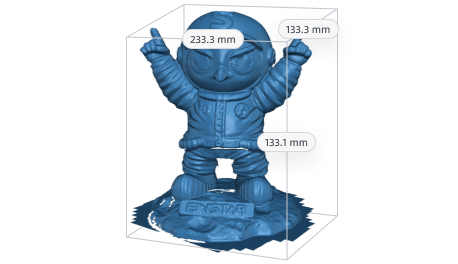
Measure Bounding Box
Col
In the Measure interface, tap ![]() button in the right-side function bar to show the bounding box, whose length (mm), width (mm) and height (mm) will also be shown.
button in the right-side function bar to show the bounding box, whose length (mm), width (mm) and height (mm) will also be shown.
Col
Note
The model can be panned, rotated or scaled ( Reset View function can be used to reset the model to its original size and correct the viewing angle).
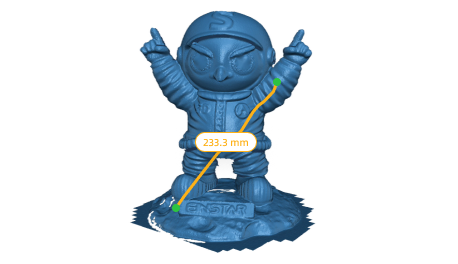
Measure Distance
In the Measure interface, tap ![]() button in the right-side function bar to enable the function for measuring the distance.
button in the right-side function bar to enable the function for measuring the distance.
The steps for measuring the distance are as follows:
Col
-
Tap any position on the model to add 2 points.
Note
You can switch to
 rotation mode by tapping
  , then the model can be panned, rotated or scaled ( Reset View function can be used to reset the model to its original position).
 -
After two points are added, they will be automatically connected, and the straight line distance (mm) will be displayed; if you add another point, the previous connection will be removed, and a new line will start from the new point.
-
(Optional) When there are existing lines, the Geodesic function can be enabled to calculate geodesics.
Note
After the Geodesic function is enabled, the straight line will be automatically hidden.
Col
Note
- You can drag the points to adjust their position, and the distance value will be updated in real time; you can drag the points to activate the magnifying glass function, which can be used to zoom in and display a specific part of the model, which can help you define the measurement point more precisely.
- If the two added points are not on the same surface, the Geodesic function can not be enabled.