Scan settings
Rapid scan
You can set parameters on the left of the scan interface, including Brightness, Texture Flashing, Plane Detection, Scan Mode and Enhanced Recognition, in which Brightness is necessary but other functions are depending on project settings.
Brightness
By dragging the slider  or pressing
 ![]() and
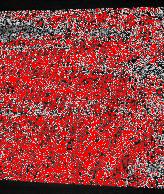
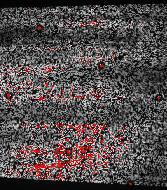
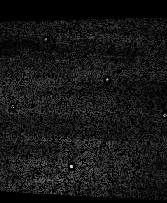
and ![]() on the scanner to adjust brightness. If the object to scan is clearly visible in the camera window, the brightness is suitable.
on the scanner to adjust brightness. If the object to scan is clearly visible in the camera window, the brightness is suitable.
| Too bright | Proper | Too dim |
|---|---|---|
 |
 |
 |
Other functions
| Functions | ||
|---|---|---|
| Scan Mode | You can import a global markers file to aid scanning after selecting Markers or Hybrid Alignment. | |
| Plane Detection | To decrease the possibility of misalignment | This function is enabled by default when you select Texture or Hybrid Alignment. When this function is enabled, you can't scan flat objects or objects with a few features. |
| Texture Flashing | To ensure an even texture light | This function is enabled by default when you select Texture Scan.By enabling this, you can ensure more uniform texture illumination, eliminating the need to manually adjust ambient light, and allowing you to scan directly. Please disable it when ambient light is distrubuted evenly. |
| Enhanced Recognition | To enhance the ability to recognize markers on a dark object | This function is enabled by default when you select Markers or Hybrid Alignment. The scanning accuracy may drops when this function is enabled. |
Laser scan
You can set parameters on the left of Scan interface under Camera Windows, including Scan Mode, Object, Brightness, Optimize Point Clouds, Local Enlarged View and Data Setting.
Scan mode
A point cloud is a collection of point data in the coordinate system. In the coordinate system, these points are defined by X, Y, Z axis to identify the outer surface of the object to scan. You can acquire point cloud data through scanning for further model rendering and measuring.
Caution
The current scanned data will be cleared when you click Scan Markers or Open global markers file.
Note
- Add global markers can only be selected when you scan markers or open global markers file in advance.
- If this function is enabled, when you scan a point cloud, new markers will be added to the global markers.
- If this function is disabled, new markers will not be added to the global markers.
- Make sure the scanner faces the object directly at a proper distance.
Steps
- After the preview, click
 on the right panel or press
  on the scanner to start scanning.
- Click
 or press on the scanner to pause scanning.
 - Click or press on the scanner to continue scanning.
- Click
- After scanning, click
 on the right panel to generate a point cloud.
- Point Cloud Data is available in offline mode.
- Click
 to save the point cloud data.
You can get global markers data by acquiring markers.
The software supports global markers generated by the third party.
Steps
-
Select Scan Markers.
-
Click
 on the right panel or press on the scanner to preview the scanning effect.
 -
Click
on the right panel or press on the scanner to start scanning markers. -
After scanning, click
on the right panel to generate global markers. -
Click
to save scanned data.
Note
- After scanning global markers or importing the global markers file, you can select Scan Point Cloud.
- If this function is enabled, when you scan a point cloud, new markers will be added to the global markers.
- If this function is disabled, new markers will not be added to the global markers.
Caution
After creating a project group, only if you generate a point cloud or open global markers file can you switch between Scan Point Cloud and Scan Markers.
Object
Brightness levels are pre-set according to the material of the object to scan. If you scan a dark or reflective object, it's better to compare the effect of Reflective and Black and then choose one.
| Material | |
|---|---|
| Normal | To scan objects with a light color. |
| Reflective | To scan reflective objects. |
| Black | To scan dark or totally black objects. |
Brightness
By dragging the slider or pressing ![]() and
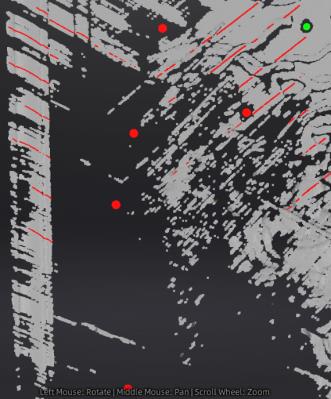
and ![]() on the scanner to adjust brightness until laser lines are clearly visible in the camera window.
on the scanner to adjust brightness until laser lines are clearly visible in the camera window.
Auto Exposure ![]() : The software adjust the brightness automatically according to the material and color of the object. You can select this function when you preview the scanning effect or pause scanning.
: The software adjust the brightness automatically according to the material and color of the object. You can select this function when you preview the scanning effect or pause scanning.
| Need to adjust distance or brightness | Normal |
|---|---|
 |
 |
Optimize point clouds
It's better to enable the function when you scan an object that is larger than 800 mm. It improves the scanning accuracy, but at the same time increases the time to process scanned data.
Local enlarged view
It's better to enable the function when the point distance is less than 0.5 mm. The enlargement of locally scanned model during scanning can ensure the holes are presented clearly, so as to fill the holes easily to avoid data loss after generating the point cloud.
Data settings
| Priority | |
|---|---|
| Quality Proirity | Suitable for scanning normal objects. The noise is less. |
| Integrity Priority | Suitable for scanning reflective or dark objects. The scanned data is complete but the noise is a little too much. |