Mesh editing
Left panel
Click + to open each function.
| Function | Instruction | Note |
|---|---|---|
| Texture | Brightness and Contrast can be adjusted. | Confirm to apply, Cancel to restore |
| Simplification | After simplification, the polygon numbers, file size and detail of data will be reduced universally. | High level may cause detail loss. Set the ratio from 1 to 100, the default is 0. |
| Mesh Optimization | Mesh optimization can optimize the quality of the data by adding more triangles to curvature regions. | |
| Smooth | Smooth the possible noise on the surface of the scan data. | It might remove some small details or smooth some sharp edges at the same time. Set the ratio from 1 to 100, the default is 0. |
| Remove small floating parts | Remove small floating parts in the scan data. | From 0 to 100% where 100% is the size of the largest mesh island. Smaller islands will be removed. 0 means no operation, 100 is the maximum. The maximum value is the square of the diagonal length of the floating part/10, MAX=(L/10)². |
| Auto Hole Filling | Auto fill every hole with a smaller perimeter than the number input. |
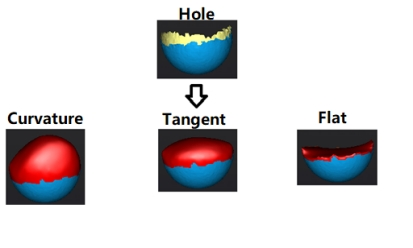
Choose Curvature, Tangent or Flat before filling hole. - FLAT: calculates the solution for the hole filling considering the point position on the boundary. - TANGENT: calculates the solution considering the point position and the normal of the last row of triangles forming the boundary. - CURVATURE: calculates the solution considering the point position and the normal of the 2 last rows of triangles forming the boundary. |
| Manual Hole Filling | The hole edges are displayed green and get red after picking. The number of the holes and the number of holes filled will be displayed on the interface. | Choose Curvature, Tangent or Flat before picking a hole. |
| Flip Normal | To redefine the front direction of the scanned data in reversal design. | Texture mapping will be unavailable after flip Normal |
| Cutting Plane Tool | Define a plane by drawing a straight line. Delete the selection and close the mesh at the intersection. Use the cutting plane to align the mesh to the CSYS. | |
| Mirror | Mirror the mesh through a plane defined by a straight line. | After mirroring, texture remapping cannot be performed. |
Buttom panel

| Icon | Function | Instruction |
|---|---|---|
| Select Visible | To select data on the front view only. | |
| Select through | To select data all though. |
Note
- The other editing functions are the same as point cloud editing
Right panel
| Icon | Function | Instruction |
|---|---|---|
| Open file | Open a file (STL, OBJ, PLY) for post processing | |
| Save Data | Save scan data. | |
| Sketchfab Upload | Use your Sketchfab account to share the model. | |
| Third-party software | Save the data and open with third-party software. | |
| Texture remapping | After the post-processing, hole filling on texture scanned data will affect the texture render. By doing the texture remapping, the texture information will be reapplied on the mesh. | |
| Show Texture | To show / hide texture on screen. |