Running
After running the software and completing the login, you will be automatically directed to the software's home page. You can access recent files and links to resources, create project groups as well as jump to other interfaces quickly.
Interface

① Settings and Help
For more, see Interface.
② Return to the Previous Step
Click here to quickly return to the previous step.
③ Device Information
Col
 Connected
Col
 Not Connected
When the device is successfully connected, the device name and the serial number will be displayed; if the device connection fails, check the issues and click ![]() to reconnect.
to reconnect.
Col
Col
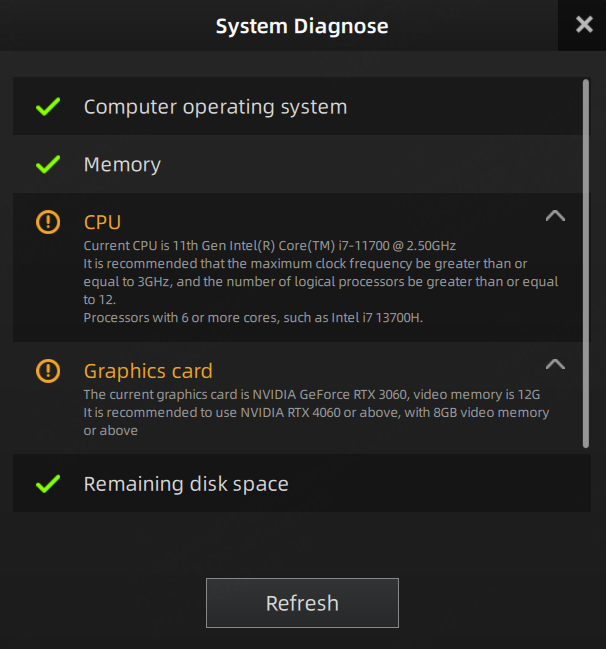
Click System Diagnose to quickly check whether your computer configuration meets the running requirements or not.
- If
 appears, it means that the device information is being read correctly or your configuration meets the software's requirements.
 - If
 appears, it means that there are some issues need to be resolved.
 - Click Refresh to diagnose again.
④ Project Group
Click here to quickly create or open a project group.
New Project Group
- Click New Project Group.
- In the prompt window, name the project group and click Browse to select the save path.
- Click Confirm and all scanned data will be saved to the folder with the name you just set.
Open Project Group
- Click Open Project Group.
- In the prompt window, select the project group.
- Click Open to import the project group into the software.
⑤ Resource
Click here to view instructional videos, the user manual, and contact information.
⑥ Quick Links
Click here to quickly navigate to the corresponding interface for Calibration / Post-Processing / Measurement, where you can perform the relevant operations.
Note
Calibration can only be performed after the device is successfully connected.
⑦ Project Group List
The recently opened or newly created project group files and their relevant information (name, operation time, and file size) will be displayed here.
Note
Up to 30 project group files can be shown.