Photogrammetry
Note
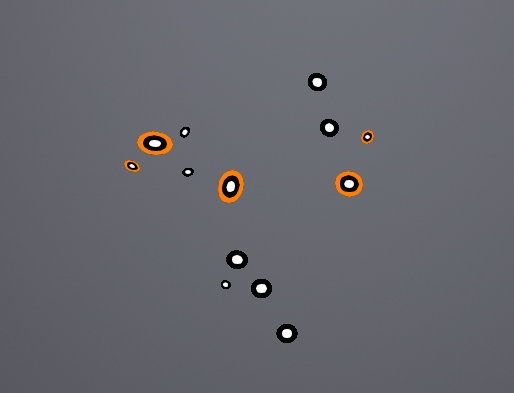
In the Trak Mode (real-time scanning), after scanning the global markers, you may notice additional colors outside the global markers.
Col
- If there is an orange circle outside the markers, it indicates that the quality of the scanned markers is low.
- If there is no additional color outside the markers, it indicates that the quality of the scanned markers is normal.
- Markers with an orange circle may disappear or be displayed abnormally after data processing.
- Once the markers are optimized, the color indication will disappear.
- There is no color outside the newly added global markers in Scan Mesh.
Col
Steps
Caution
The global markers of imported files and the newly added global markers in Scan Mesh cannot be optimized in Photogrammetry.
-
Place the calibration rod near the object to be scanned.
Note
Do not place the scanner within the tracker's field of view to avoid affecting the scanning accuracy. You can also turn on Detecting Scanner Frame in
 Settings, and the tracker will automatically filter out the scanner's markers that are recognized within its field of view.
 -
Select Trak Mode > Photogrammetry.
-
(Optional) Click
 on the right of the panel or press the scan button on the scanner to preview scanning. You can check the scanning performance and adjust parameters.
 -
Click
 on the right and the tracker starts to scan the markers. At this time, the left side of the interface will display the number of markers that can be aligned and the total number of recognized markers.
Note
If the calibration rod is placed, only scan the markers on one side of the calibration rod.
-
Change the scanning perspective (move the tracker or the scanned object) and click
to start scanning other markers. The software will automatically align the new markers with the former ones. -
Click
 to stop.
 -
Click
 to optimize the markers.
Note
After optimization, recognized markers on one side of the rod will disappear.
-
After optimization, click
 to save data, or choose Scan Mesh to continue.
Note
- After scanning, you can remove the calibration rod and then switch to Scan Mesh to continue.
- After scanning and optimization, you can click
 in the right-side function bar to import the data into Polyworks for measurement.