FreeProbe Operation
Connection
The probe can connect wirelessly or with a wire.
Wired connection
- Use the included USB cable to connect the probe to the computer.
- After starting the software, the probe connects automatically.
- The probe indicator light turns green when the connection is successful. After the connection, set the probe as needed.
Wireless connection
- Install the battery into the battery hole of the device.
- Start the software and enter the scanning interface.
- Click in the upper right corner of the scanning interface to expand the device information card.
- Select Probe on the device information card and click Pair.
- Press and hold the and keys on the device to pair the probe with the software.
- The probe indicator light turns green and flashes to indicate a successful pairing. After the pairing is successful, set the probe as needed.
Note
Only one probe can be paired or connected at a time. If you need to use another probe, please disconnect it first, and then pair or connect the other.
- Insert the battery into the slot at the bottom of the device.
- Press the button on the left rhombic button to turn on and wait for its indicator to become cyan.
- Run the FreeScan Trak software.
Note
- If the probe cannot connect successfully, please open Network & Internet > Mobile Hotspot and set the network band to 2.4 GHz.
- If you are using a desktop computer, you can turn on the mobile hotspot by inserting a wireless network card. If the mobile hotspot cannot be turned on after inserting the wireless network card, please contact technical support.
Probe Settings
Set the probe after the successful pairing or connection.
Instructions
- If the probe is connected by cable, select Probe Calibration in the calibration interface, and a window will pop up to determine whether to set the probe; you can also click
 on the probe device card to open the setting window.
 - If the probe is wirelessly paired, the probe setting window will pop up automatically after successful pairing; you can also click on the probe device card to open the setting window.
- Type: Support vertical tip and L-type probes.
- Direction: After selecting the L-type probe, you can select the probe direction.
- Diameter (DK): Support input of values from 0.3 to 10, with a maximum of one decimal place (unit: mm).
- Length (vertical tip): Support input of values from 1 to 200, with a maximum of two decimal places (unit: mm).
- Length (L1 - L-type): The default value is 50. You can select 50 or 100 in the drop-down menu, or enter a length value (unit: mm).
- Length (L2 - L-type): Support input of values from 1 to 200, with a maximum of two decimal places (unit: mm).
Note
After replacing the probe, please recalibrate to ensure measurement accuracy.
In the calibration interface, enter the probe diameter and probe length and complete the calibration; for details, see Calibration Operation.
Calibration
When the probe has not been used for a long time, its accuracy has decreased or its tip has been replaced, please perform Probe Calibration before use.
Add Points & Measurement
Steps
-
Select Trak Mode to scan and finish mesh optimization.
-
Import the data into the third-party software.
- The third-party software currently supported in Probe Mode of this software is Polyworks Metrology Suite Polyworks Metrology Suite (2023 / 2024 / 2025) and Geomagic Control X (2023.1).
-
After selecting the Probe Mode, the third-party software opened in the software defaults to Polyworks Metrology Suite. If you need to change the opened third-party software, you can change it through the
 Settings in the upper right side of the software.
 -
After scanning and optimization in Photogrammetry or Scan Global Markers, you can click
 in the right-side function bar to import the data into Polyworks.
-
Connect to the probe in the third-party software.
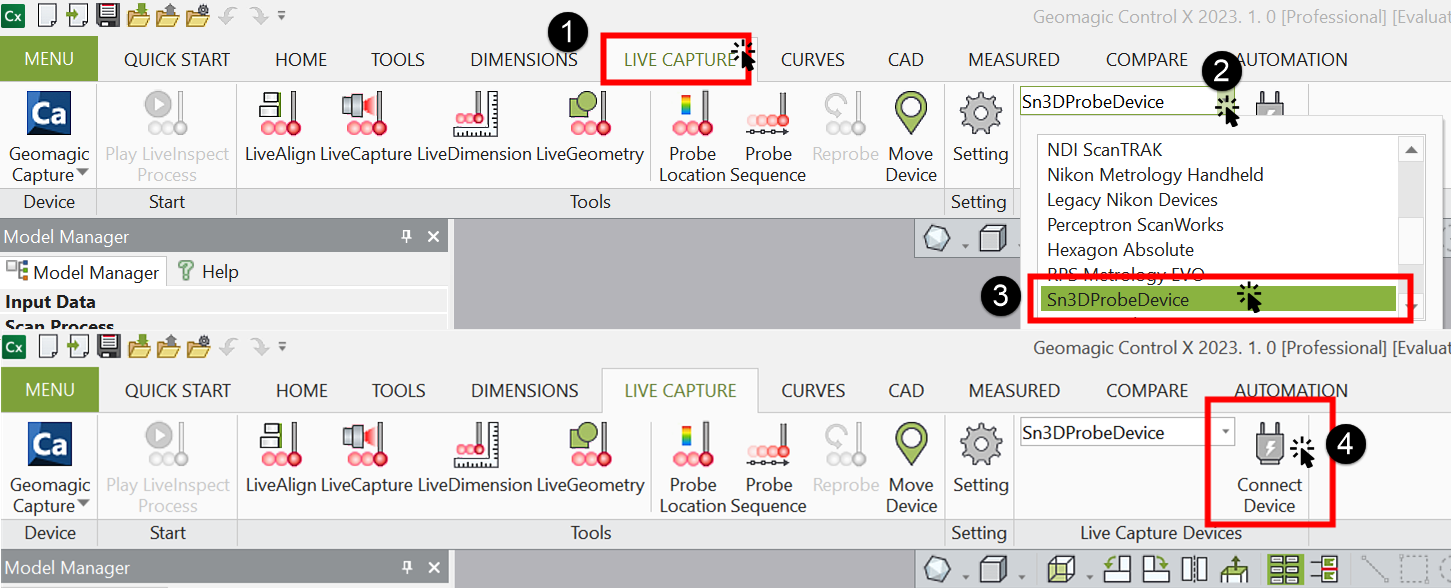
How to connect the probe in Geomagic Control X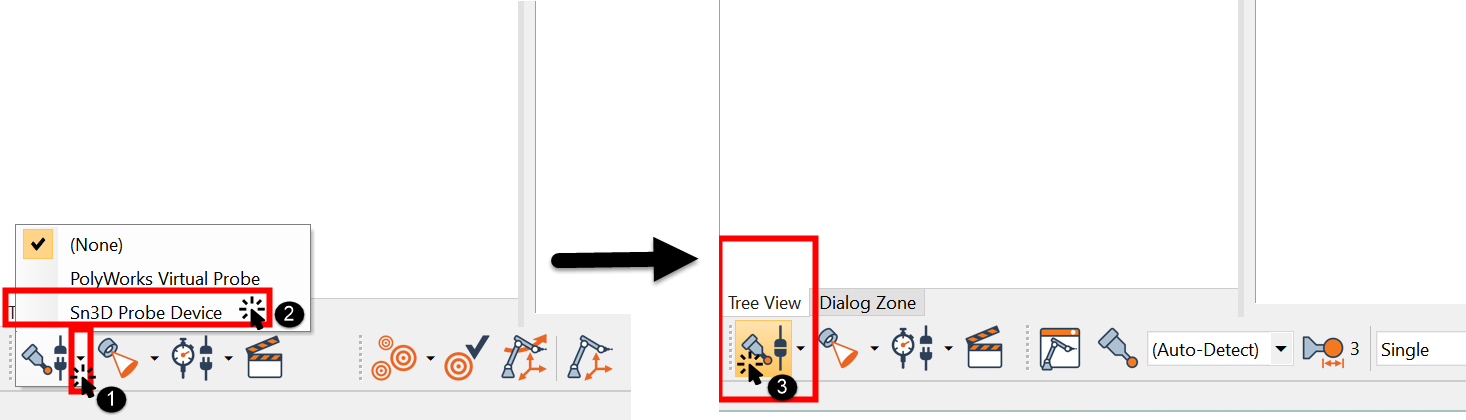
How to connect the probe in Polyworks Metrology Suite -
Now you can use the probe to add feature points and do measurement in the opened third-party software.
Note
- Please exit the third-party software before continuing to use the FreeScan Trak software.
- You can directly import the data to Polyworks for measurement when running the FreeScan Trak software with the device online.
- To add feature points with the Probe, ensure its tip is within the range of the tracker's camera and in the same plane as the camera.
Cautions
Before using the battery and the probe charging case, please read the following safety precautions to prevent dangerous situations such as battery explosions.
Caution
- Do not charge the battery for a long time.
- Do not reverse the positive (+) and negative (-) terminals.
- Do not directly solder the battery terminals.
- Do not disassemble the battery and the charging case at will.
- Do not put the battery into a fire or apply direct heat to it.
- Do not place the battery in a microwave oven or pressurized container.
- Do not use or store the battery near any source of heat such as a fire or heater.
- Do not short-circuit the battery by connecting wires or other metal objects to the positive (+) and negative (-) terminals.
- Do not connect the battery directly to wall outlets or car cigarette-lighter sockets.
- Replace the damaged battery shell to prevent leak or fire accident.
- Do not put any objects on the charging case when it's charging the battery, in order to keep good ventilation and heat dissipation.
- Do not connect the charging case with power for a long time. Cut off the power after using the charging case to avoid safety hazards.
- Store the battery and the charging case in an environment that is clean, dry, and free of inflammable materials like powder, liquid,and metal scraps.
- Do not use the battery if it gives off an odor, generates heat, becomes discolored or deformed, or appears abnormal in any way. If such batteries are in use or being recharged, remove them from the device or charger immediately and discontinue use.