Mandibular movement trajectory analysis
By aligning DICOM data with facial and intraoral scan data, the software can create a 3D digital model of the jawbone. This enabled the virtual reconstruction of mandibular movements.
Resting face scanning refers to collect data when the patient is relaxed. The patients are asked to remove the glasses, and tie up hair for scanning.
Steps
-
Adjust the distance between the face and the camera. Keep your face relaxed with your mouth slightly open. Maintain a neutral expression.
- Facial recognition: center the face in the camera and the face detection box will be green
- Appropriate distance: adjust the distance between the face and camera untill the vertical indicator shows Suitable.
-
Scanning begins automatically after a 3-second countdown. To start manually, press the Space or click
 .
. -
Instruct the patient to slowly and steadily turn their head up, down, left, and right, or hold the scanner yourself and move it in the same directions to scan the patient’s head, depending on the mode you choose.
Col
Col
-
Click
 to finish scanning Resting Face.
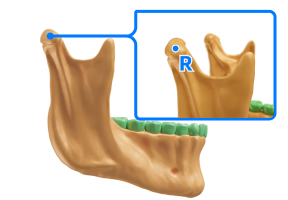
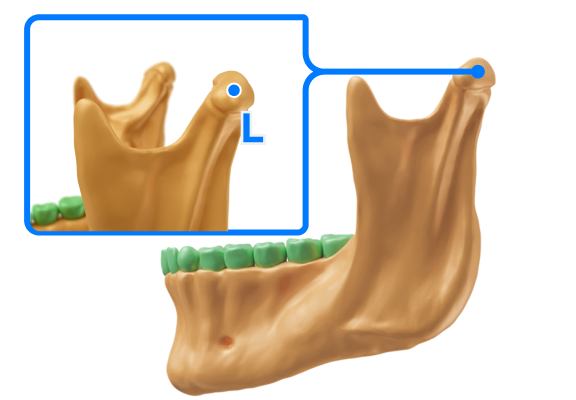
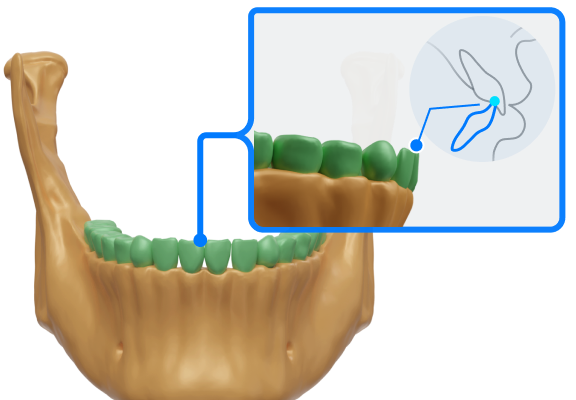
A total of three points need to be selected: the right condyle point, the left condyle point, and the incisal point.
The condyle is the prominent part of the mandible, shaped like an oval, located at the temporomandibular joint. The incisal edge is at the front end of the incisors, and the incisal point is located at the midpoint of the incisal edge.
Col
Col
Col
Steps
-
Double-click on the highest point of the condyle of the mandible to mark a point, labeling the left and right condyles respectively.
-
Double-click on the midline of the incisal edge to mark the incisal point.
-
Click
 to navigate to the Alignment interface.
Note
You can quickly switch the model view for easier marking by selecting the right condyle point, left condyle point, or incisal point in the left point selection box.
The alignment includes two groups of data (the alignment of upper jaw and DICOM data and the alignment of lower jaw and DICOM data). Choose automatic alignment first. If the results are unsatisfactory, switch to manual alignment.
Steps
-
Click
 to enter the interface.
 -
If the DICOM data has not been imported, click
 on the right to select and import the DICOM data.
 -
Start alignment.
-
Auto alignment
Click
 and the software will automatically align the data.
Note
if the alignment effect is not ideal, select Manual alignment.
-
Manual alignment
-
Click
to enter the interface. -
Double-click on the upper jaw/lower jaw and the DICOM data respectively to select 3 corresponding points.
Col
Alignment of the Dicom data with the upper jaw model.Col
Alignment of the Dicom data with the lower jaw model. -
Click
to start manual alignment.
Caution
Those added points should not be in one straight line.
-
-
Collect data of markers' positions and align with the static face data. Thus, the jaw motion can be aligned with the whole face.
Preparations
- Use 97% alcohol pads to disinfect the markers.
- Assist the patient in wearing a mouth retractor or using a mouth opener to keep mouth open.
Steps
-
With the patient’s mouth open, dry the tooth surfaces with cotton balls or an air syringe.
-
Select Stick markers or Jaw Motion Tracker and prepare the patient for scanning, then click Confirm.
Col
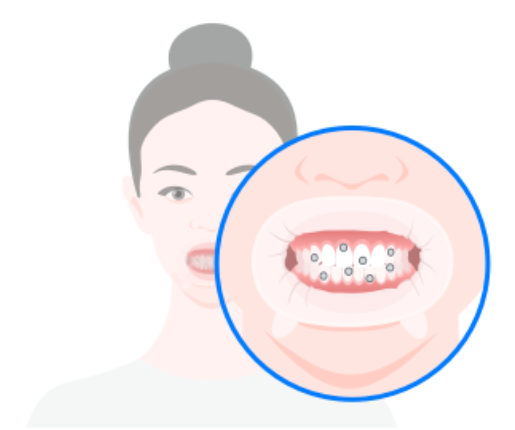 Stick markers
(for patients with a fully exposed low dentition)Col
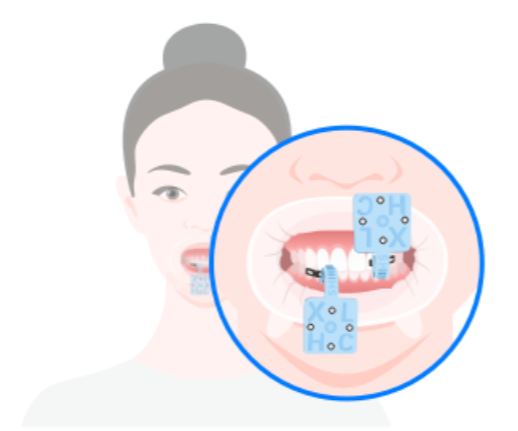 Jaw Motion Tracker
(for patients with a deep overjet or overbite)Caution
- More than 3 markers are required.
- Markers cannot be sticked in an approximate straight line.
- Please fix Featured Shell before using Jaw Motion Tracker and place markers.
-
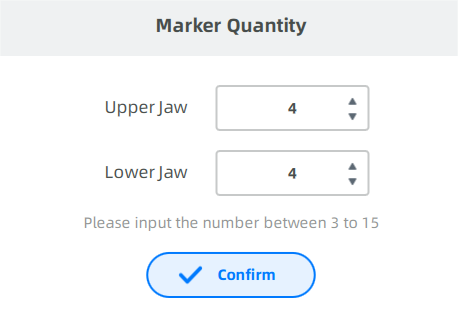
Click Start, and enter the marker quantity to collect two sets of marker data.
-
Keep the head steady.
-
The scanner's camera will automatically count the markers and record the number.
Note
-
If the number of markers is consistent with the number you punched in, the camera will automatically save the coordinates of points when the maxillary and mandibular teeth approach each other.
-
If the number of markers is not consistent with the number you punched in, adjust the face position or re-attach the points.
-
-
Open your mouth slightly. The camera will automatically recognize the number of markers on the upper and lower jaw again.
-
When finished, a message will pop up to inform that marker input is completed.
-
Preparation
- Ensure that the patient is putting on the retractor in place and the upper and lower jaws are in the intercuspal position.
- Ensure that the markers are securely bonded to the patient's teeth or the tracker to prevent them from falling off.
Steps
-
Adjust the distance between the face and the camera until the face detection box is green. And the markers can be recognized in green.
-
The software automatically starts scanning after 3 seconds when the face distance from the camera is suitable. Or click
to start scanning directly. -
Instruct the patient to slowly and steadily turn their head up, down, left, and right, or hold the scanner yourself and move it in the same directions to scan the patient’s head, depending on the mode you choose.
Col
Col
-
Click
to finish scanning static face.
Caution
During the scan, the patient should maintain a stable facial expression.
Alignment contains two steps: the alignment of intraoral model and static face, and the alignment of the resting face and static face.
| Auto alignment | Manual alignment |
|---|---|
| Click and the software will automatically align the data. Select Manual alignment if the alignment effect is not ideal. |
Steps 1) Click  to start manual alignment. to start manual alignment. 2) Double-click on the upper/lower jaw and the static face respectively to select 3 corresponding points. 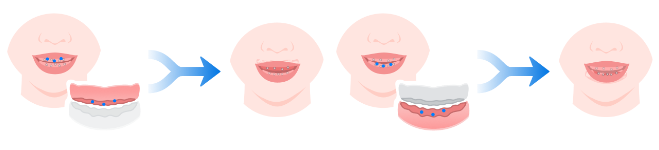 3) Click to confirm. Caution CautionThose added points should not be in one straight line. |
Click  to check the alignment effect.
Align the resting face data with the static face containing the dental retractor. Click Resting face and Static facial on the left.
| Auto alignment | Manual alignment |
|---|---|
| Click and the software will automatically align the data. Select Manual alignment if the alignment effect is not ideal. |
Steps 1) Click to start manual alignment. 2) Double-click on the resting face and the static face respectively to select 3 corresponding points.  3) Click to confirm.CautionThose added points should not be in one straight line. |
Click to check the alignment effect.
| Type | Icon | Illustration |
|---|---|---|
| Opening-closing Movement |  |
 |
| Protrusive Movement |  |
 |
| Left lateral Movement |  |
 |
| Right lateral Movement |  |
 |
| Chewing Movement |  |
 |
| Posselt Movement |  |
 |
Steps
-
Select the the type of movement you want to record.
-
Adjust the facial position to align with the face detection box on the interface. When correctly aligned, the face recognition frame will turn green.
-
Click
to start recording the motion track. -
Instruct the patient to complete the selected movement.
-
After completing a single movement, click
 or press Space to stop the recording.
 -
Repeat steps 3-5 until 3 valid tracks have been recorded.
-
After the whole recording process is complete, you can replay the motion.
Note
-
Ensure that the patient keeps their head stable throughout the entire recording process to obtain accurate jaw motion.
-
When recording Posselt movements, it may be necessary to explain the procedure in detail to the patient to ensure data accuracy.
-
At least 1 valid movement must be retained for each type of movement, with a maximum of 3 movements that can be recorded.
-
If the quality of the recorded data is unsatisfactory, you can click
 to re-record that particular movement.
Related Operations
| Icon | Description |
|---|---|
| Previous frame | |
| Play | |
| Next frame | |
| 1X ▲ | Select playback speed |
| Replay |
Click Go to Pre-design to select ![]() Visualization of Mandible Movement Trajectory. For more, see Visualization of Mandible Movement Trajectory.
Visualization of Mandible Movement Trajectory. For more, see Visualization of Mandible Movement Trajectory.