Mandibular movement trajectory tracking
Mandibular movement trajectory tracking acquires 3D images from the dentulous mandible and track the mandibular movements, which allows you to better simulate the mandibular movements and its effect on the entire face so as to provide targeted therapy. The whole scanning process includes:
Recognize the coordinates of the markers for the alignment with face data.
Preparation
- Disinfect the markers with a 75% alcohol swab and clean the patient's teeth surface to remove plaques.
- Assist the patient in wearing a disposable mouth retractor to maintain an open state.
Steps
-
With the patient’s mouth open, dry the surface of the teeth with dry cotton balls or an air syringe.
-
Select Stick markers or Jaw Motion Tracker and prepare the patient for scanning. Once the patient is ready, click Confirm.
Col
 Stick markers
(For the patient with exposed lower dentition without obvious coverage in the occlusal state)Col
 Jaw Motion Tracker
(For the patient with a deep overjet or overbite that covers the lower dentition)Caution
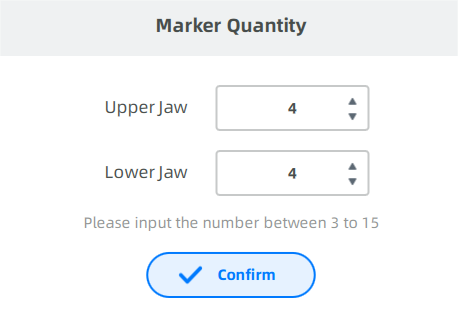
- More than 4 markers are required.
- Markers cannot be sticked in an approximate straight line.
- Please fix Featured Shell before using Jaw Motion Tracker and place markers.
-
Enter the number of markers placed, click Confirm, to collect two sets of marker data.
-
Choose
 Handheld Mode or
  Fixed Mode in the lower left corner of the interface.
Description
The default is handheld mode. In fixed mode, the camera window mirrors the scan.
-
Start scanning:
-
Instruct the patient to keep the head still and maintain a stable expression. Ensure that the upper and lower jaws are in an occlusal state.
-
The scanner's camera will automatically count the markers and record the number.
Note
-
If the number of markers recognized by the camera matches the input number, the coordinates of the markers are automatically saved.
-
If the number of markers does not match the input number, adjust the facial position or place the markers again.
-
If recognized markers turn orange, please check the scanning angle and ensure the markers are not be covered, moved, or wet. If you find any problem, please reattach the markers or recalibrate the device.
-
-
Tell the patient to open the mouth slightly. The camera will automatically recognize the number of markers on the upper and lower jaw again.
-
Preparation
-
Ensure that the patient is wearing the retractor or tracker, with the upper and lower jaws in the intercuspal position.
-
Ensure that the markers are securely pasted to avoid falling off during the scanning process.
Steps
-
Adjust the facial position:
- Face recognition: The face is centered, and the face detection box shows green.
- Markers recognition: Ensure the markers are recognized as green.
- Appropriate distance: The distance indicator shows Suitable.
-
Maintain a stable facial position and prepare to start scanning:
- Handheld mode: Press Space or click
 to start scanning.
 - Fixed mode: Scanning starts automatically after a 3-second countdown or can be started manually, similar to the handheld mode.
Note
The countdown guide for handheld mode is turned off by default and can be enabled in Scan Settings.
- Handheld mode: Press Space or click
-
In handheld mode, you need to move the scanner up, down, left, and right to scan the patient's head; in fixed mode, guide the patient to slowly and evenly rotate their head up, down, left, and right.
Col
Handhold ModeCol
Fixed Mode -
Press Space again or click
 to end the scan.
 -
After the scan is completed, the software will automatically align the scanned model and oral scan model to obtain the oral scan model in the rest position.
-
Automatic alignment successful:
- The heat map is displayed by default to check the alignment effect; click
 will hide the heat map.
 - If you are not satisfied with the alignment effect, you can click
 to go to the Data Alignment to align them again.
 - If you are not satisfied with the facial scanning effect, you can click to rescan.
- The heat map is displayed by default to check the alignment effect; click
-
Automatic alignment failed:
The interface will prompt that alignemnt has failed, and you need to go to the Data Alignment for manual alignment.
-
-
Click
to go to the next process.
The movement trajectories and jaw positions included in the template will be applied. You can click the ![]() to preview the template.
to preview the template.
Before starting the tracking, you may click the ![]() to scan the QR code or directly visit the Mandibular Movement Video Guide Website, allowing the patient to view the instructional videos and practice in advance.
to scan the QR code or directly visit the Mandibular Movement Video Guide Website, allowing the patient to view the instructional videos and practice in advance.
Steps
-
Select the type of movement you want to record.
To record a customized movement, click to add a customized movement or jaw poisition.
 -
Adjust the facial position to align with the face detection box on the interface. When correctly aligned, the box will display in green.
-
Press Space or click
to start recording the trajectory. -
Instruct the patient to complete the selected movement. Only perform a single movement during each trajectory recording.
Note
- Ensure that the patient keeps their head stable throughout the recording process to obtain accurate mandibular movement data.
- If a patient's marker falls off, you can pause the scan, then click
 to place the marker.
 - During this process, the patient's upper and lower jaws must be in occlusion.
-
Press Space again or click
 to end this trajectory recording.
 -
Repeat Steps 3–5 until the trajectory of movement has been recorded the required number of times (as specified in the template).
Click
 to record more trajectories.
 -
After all trajectories of one movement are recorded, the software will automatically go to the next movement.
Note
- Retain at least one trajectory for each type of movement, with a maxmimum of five.
- If the recorded trajectory are not satisfying, you can click
 to record it again.
 - To export trajectory data in XML format for further operation, make sure to set CAD type to 3rd party when exporting the order.
Related Operations
| Icon | Description |
|---|---|
| View Previous Frame | |
| Start Playback | |
| View Next Frame | |
| 1X | Select Playback Speed |
| Replay | |
| View occlusion | |
| Expand Occlusion |
Steps
-
Instruct the patient to adjust their facial position, keeping the face relaxed with a slightly open mouth and a stable expression, while maintaining an appropriate distance from the camera.
- Face recognition: Face is centered, and the face detection box is displayed in green.
- Appropriate distance: The distance indicator shows Suitable.
-
Maintain a stable facial position and prepare to start scanning:
- Handheld mode: Press Space or click to start scanning.
- Fixed mode: Scanning starts automatically after a 3-second countdown or can be started manually, similar to the handheld mode.
Note
The countdown guide in handheld mode is turned off by default and can be enabled in Scan Settings.
- Handheld mode: Press Space or click
-
In handheld mode, you need to move the scanner up, down, left, and right to scan the patient's head; in fixed mode, guide the patient to slowly and evenly rotate their head up, down, left, and right.
Col
Handheld modeCol
Fixed mode -
Press Space again or click
to end the scan. -
Click Data Alignment to align the resting face with the static face.
Click  to align the data.
Note
- By default, a upper or lower jaw model is aligned with face scan.
- When Separate Alignment of Upper and Lower Jaw with Face Scan is checked, an additional alignment step is added, allowing the upper and lower jaw data to be aligned separately with the face scan.
| Auto alignment | Manual alignment |
|---|---|
| Click Click |
Steps 1) Click 2) Click on the upper/lower jaw and the static face respectively to select 3 ~ 12 corresponding points. 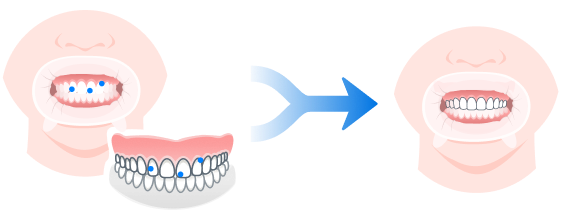 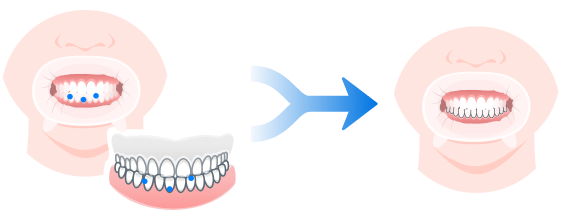 3) Click  to confirm. to confirm. Caution CautionThose added points should not be in one straight line. |
Click  to check the alignment effect.
Align the resting face data with the static face containing the dental retractor. Click Resting face and Static facial on the left.
| Auto alignment | Manual alignment |
|---|---|
| Click Click |
Steps 1) Click 2) Click on the resting face and the static face respectively to select 3 ~ 12 corresponding points. 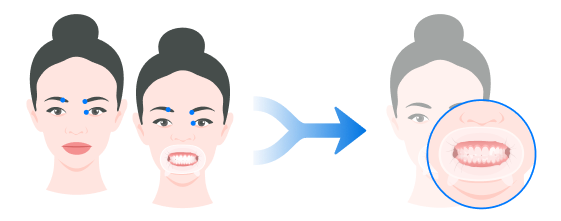 3) Click to confirm.CautionThose added points should not be in one straight line. |
Click to check the alignment effect.