File
Click File in the top navigation bar to enter the file module, where you can manage projects, import reference models and measured models, as well as create automation templates.
Note
By default, when you first launch the software, a new project will be created.
Manage Projects
In the File Tools bar, click ![]() Project to expand the drop-down list, where you can Create / Save / Save As / Open Project (*.SNIProj).
Project to expand the drop-down list, where you can Create / Save / Save As / Open Project (*.SNIProj).
After creating a project, you can click Save as Template to transform the project file into a template (*.SNITemplate) and save it locally.
Consequently, you can click Create Project > Create Project from Template, and select a template file as well as a measured model, so as to quickly create a project using the same alignments, comparison methods, etc.; the created templates can also be imported into the Auto Inspector tool.
Note
- If the current project has no data or has not been modified, the options to create a new project, save, or save as will not be available.
- If the current project has data or has been modified, when creating a new project or opening a project, please follow the instructions in the
 pop-up window.
 - If the save is successful, it will prompt that "
 Saved successfully".
 - The supported file format for importing projects is .SNIProj. If it prompts that "
 The imported file is invalid", please check the file format.
Import Reference Models
In the File Tools bar, click ![]() Import Reference Data to open the file selection window, where you can choose the reference model to be imported into the software as a reference standard for measurement. This reference model will be used for subsequent inspection calculations.
Import Reference Data to open the file selection window, where you can choose the reference model to be imported into the software as a reference standard for measurement. This reference model will be used for subsequent inspection calculations.
After importing the reference model, the ![]() model object will be displayed in the left-side tree view, where you can right-click on the reference model to delete it.
model object will be displayed in the left-side tree view, where you can right-click on the reference model to delete it.
Note
- Multiple reference models can be imported.
- Supported file formats for reference models include: STP, STEP, IGS, IGES, etc.
- If the model file is large, it will prompt that "
 Importing data...", and please wait patiently until this process completes before performing any operations.
Import Measured Models
In the File Tools bar, click ![]() Import Measured Data to open the file selection window, where you can choose the measured model to be imported into the software.
Import Measured Data to open the file selection window, where you can choose the measured model to be imported into the software.
After importing the measured model, the ![]() model object will be displayed in the left-side tree view, where you can right-click on the measured model to delete it or replace it (which will trigger the recalculation function). Additionally, the software will display the corresponding
model object will be displayed in the left-side tree view, where you can right-click on the measured model to delete it or replace it (which will trigger the recalculation function). Additionally, the software will display the corresponding ![]() Align Group in the
Align Group in the ![]() Align module for the measured model.
Align module for the measured model.
Note
- Multiple measured models can be imported.
- Only measured models in the formate of STL can be imported.
- If the model file is large, it will prompt that " Importing data...", and please wait patiently until this process completes before performing any operations.
Recalculation
Col
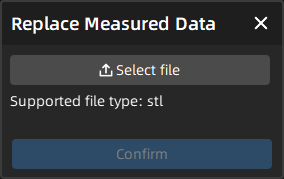
Right-click on a ![]() Measured Data object and click Replace Measured Data to open the corresponding window, where you need to
Measured Data object and click Replace Measured Data to open the corresponding window, where you need to ![]() select a file (STL) and Confirm, and it will trigger the recalculation function to recalculate all related node objects in the left-side tree view.
select a file (STL) and Confirm, and it will trigger the recalculation function to recalculate all related node objects in the left-side tree view.
Col
Note
- If a node object fails to calculate successfully, it will be marked with
 to indicate an illegal state.
 - Editing an align object (best-fit alignment or matrix alignment) or modifying the parameters for Extract Measured Feature will also trigger the recalculation function.
Automation Templates
In the file toolbar, click ![]() Automation Templates to expand the drop-down list, which supports New Template / Edit Template / Save Template / Save Template As (*.SNITemplate).
Automation Templates to expand the drop-down list, which supports New Template / Edit Template / Save Template / Save Template As (*.SNITemplate).
Note
If there is data in the current interface, when creating or opening a template, please follow the instructions in the ![]() prompt dialog.
prompt dialog.
The steps for creating automation templates are as follows:
-
After clicking New Template, the Import Reference Data window will pop up. Select the reference model (STL / STP) that needs to be imported into the software.
-
The software will automatically generate a triangulated measurement model based on the imported reference model and will enter the "
 Creating template" status.
 Note
You can exit the creating template status by creating or opening a project.
-
(Optional) Perform operations such as alignment or comparison on the model.
- Click Save Template / Save Template As and select the save path in the pop-up window to save the template locally.
- Consequently, you can click Edit Template to choose an existing local template for editing; you can also click Project > Create Project > Create Project from Template to quickly create a project using the same alignment, comparison, and other methods.