AutoInspect
![]() AutoInspect, an automated processing tool, supports importing an inspection template and multiple measured models by one-click, as well as controlling the inspection process and exporting inspection reports.
AutoInspect, an automated processing tool, supports importing an inspection template and multiple measured models by one-click, as well as controlling the inspection process and exporting inspection reports.
Interface Overview
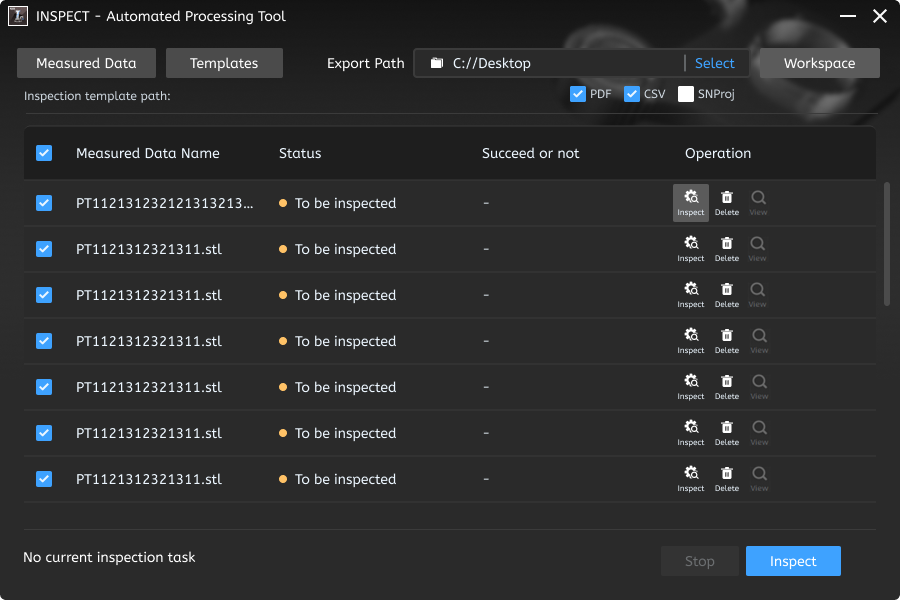
Set the inspection template, measured data and the export path as well as the format of the final inspection report.
Note
The project file (*.SNIProj) exported from the Inspect can be used as the inspection template.
Display all imported measured models, including the measured data name, inspection status, inspection results, and support operations including ![]() Inspect,
Inspect, ![]() Delete and
Delete and ![]() View to one individual model.
View to one individual model.
Note
When there is no imported model, it will prompt that "Please import data".
The buttons to control the automated inspection process: Stop / Inspect.
Operational Procedure
-
Click Templates to open the file selection window, where you need to upload a template (*.SNIProj) as the reference for this automated inspection process; After uploading, the inspection template path will be displayed below.
Note
When there is no uploaded inspection template, it will prompt that "Not yet uploaded...".
-
Click Measured Data to open the file selection window, where you need to import one or multiple measured models (STL); The imported models will be displayed in the list, and the inspection status will be "
 To be inspected".
Note
Click the
 Delete button in the right-side operation column to delete the individual model.
 -
Click Select to open the file selection window, where you need to select the export path, and check the formats you want to save below: PDF, CSV, and SNProj.
Note
- PDF and CSV are checked by default.
- After selecting the path, the system will automatically generate a DB file in that location to record the data of the current detection project.
-
Click the
 Inspect button on the right side of the specified measured model, or click the Inspect button in the bottom right corner of the interface to enter the automated inspection process, and the status of measured models will be "
 Inspecting...".
 -
During the automated inspection process, the inspection progress will be displayed in the bottom left corner as "Inspecting, currently No."; The status of the measurement model that has completed the inspection will be displayed as "
 Completed", and the inspection result will be displayed as "
 Success /
  Fail". You can click the
  View button to view the corresponding inspection report.
Additionally, you can click the Stop button to pause the inspection process.Note
If you manually click the Stop button while there is an ongoing inspection task, the software will stop the inspection process after the current task is completed.
-
(Optional) If the inspection process is unexpectedly terminated and it causes the software to close, you can restart the software and click the Workspace button in the top right corner to restore the inspection project.