Scanner Care
We suggest that you reprocess the scanner in the following order.
(1) Scanner cradle care
(2) Scanner body care
(3) Scanner tip care
Caution
-
Concerning hand hygiene and personnel safety when performing pre- cleaning and disinfection/sterilization, you must wear clean surgical gloves before you start.
-
Always ensure that you have pre-cleaned and disinfected/sterilized the scanner body, scanner cradle, and scanner tip before each scan.
-
The caring methods for the scanner cradle, scanner body, and scanner tip are different and must be executed separately.
-
Ensure that the scanner tip is detached from the scanner, and the dust cap is put on the scanner when disinfecting the scanner body.
-
Avoid using detergent of any kind as some detergents or surfactants might penetrate the surface of the scanner body.
Follow the steps below to perform cleaning and disinfection:
Hold the scanner cradle with your hand, use new cotton gauze moistened with 70%-75% solution of ethanol to wipe the surface of scanner body.
When done, store the scanner cradle in a clean and safe place.
Caution
-
Concerning hand hygiene and personnel safety when performing pre- cleaning and disinfection/sterilization, you must wear clean surgical gloves before you start.
-
Always ensure that you have pre-cleaned and disinfected/sterilized the scanner body, scanner cradle, and scanner tip before each scan.
-
The caring methods for the scanner cradle, scanner body, and scanner tip are different and must be executed separately.
-
Ensure that the scanner tip is detached from the scanner, and the dust cap is put on the scanner when disinfecting the scanner body.
-
Do not place your finger(s) on the mirror of the tip when detaching as this may result in damage to the mirror.
-
Do not attempt to clean the outer units and inner optical components on the front end of the scanner with any sharp objects or other such tools, which may result in scratches and damage to the scanner.
-
Avoid using detergent of any kind as some detergents or surfactants might penetrate the surface of the scanner body.
Follow the steps below to perform cleaning and disinfection:
(1) Disconnect the power of the scanner. More details see Disconnect the Scanner.
(2) Hold the scanner tip firmly with your thumb and forefinger on both sides, and then gently slide the tip off from the scanner.

Note
Store the detached tip in a safe place, e.g. a dental instrument tray, prior to disinfecting the scanner body.
(3) Hold the supplied dust cap with the triangle mark facing upward. Then, align the dust cap blocks to the matching slots on the front end of the scanner body.
(4) Hold the scanner body with your hand, use new cotton gauze moistened with 70%-75% solution of ethanol to wipe the surface of scanner body.
(5) When done, store the scanner body in a clean and safe place.
The scanner tip is the most essential part of the scanner as it is inserted into your patient’s mouth during scanning. Therefore, the tip must be thoroughly cleaned and sterilized before and after each patient contact in order to prevent cross- contamination in your operation.
Caution
- Concerning hand hygiene and personnel safety when performing cleaning and disinfection/sterilization, you must wear clean surgical gloves and goggles before you start.
-
Cleaning the scanner tip is an essential step before effective disinfection or sterilization.
-
When inserting the scanner tip into the disinfectant solution, be sure to follow the instructions on the disinfectant label and limit the time and depth that the tip is soaked within the minimum time recommended.
-
The scanner tip can be reused up to 100 times and must be disposed of afterwards. For more information on disposal, see Disposal.
-
High-level disinfection and steam sterilization must NOT be combined.
-
Apply only either of these methods to ensure the safe and effective reprocessing of the scanner tip, and thus to prevent damage of reusable tip.
Two effective and approved methods of cleaning and disinfection/ sterilization are recommended and described as below.
Either should be used to reprocess the scanner tip between each patient contact:
Follow the steps below to perform cleaning and high-level disinfection:
(1) Disconnect the power of the Aoralscan 3. For more information on disposal, see Disconnecting the scanner.
(2) Hold the scanner tip firmly with your thumb and forefinger on both sides, and then gently slide the tip off from the scanner body.
Caution
Do not place your finger (s) on the mirror of the tip when detaching as this may result in damage to the mirror.
(3) Pay particular attention to inspect the mirror of the tip to ensure that the mirror is not cracked or broken and there is no scratch on it.
Caution
If the mirror of the tip has cracks or scratches, stop the cleaning process and contact your local distributor or service provider.
(4) Gently clean the inner and outer sides of the tip using mild pH-neutral soap water and a soft brush for 3 minutes.
-
When cleaning the inner surface of the tip, insert the soft brush into the tip from both the front and rear ends, and move the brush lightly in tiny circles.
-
When cleaning the outer surface of the tip, move the brush lightly back and forth, and repeat for each side.
(5) Repeat the previous step for at least two times.
(6) Rinse the tip thoroughly with sterile water.
(7) If you notice stains, fingerprints, or smears on the mirror surface, repeat the previous step.
(8) Dry the tip carefully with a clean, soft lens tissue or lint-free cloth.
(9) Pay particular attention to inspect the mirror surface of the tip again to make sure that the cleaning is done properly and the mirror is not damaged during the cleaning process.
(10) Carefully fill the container with a disinfectant solution, such as phthalaldehyde at a concentration of 5.5g/L (depending on the brand of disinfectant used). In the event of a leak, follow the disinfectant manufacturer's instructions for handling.
(11) Immerse the cleaned tip into the disinfectant and leave it for at least 12 minutes at 25°C.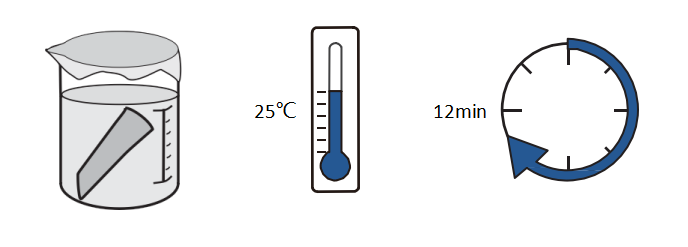
(12) Prepare a large container of sterile water, e.g. 2 L.
(13) Take out the tip from the disinfectant.
(14) Immerse the tip into the container of sterile water for at least 5 minutes.
(15) Take out the tip and manually flush it with at least 500 ml of sterile water.
Caution
Discard the rinse water. Always use fresh volumes of sterile water for each rinse. Do not reuse the water for rinsing or any other purpose.
(16) Repeat the rinsing process (step 12 to 15) for at least two times for removing the residue of disinfection solution.
(17) Use a soft lint-free cloth to dry the tip.
(18) Pay particular attention to inspect the mirror surface of the scanner tip again to make sure that the disinfection is done properly and the mirror is not damaged during the disinfection process.
(19) Re-attach the scanner tip. Or if you attempt to store the scanner tip with other dental instruments, e.g. a dental instrument tray, ensure that it is thoroughly dry.
Attach the Scanner Tip
There is a risk of damaging the mirror of tip if any improper actions are taken when attaching the tip to the scanner.
Caution
-
Wear clean surgical gloves before you start.
-
Ensure that the scanner cradle, scanner body, and scanner tip are pre-cleaned and disinfected/sterilized.
Follow the steps below to complete the attachment:
(1) Hold the scanner tip firmly with your thumb and forefinger on both sides, and then gently attach the tip facing downward to the scanner.

Caution
Do not place your finger(s) on the mirror of the tip when attaching as this may result in damage to the mirror.
(2) Try swiveling the scanner tip around to ensure it is locked into position and stable.
(3) Place the scanner in the cradle, and the set is ready for use.
Follow the steps below to perform cleaning and steam sterilization:
(1) Disconnect the power of the Aoralscan 3. More details see Disconnect the Scanner.
(2) Hold the scanner tip firmly with your thumb and forefinger on both sides, and then gently slide the scanner tip off from the scanner.
Caution
Do not place your finger(s) on the mirror of the tip when detaching as this may result in damage to the mirror.
(3) Hold the supplied dust cap with the triangle mark facing upward. Then, align the dust cap blocks to the matching slots on the front end of the scanner body.
Caution
If the mirror of the tip has cracks or scratches, stop the cleaning process and contact your local distributor or service provider.
(4) Gently clean the inner and outer sides of the tip using mild pH-neutral soap water and a soft brush for 3 minutes.
-
When cleaning the inner surface of the tip, insert the soft brush into the tip from both the front and rear ends, and move the brush lightly in tiny circles.
-
When cleaning the outer surface of the tip, move the brush lightly back and forth, and repeat for each side.
(5) Repeat the previous step for at least two times.
(6) Rinse the tip thoroughly with sterile water for at least 3 minutes.
(7) If you notice stains, fingerprints, or smears on the mirror surface, repeat the previous step.
(8) Dry the tip carefully with a clean soft lens tissue or lint-free cloth.
(9) Pay particular attention to inspect the mirror surface of the scanner tip again to make sure that the cleaning is done properly and the mirror is not damaged during the cleaning process.
(10) Fill the scanner tip lens with medical gauze.
(11) Put the wrapped scanner tip into an autoclave and sterilize it for 30 minutes at 121°C (or 4 minutes at 134°C). For the specific sterilization pressure, refer to the instructions of the autoclave (102.9kpa at 121°C is recommended; Or 205.8kPa at 134°C).
(12) Dry the sterilized tip for 30 minutes with the autoclave program before opening the autoclave.
(13) Reattach the scanner tip.