Measurement Analysis
Click  to enter the measurement analysis interface.

The measurement methods are displayed on the right side of the interface. You can analyze various data of the model through different measurement methods. You can select one or two models for measurement analysis through the timeline.
Moyers analysis
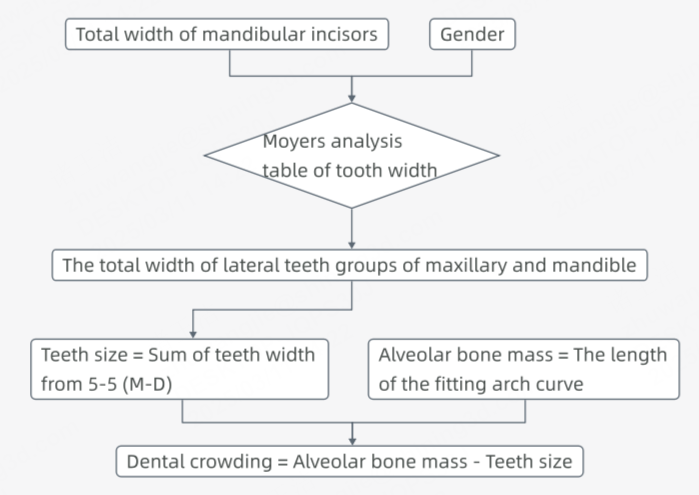
For patients in the mixed dentition stage, you can use the ![]() Moyers analysis. By referring to the Moyers analysis table of tooth width for males and females and the crown width of the erupted mandibular incisors, you can predict the crown width of the upper and lower canines and premolars, thus predicting the dental crowding of the permanent teeth that will erupt.
Moyers analysis. By referring to the Moyers analysis table of tooth width for males and females and the crown width of the erupted mandibular incisors, you can predict the crown width of the upper and lower canines and premolars, thus predicting the dental crowding of the permanent teeth that will erupt.
Caution
- Moyers analysis is only applicable to patients in the mixed dentition stage.
- Moyers analysis is only applicable to the prediction of dental crowding when all the permanent incisors have erupted. The presence of primary incisors will affect the accuracy of prediction.
- When importing a single upper jaw, Moyers analysis is not supported; when importing data for a single lower jaw, Moyers analysis is supported.
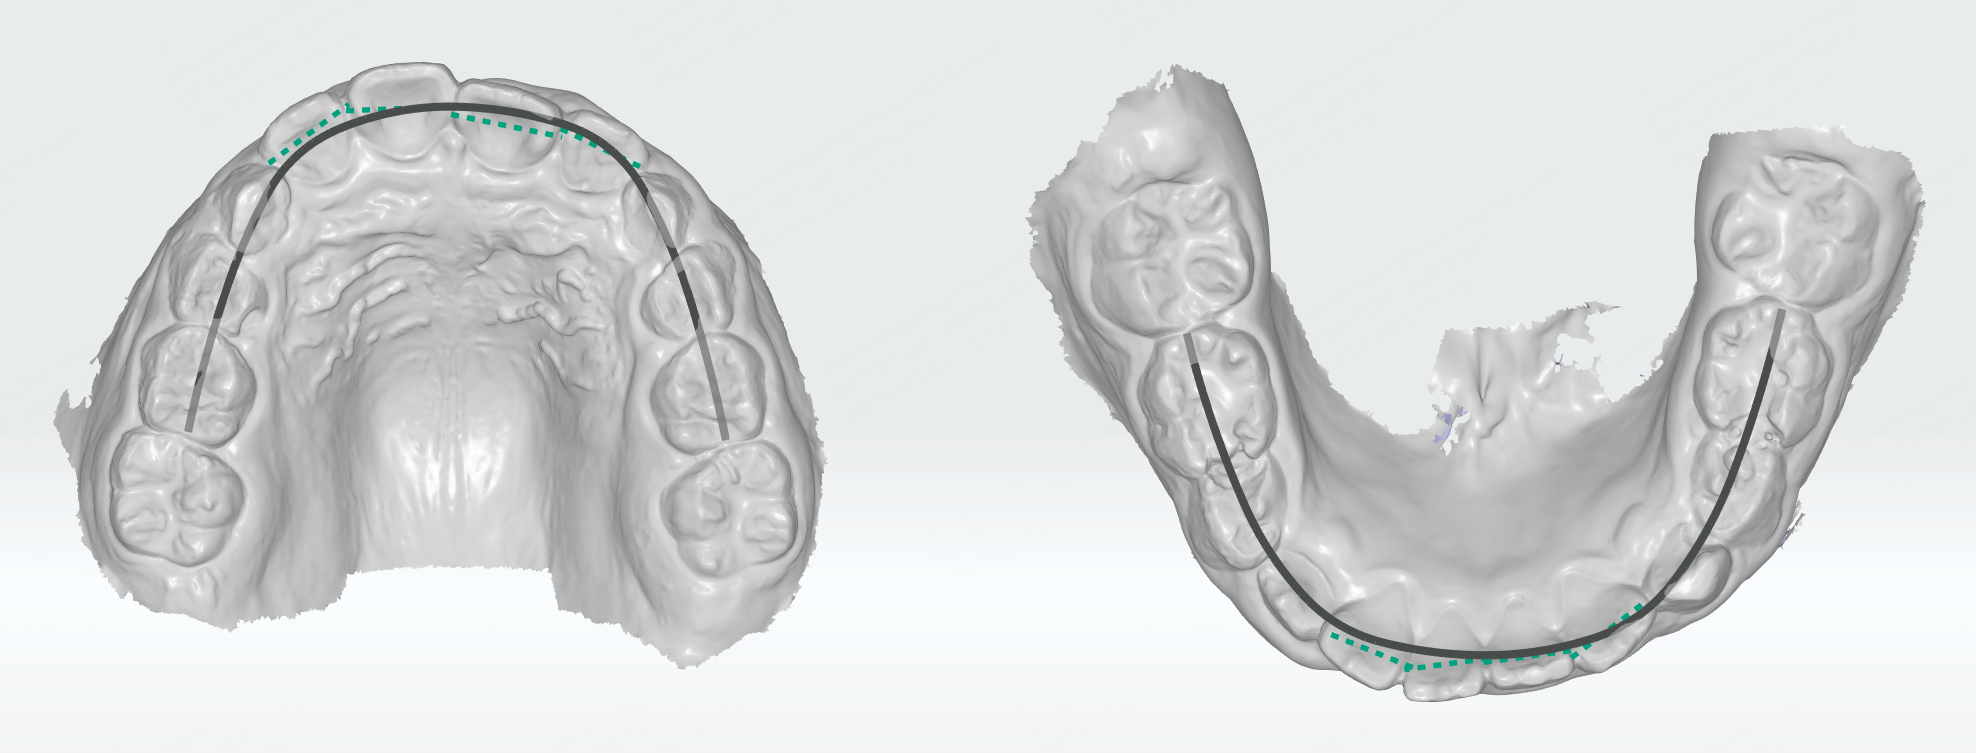
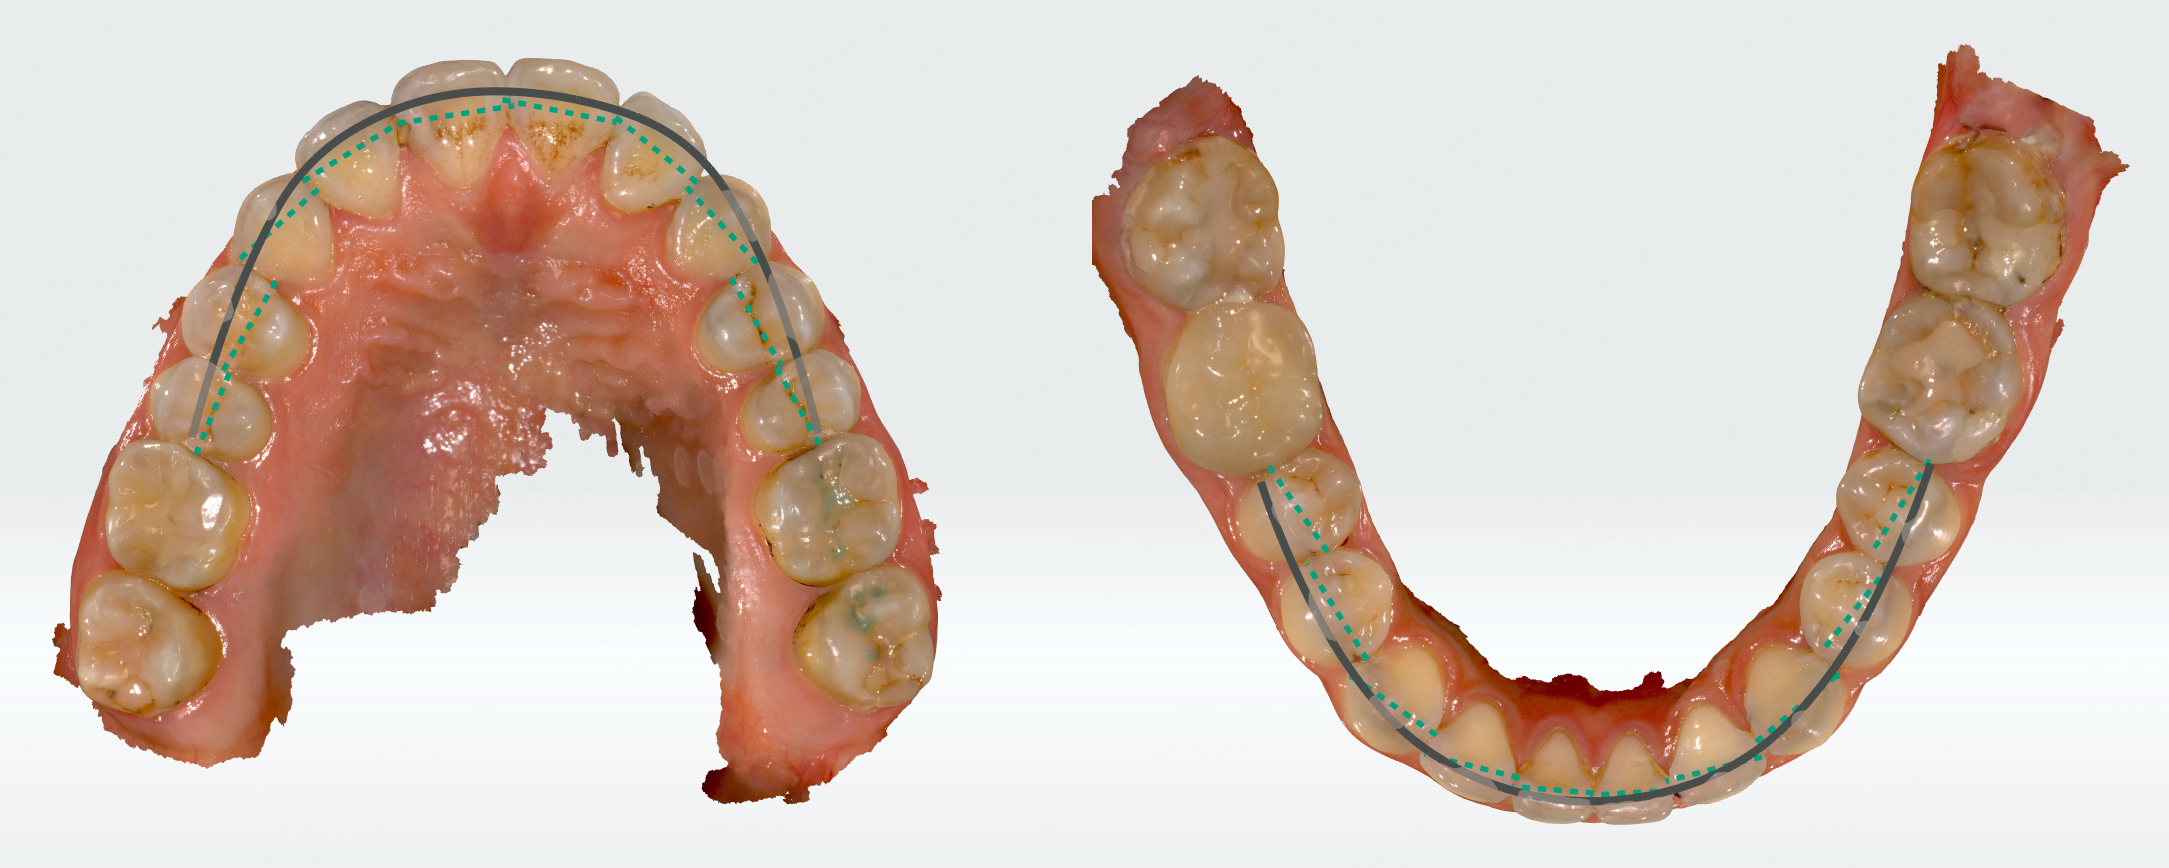
After entering Moyers analysis, the fitted dental arch curves of the upper and lower jaws will be automatically generated. A measurement table will be generated as well, including multiple measurement results such as teeth size, alveolar bone mass, and dental crowding prediction.
In the measurement table, move the cursor to ![]() to view the Moyers measurement method. Click Check the Moyers table to pop up the Moyers analysis table of tooth width for males and females.
to view the Moyers measurement method. Click Check the Moyers table to pop up the Moyers analysis table of tooth width for males and females.
You can move, zoom, and perform other operations on the measurement table. For details, please refer to Measurement Table Operations.
Measurement Method:
-
Click the dental arch (which will be colored in blue), and a panel for dental arch shape adjustment will appear at the bottom right corner.
-
On the panel, you can hold the control point on the dental arch curve and move the cursor to adjust the shape of the dental arch.
-
After clicking a tooth on the green dashed line, the label will display the tooth width and a panel for width adjustment will appear at the bottom right corner.
-
On the panel, you can rotate the tooth to align the mesiodistal and buccolingual directions with the coordinate axes. The measurement value of the tooth width will be updated in real-time.
Note
To move the panel, you can hold ![]() at the top right corner of the panel and move the cursor.
at the top right corner of the panel and move the cursor.
Dental crowding measurement
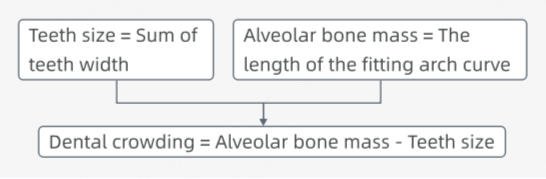
Dental misalignment will lead to dental crowding. ![]() Dental crowding measurement is mainly used to measure the dental crowding of patients at the permanent dentition stage. Dental crowding is an important indicator for determining whether a patient needs tooth extraction. This function will measure the crown width of the permanent teeth and the length of the fitted dental arch. The difference between the two is the crowding.
Dental crowding measurement is mainly used to measure the dental crowding of patients at the permanent dentition stage. Dental crowding is an important indicator for determining whether a patient needs tooth extraction. This function will measure the crown width of the permanent teeth and the length of the fitted dental arch. The difference between the two is the crowding.
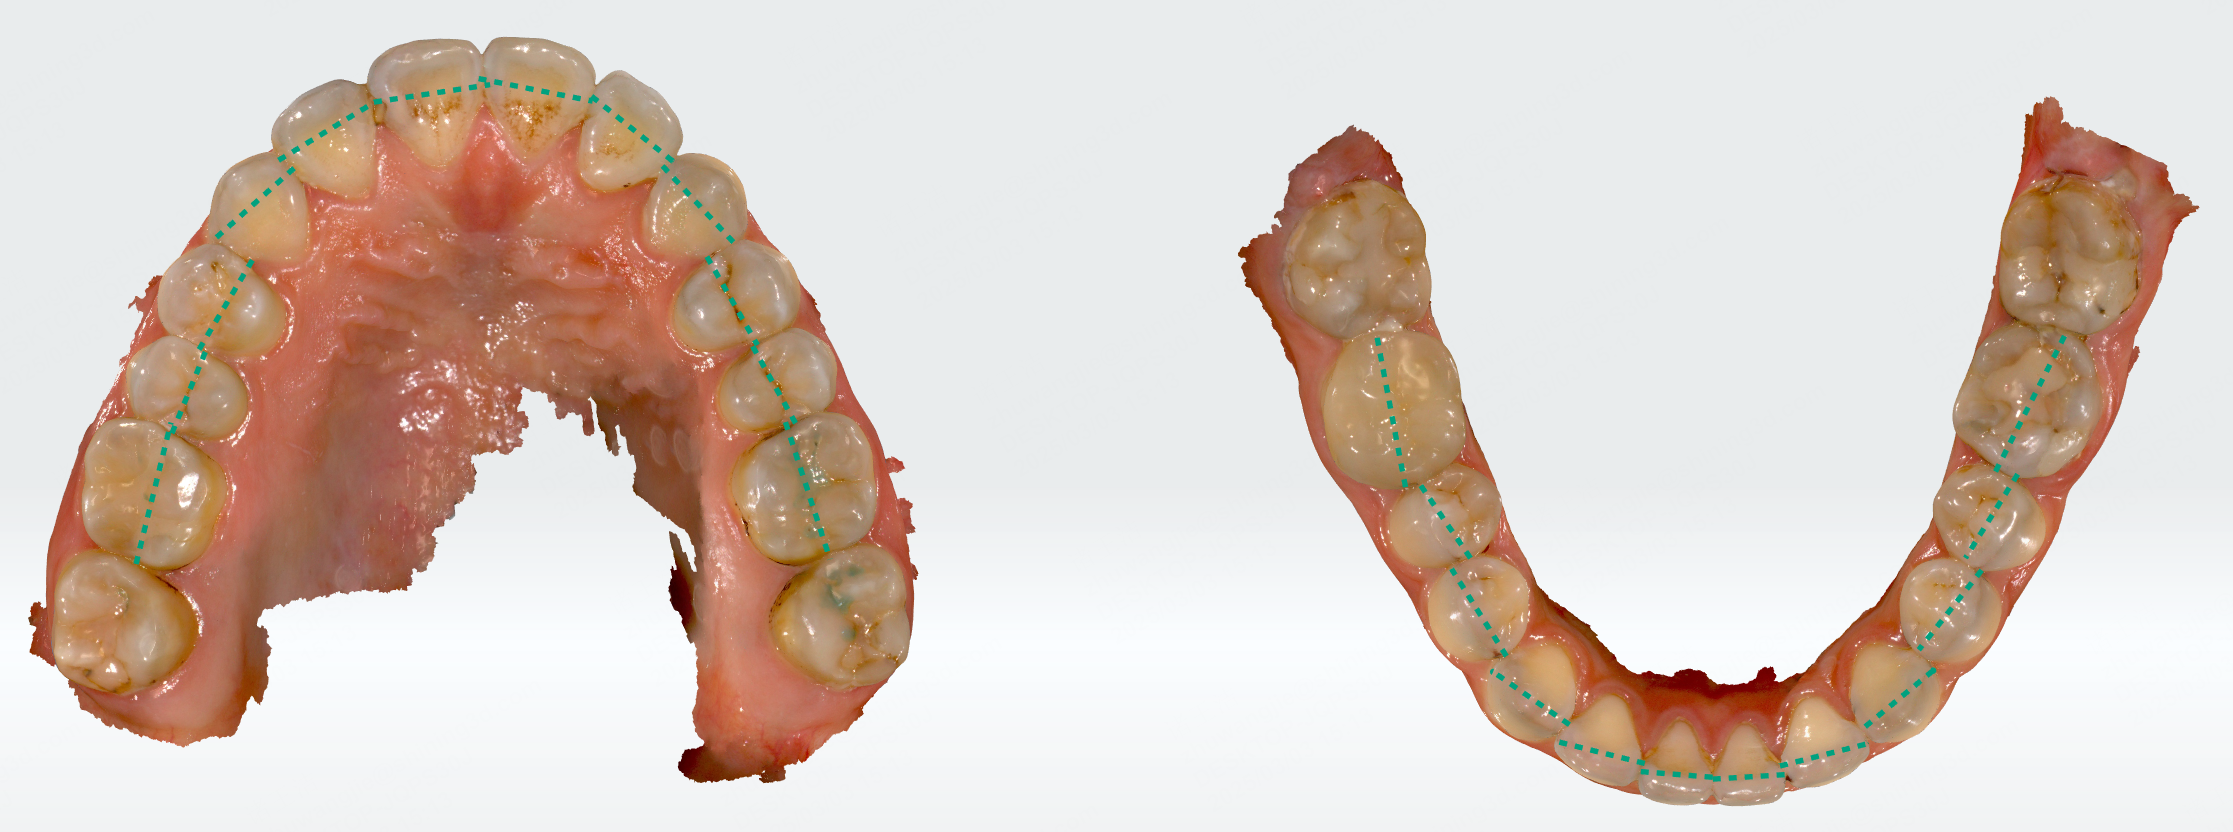
After entering this function, the fitted dental arch curves of the upper and lower jaws will be automatically generated. A measurement table will be generated as well, including teeth size, alveolar bone mass, and dental crowding results.
The measurement table provides crowding measurements for 3-3, 5-5, 6-6, and 7-7 dental arches. You can switch the dental arches to obtain different measurement results. Move the cursor to ![]() to view the crowding measurement method.
to view the crowding measurement method.
You can move, zoom, and perform other operations on the measurement table. For details, please refer to Measurement Table Operations.
Measurement Method:
-
Click the dental arch (which will be colored in blue), and a panel for dental arch shape adjustment will appear at the bottom right corner.
-
On the panel, you can hold the control point on the dental arch curve and move the cursor to adjust the shape of the dental arch.
-
After clicking a tooth on the green dashed line, the label will display the tooth width and a panel for width adjustment will appear at the bottom right corner.
-
On the panel, you can rotate the tooth to align the mesiodistal and buccolingual directions with the coordinate axes. The measurement value of the tooth width will be updated in real-time.
Note
To move the panel, you can hold ![]() at the top right corner of the panel and move the cursor.
at the top right corner of the panel and move the cursor.
Bolton ratio measurement
Bolton ratio refers to the ratio of the mesiodistal widths of the upper and lower teeth. Through ![]() Bolton ratio measurement, you can preliminarily determine whether the upper and lower dental arches and tooth widths of the patient are abnormal, which can be used as a reference for diagnosing malocclusion.
Bolton ratio measurement, you can preliminarily determine whether the upper and lower dental arches and tooth widths of the patient are abnormal, which can be used as a reference for diagnosing malocclusion.
In addition, by analyzing the Bolton ratio, you can assess the size of the tooth volume of the upper and lower jaws and effectively adjust the arrangement of the teeth based on the results. Therefore, Bolton ratio measurement is of great reference value in orthodontic treatment planning.
Caution
Bolton ratio measurement is only applicable to patients at the permanent dentition stage.
After entering this function, the widths of the upper and lower teeth will be detected and displayed as green dashed lines on the model.
A measurement table will be generated as well, including the sum of mandibular and maxillary anterior teeth, the anterior ratio, and the overall ratio.
Measurement Method:
- Anterior Ratio = (Sum of the mandibular 6 (M-D) / Sum of the maxillary 6 (M-D)) * 100%
- Overall Ratio = (Sum of the mandibular 12 (M-D) / Sum of the maxillary 12 (M-D)) * 100%
You can move, zoom, and perform other operations on the measurement table. For details, please refer to Measurement Table Operations.
Manual Adjustment of Tooth Width
-
After clicking a tooth on the green dashed line, the label will display the tooth width and a panel for width adjustment will appear at the bottom right corner.
-
On the panel, you can rotate the tooth to align the mesiodistal and buccolingual directions with the coordinate . The measurement value of the tooth width will be updated in real-time.
Note
To move the panel, you can hold ![]() at the top right corner of the panel and move the cursor.
at the top right corner of the panel and move the cursor.
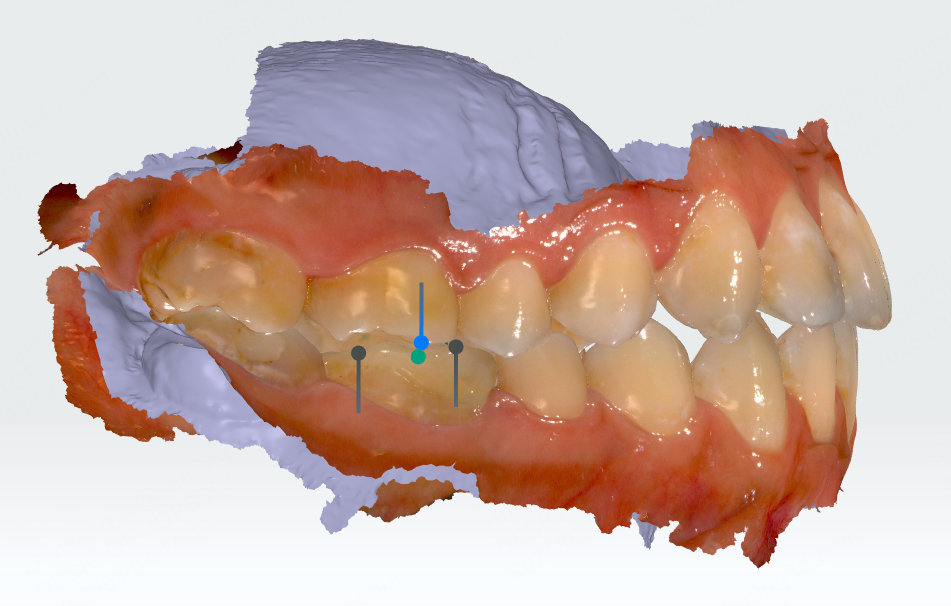
Curve of Spee
The leveling of the Spee curve is a key factor for the success of orthodontic treatment. Click ![]() to enter this function. The fitted Spee curve and plane of the lower jaw will be automatically generated. A measurement table will be generated as well.
to enter this function. The fitted Spee curve and plane of the lower jaw will be automatically generated. A measurement table will be generated as well.
Note
If there are too many teeth missing (e.g., missing lower central incisors or both the first and second molars on the same side) on the imported model, the measurement of the Spee curve is not available.

- The plane is formed by three points: the midpoint of the incisal edge on the central incisors of the lower jaw, the distobuccal cusp tips of the second molars on both sides of the lower jaw (or the distobuccal cusp tips of the first molars on both sides).
- The curve is formed by multiple feature points on the teeth.
- The green line represents the distance from the lowest point of the Spee curve to the plane.
You can move, zoom, and perform other operations on the measurement table. For details, please refer to Measurement Table Operations.
Measurement Method:
Create fitted curve of Spee and plane, and calculate the distance from the lowest point of the curve to the plane.
Manual Adjustment
You can manually adjust the Spee curve by moving the blue feature points on the curve. The measurement results in the table will be updated in real-time.
Palatal height measurement
![]() Palatal Height Measurement allows you to visually examine the patient's palatal condition. By observing the patient's palatal condition and the direction of the posterior alveolar, you can determine whether the patient has dental or skeletal maxillary transverse deficiency.
Palatal Height Measurement allows you to visually examine the patient's palatal condition. By observing the patient's palatal condition and the direction of the posterior alveolar, you can determine whether the patient has dental or skeletal maxillary transverse deficiency.
If a crossbite patient has a wide and flat palate but the posterior alveolar tilts towards the palate, it may indicate a dental crossbite; if the patient has a V-shaped dental arch and/or a narrow and high palate, it may indicate a skeletal discrepancy. Measuring the palatal height can provide reference data for orthodontic treatment, helping you to develop a more precise treatment plan.
After entering this function, a line segment linking the central fossa of teeth 16 and 26 will be automatically generated. The distance between the palate and the midpoint of this line segment is the palatal height.
Caution
- Palatal height measurement is only supported for the upper jaw when importing a single jaw.
- Please ensure the model is completely scanned, otherwise, palatal height measurement is not supported.

By moving the blue control points at both ends of the line segment, you can measure the palatal height at other positions. The measurement results in the table will be updated in real-time.
You can move, zoom, and perform other operations on the measurement table. For details, please refer to Measurement Table Operations.
Occlusion
Click ![]() to enter occlusion measurement, which is divided into four measurement tools: Overbite and overjet, Molar relationship, Canine relationship, and Midline relationship.
to enter occlusion measurement, which is divided into four measurement tools: Overbite and overjet, Molar relationship, Canine relationship, and Midline relationship.
Caution
When importing a single jaw, occlusion measurement is not supported.
Overbite and overjet
Overbite and overjet measurement helps you view the occlusal relationship between the upper and lower teeth of the patient, aiding in diagnosing occlusal problems.
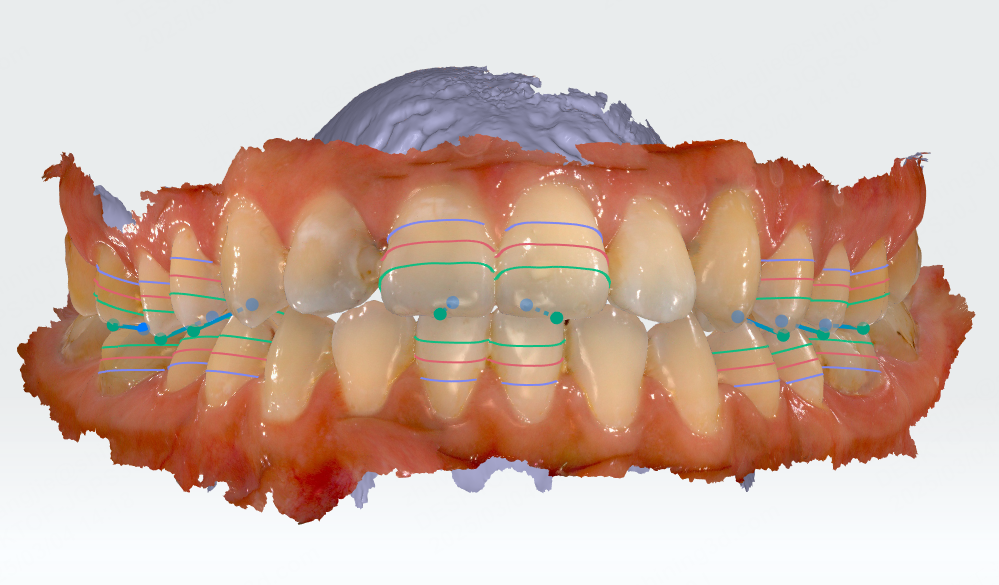
Click ![]() to enter overbite and overjet measurement. Teeth with overbite and overjet relationships will be automatically detected. Feature lines at ⅓, ½, and ⅔ of the crown and feature points will be generated.
to enter overbite and overjet measurement. Teeth with overbite and overjet relationships will be automatically detected. Feature lines at ⅓, ½, and ⅔ of the crown and feature points will be generated.
A measurement table will also be generated, including tooth position, overbite degree, and overjet degree.
Manual adjustment of feature points
-
Click a pair of teeth to be adjusted, and the adjustment panel will be displayed at the bottom right corner.
-
On the left side of the panel, you can hold and move the feature point. The overbite and overjet relationships for the corresponding teeth will be updated in real-time.
You can hold the left/right mouse button to rotate the teeth.
-
Take the upper and lower central incisors as an example. Click this pair of teeth and manually adjust the feature points on the panel.
- According to the relative position of the upper central incisor to the lower central incisor crown and the relative position of the lower central incisor to the upper central incisor crown, the overbite relationship will be displayed on the measurement table.
- Move the feature point of the upper incisal edge to adjust the length of the line connecting this point to the point of the lower incisal edge. The overjet relationship measurement will be displayed on the measurement table.
Molar relationship
Click ![]() to enter the molar relationship measurement. Different feature points will be displayed according to different stages (primary dentition, mixed dentition and permanent dentition).
to enter the molar relationship measurement. Different feature points will be displayed according to different stages (primary dentition, mixed dentition and permanent dentition).
| Period | Feature Points |
|---|---|
| Primary dentition | Mesial buccal cusp tips of the second primary molars (55 and 65) and mesial buccal groove points, mesial buccal cusp tips, and distal buccal cusp tips of the second primary molars (75 and 85). |
| Mixed dentition | Mesial buccal cusp tips of the first molars (16 and 26) and mesial buccal groove points, mesial buccal cusp tips, and distal buccal cusp tips of the first molars (36 and 46). |
| Permanent dentition | Mesial buccal cusp tips of the first molars (16 and 26) and mesial buccal groove points, mesial buccal cusp tips, and distal buccal cusp tips of the first molars (36 and 46). |
Molar relationship
| Position | Molar Relationship |
|---|---|
| Mesial buccal cusp tip of the maxilla is between the mesial and distal buccal cusp tips of the mandible | Neutral relationship |
| Mesial buccal cusp tip of the maxilla is anterior to the mesial buccal cusp tip of the mandible | Distal relationship |
| Mesial buccal cusp tip of the maxilla is posterior to the distal buccal cusp tip of the mandible | Mesial relationship |
Manual Adjustment of Feature Points
-
Click a pair of teeth with a molar relationship, and the adjustment panel will be displayed at the bottom right corner.
-
On the left side of the panel, hold and move the feature points of the teeth to modify the molar relationship.
You can hold the left/right mouse button to rotate the upper and lower teeth.

-
Take teeth at the permanent dentition stage as an example. Move the feature point on the panel to adjust the distance between this point and the buccal groove point, mesial buccal cusp tip, and distal buccal cusp tip of the mandible, thereby determining the molar relationship on both sides of the teeth.
Note
If one or both teeth in a pair of molar relationship are missing, the feature points for that pair of teeth will not be displayed.
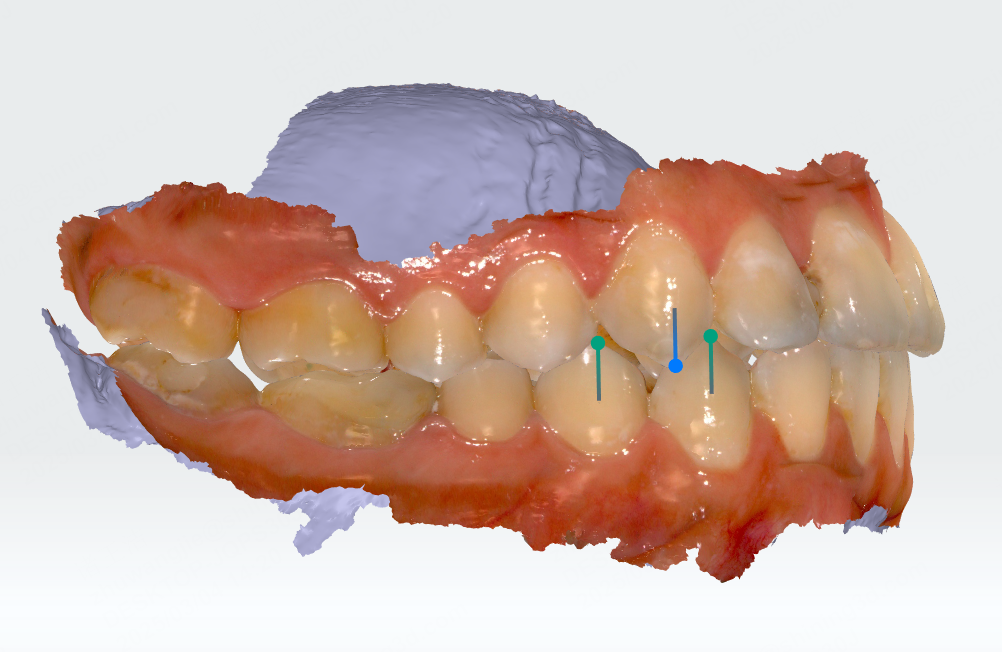
Canine relationship
A neutral canine relationship is a prerequisite for normal occlusion and function.
Click ![]() to enter the canine relationship measurement. It will automatically identify the cusp tips of the canines (13, 23, 33, 43) and the buccal cusp tips of the first premolars (34, 44), and generate feature points. A canine relationship measurement table will also be generated.
to enter the canine relationship measurement. It will automatically identify the cusp tips of the canines (13, 23, 33, 43) and the buccal cusp tips of the first premolars (34, 44), and generate feature points. A canine relationship measurement table will also be generated.
Canine relationship
| Position | Canine Relationship |
|---|---|
| The line connecting the cusp tips of the maxillary canines is between the cusp tips of the mandibular canines and the buccal cusp tips of the mandibular first premolars | Neutral relationship |
| The line connecting the cusp tips of the maxillary canines is anterior to the cusp tips of the mandibular canines | Mesial relationship |
| The line connecting the cusp tips of the maxillary canines is posterior to the buccal cusp tips of the mandibular first premolars | Distal relationship |
Manual adjustment
- Click teeth with a canine relationship, and the adjustment panel will be displayed at the bottom right corner.
-
On the left side of the panel, hold and move the feature point to modify the canine relationship.
You can hold the left/right mouse button to rotate the upper and lower teeth.
Midline Relationship Measurement
Midline relationship measurement can be used to evaluate whether the midlines of the upper and lower teeth are aligned during orthodontic treatment.
Click ![]() to enter the midline relationship measurement. The system will automatically detect and generate the midlines of the upper and lower teeth and generate a measurement table.
to enter the midline relationship measurement. The system will automatically detect and generate the midlines of the upper and lower teeth and generate a measurement table.

Manual adjustment
Hold and move the point in the center of the midline to move the midline. The measurement data in the table will be updated simultaneously.
Dental arch measurement
The dental arch supports the soft tissues of the face, so measuring the length, width, symmetry, and form of the dental arch can help customize a personalized treatment plan for the patient.
Click ![]() to enter the dental arch measurement, which is divided into
to enter the dental arch measurement, which is divided into ![]() Width of dental arch,
Width of dental arch, ![]() Length of dental arch,
Length of dental arch, ![]() Dental arch symmetry, and
Dental arch symmetry, and ![]() Arch form analysis.
Arch form analysis.
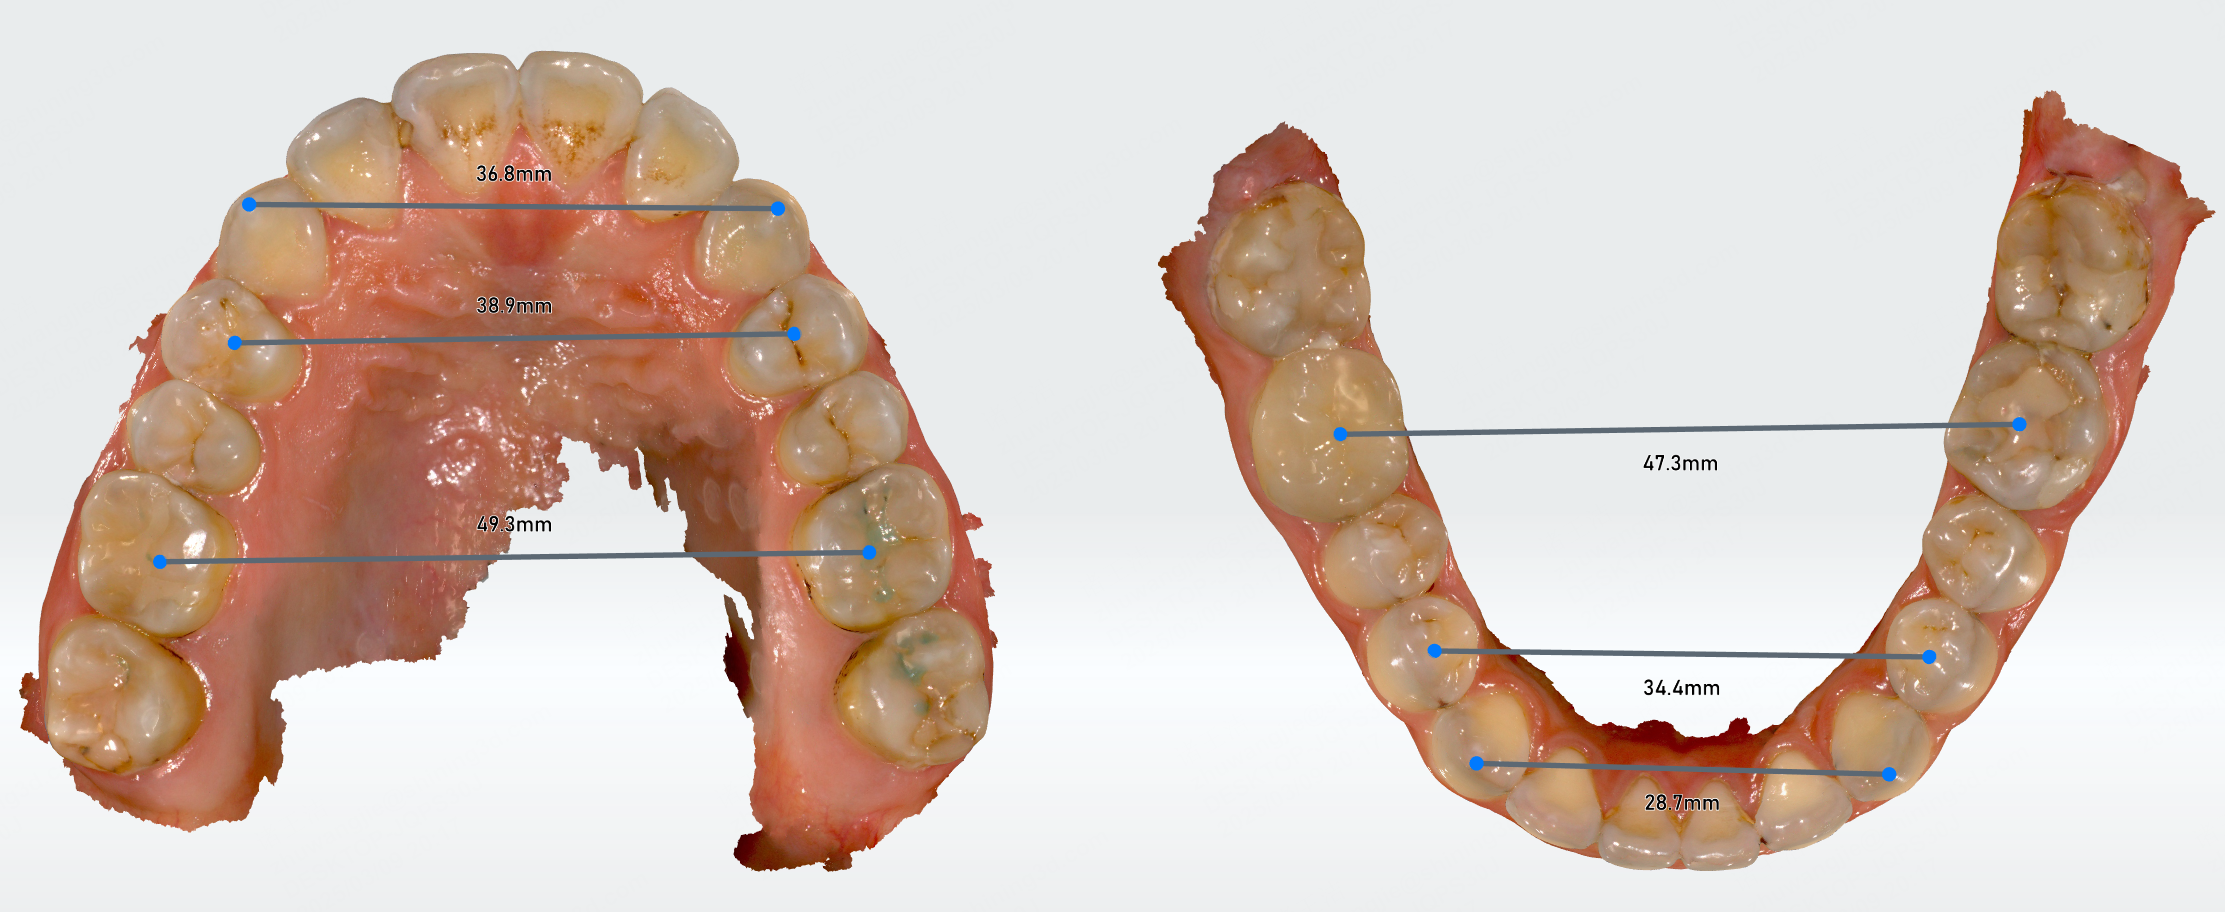
Width of dental arch
Based on the width of the dental arch, you can evaluate the patient's arch development, detect or prevent tooth alignment problems early, and customize a treatment plan.
Click ![]() to enter the width of dental arch measurement. It will automatically measure the width of the anterior, middle, and posterior parts of the dental arch and generate a measurement table.
to enter the width of dental arch measurement. It will automatically measure the width of the anterior, middle, and posterior parts of the dental arch and generate a measurement table.
You can move the feature points on the dental arch to modify the width of the dental arch, and the measurement results in the table will be updated simultaneously.
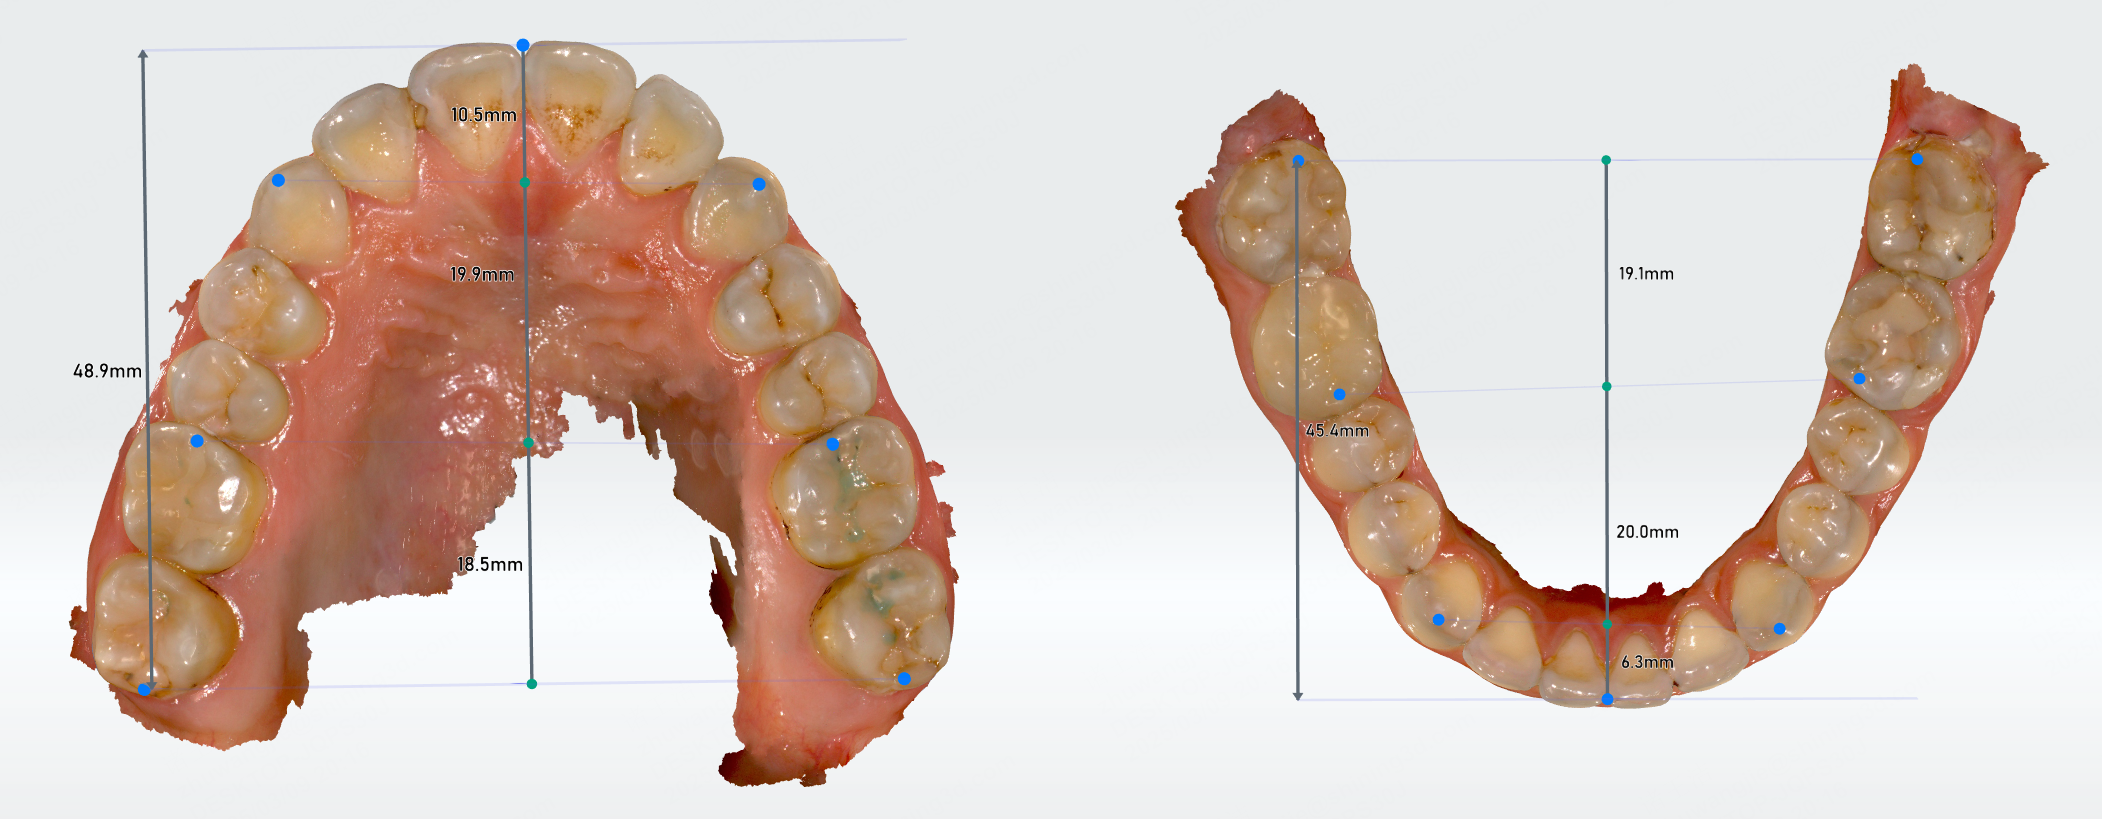
Length of dental arch
Measuring the length of the dental arch can help determine whether the patient has insufficient space for permanent teeth due to early loss of primary teeth. You can treat early and restore space for permanent teeth eruption.
Click ![]() to enter the length of the dental arch measurement. The system will automatically measure the length of the anterior, middle, posterior, and the total length of the dental arch, and generate a measurement table.
to enter the length of the dental arch measurement. The system will automatically measure the length of the anterior, middle, posterior, and the total length of the dental arch, and generate a measurement table.
You can move the feature points on the dental arch to modify the length of the dental arch, and the measurement results in the table will be updated simultaneously.
Dental arch symmetry
Dental arch symmetry measurement can prevent problems caused by asymmetrical arches.
Click ![]() to enter this function. It will automatically generate a median sagittal plane and measure the distances from the left and right sides of the dental arch to the sagittal plane. The dental arch can also be divided into three parts: the anterior, the middle and the posterior.
to enter this function. It will automatically generate a median sagittal plane and measure the distances from the left and right sides of the dental arch to the sagittal plane. The dental arch can also be divided into three parts: the anterior, the middle and the posterior.

You can move the feature points on the dental arch, and the measurement results in the table will be updated simultaneously. You can also move and rotate the median sagittal plane.
- Move the median sagittal plane: Hold the purple arrow in the center of the sagittal plane and move it along the arrow direction.
- Rotate the median sagittal plane: Hold and move the purple control points on the four sides of the plane.

Arch form analysis
The form of the dental arch is generally divided into three types: rounded square, oval, and tapered. Click ![]() to enter the arch form analysis. It will automatically detect the forms of the dental arch and generate a measurement table.
to enter the arch form analysis. It will automatically detect the forms of the dental arch and generate a measurement table.
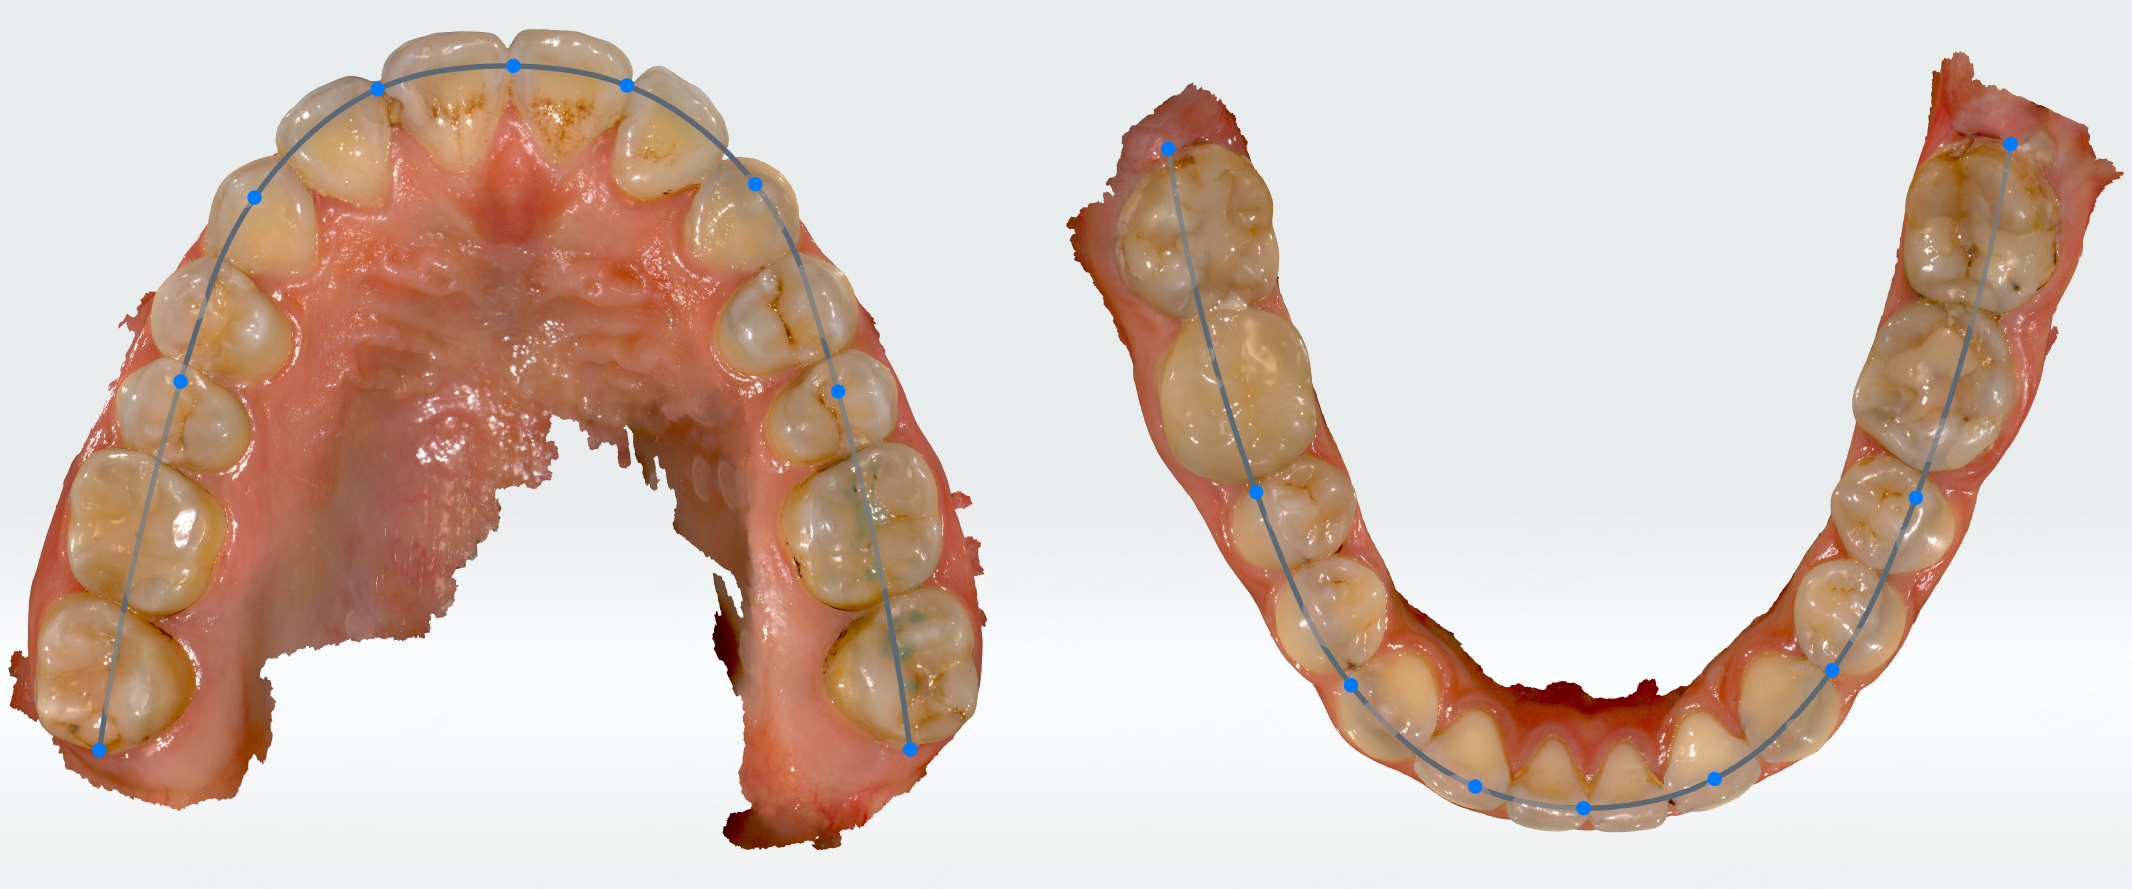
You can modify the arch shape by moving the measurement points on the dental arch or by modifying the measurement table.
Measurement table operations
| Operation | Description | Operation | Description |
|---|---|---|---|
| Move table | Hold |
Show tooth width list | Click Tooth Width List to switch the measurement table. |
| Hide table | Click |
Show table | Click |
| Show/Hide reference values | Click |
Modify measurement results | Double-click the values on the table or select the values on the dropdown list. The modified values will be displayed in blue. Click |
Other functions
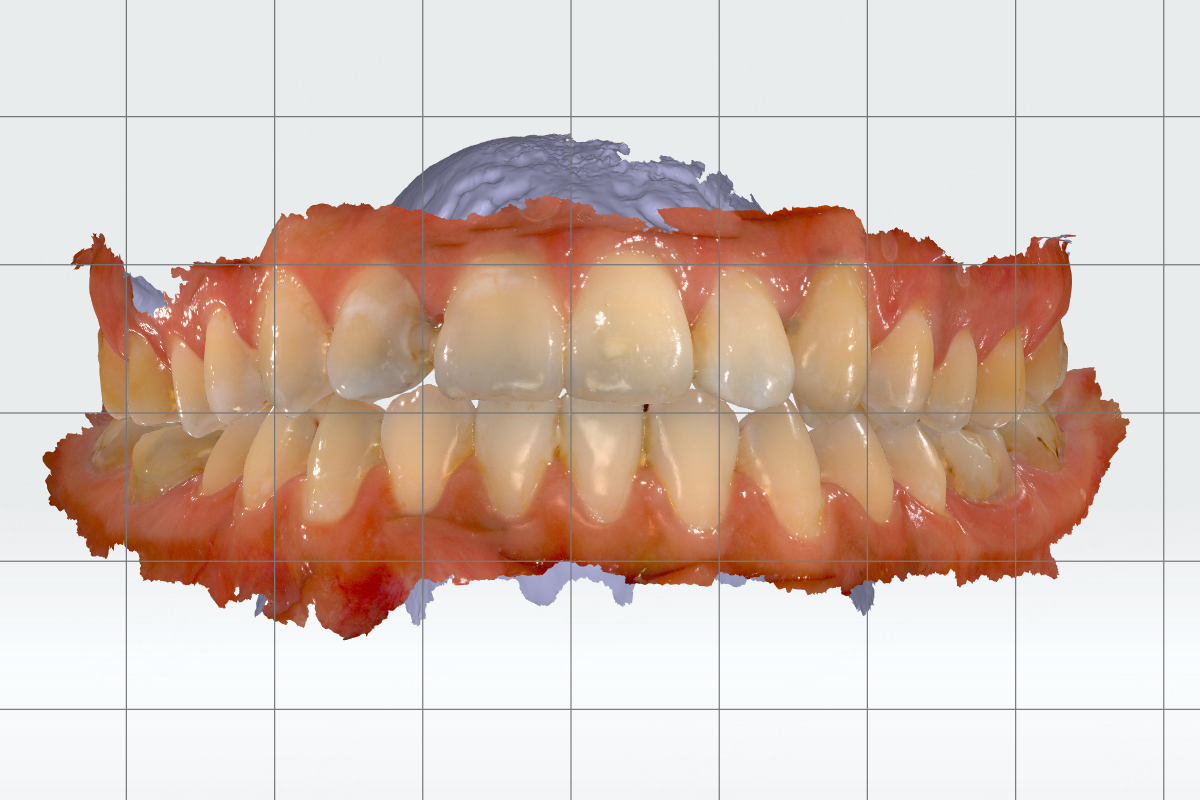
![]() Show grid
Show grid
When enabled, grid lines will be displayed in the background.
Col
Show Grid
Col
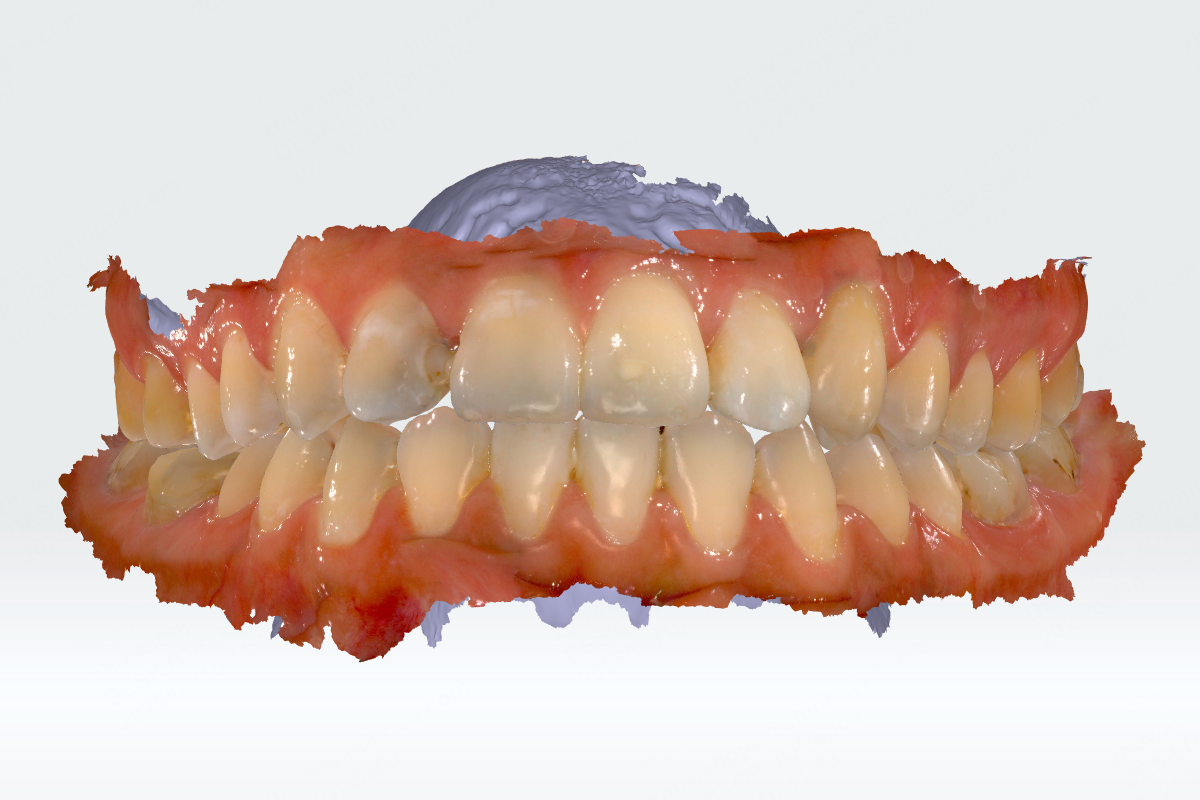
Hide Grid