Scanning Preparations
Caution
-
Concerning hand hygiene and personnel safety when performing a scan, you must wear clean surgical gloves through the whole process.
-
If you need to use isolation film or protective film (e.g., blue film) to wrap the scanner body, do not block the air inlet, outlet and positioning holes of the body to avoid affecting the heat dissipation of the equipment and the stability of the placement cradle.

-
When scanning, please do not scan silicone materials or other objects containing fluorescent agents to avoid poor scanning results.
Intraoral environment
- Make sure there is no foreign body or blood in the mouth after gargling. Stop the bleeding if necessary.
- If necessary, ask the patient to keep the tongue still and move it to the other side of the mouth.
- Consider using a dental three-way syringe or cotton to dry the tooth surface before starting the scan.
- Turn off the oral light on the dental chair and start scanning. Do not allow direct light from any light source, such as the dentist chair lamp, to shine on the area you are working on.
- Consider using aspirators or cotton to keep the surfaces dry during scanning.
- If necessary, consider using an oral mirror to help create space while working in the narrow area between the teeth.
Scanner preparation
- Ensure that the scanner tip, scanner body, and cradle are properly pre-cleaned, disinfected, or sterilized. For more details, see Pre-cleaning, Disinfection and Sterilization.
- Ensure that the scanner tip has no scratches or is not damaged. Additionally, the tip is firmly attached to the front end of the scanner body.
- Ensure that the scanner connection is ready; it is correctly connected to a power source and powered on, and IntraoralScan is launched and ready to work.
-
To avoid condensation on the mirror of the tip when scanning, the scanner tip must have been warmed up.
-
Calibrate the scanner and verify the accuracy of the acquisition regularly. For more details, see Calibration.
Scanning position and path
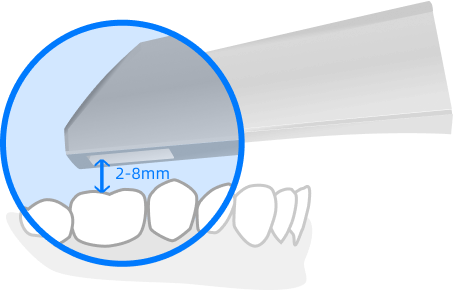
- When scanning, the scanner tip should be close to the teeth with the optimal distance being 2 - 8 mm. The movement should not be too fast, and the operation should be kept at a constant speed.
- When scanning, the scanner tip should move along the shapes of the lower and upper dental arches.
Col
Col
- A complete scan data of a single area includes the surfaces of bite, lingual, buccal, interproximal contacts of the adjacent teeth, and 2-3 mm buccal gingiva.
- A complete scan data of a single case includes the lower jaw, upper jaw, and bite registration.
- When scanning, it is important to achieve an overlap of at least 30% between each acquisition. If the overlap is small, the alignment may fail.
- Inspect the scanned image in the 3D scan view window and pay attention to warning messages. Check the scan results on the screen to ensure that the scanning is of good quality.
- For bite alignment, it is not recommended to scan a long area. Stop scanning once the data is matched (when the arches move into place on the bite scan).
- Please always pay attention to the status of the device and the patient. If any abnormal situation occurs, please stop using and consult the technical support immediately.
Col

Col

Heat the scanner tip
To ensure the quality of optimal images, you should prevent condensation on the scanner mirror before each scan by heating the scanner tip.
Follow the steps below to warm up the scanner before starting an acquisition:
- Ensure that the scanner tip, scanner body, and cradle are clean. To clean them, please check Pre-cleaning, Disinfection and Sterilization.
- Gently and carefully attach the scanner tip to the scanner body with the mirror facing downward.
- Connect the power supply to the scanner. For more details, see Connection.
- Place the scanner in the cradle to secure it in place.
- When the LED ring light on the scanner body lights up green, the heater automatically turns on and detects the temperature.
- It the temperature of the scanner tip is lower than the set value for anti-fogging, a notification message of pre-heating and current temperature appears.
- When the message disappears, the scanner tip has been heated. The scanner is now ready for scanning.
Note
- The heater helps keep the scanner tip temperature in a normal range.
- If the heater does not reach the necessary temperature for preventing condensation during scanning, a tip will appear.