Scanning Settings
Click ![]() and then click the Scan Settings tab to view or set scanning parameters.
and then click the Scan Settings tab to view or set scanning parameters.
After changing, click  to reset the settings.
- IMU menu: Enabled by default. When scanning, press the button on the scanner body twice to open the IMU menu.
- Auto-brightness: Enabled by default. Adjust the camera brightness to capture clear images.
- Refined scan: Enabled by default. Suitable for scanning refined areas, making processed data more precise and improving data details. In the scenario of teeth restoration and implant, the refined areas will be automatically recognized after enabling this function. While in orthodotics and other scanning processes, the software will automatically start refined scanning, but will not automatically recognize refined areas.
-
Supports alternate day scanning: Enabled by default. Scanned orders support unlimited add-scan.
Note
Supports alternate day scanning is not supported for orders that are scanned after this function has been disabled.
-
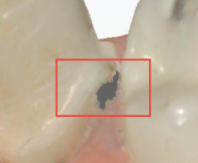
Filled holes will be displayed in grey: Enabled by default. When it is enabled, the filled holes on the teeth will be displayed in grey (after post-processed), as shown in the following picture. When it is disabled, the filled holes on the teeth teeth will be displayed in color.
-
Automatic bite optimization: Enabled by default.
- Adjust the occlusal position to keep the bite cross within the acceptable range.
- Optimize the data automatically when scanning the occlusion. When scanning bites,
 indicates that auto bite optimization is checked. Click to uncheck it.
-
Pick up and scan: Enabled by default. When it's enabled, the scanner automatically starts scanning once it's lifted from the cradle. Otherwise, please click the start button on the software, or press space button on the keyboard/start button on the scanner to start scanning.
-
Light off when not scanning: Disabled by default.
- When it is disabled, the scanner will immediately cast light when you enter the step of scanning.
- When it is enabled, you should press Space, or press the scanner button, or click
 to start casting light and scanning. The light will not be cast when scanning is paused.
-
Light on when tip is unplugged: Disabled by default. If it is disabled, the scanner will not cast light when the scanner tip is unplugged.
- Scanning order: Support to set the scanning order according to the operation habits. The default setting is working jaw priority.
- Scanning View: Support to set various scanner views.
| View | Description |
|---|---|
| Scanner view 1 | Camera Window and scanning data clockwise rotation 90°. |
| Scanner view 2 | The camera window displays the real scanning scenarios same as the scanned data displayed angle. |
| Operator perspective | The scanning position of the operator perspective is divided into Patients Front and Patients Rear. Patients Front: The scanner perspective of lower jaw scan does not change, and the upper jaw data are mirror images. Patients Rear:The scanner perspective of upper jaw scan does not change, and the lower jaw data are mirror images. When selecting the operator perspective, you can check Mirror Show Upper Jaw, This parameter is mainly designed for the sitting position of the patient. After checking, the camera window is mirrored up and down, the scanning data is clockwise rotated clockwise by 180°, and the mirror image shows the upper jaw. |
Camera top, bottom, left, and right margins’ values are acquired from the camera by default; When selecting Operator Perspective as scanning view, you can also manually set the cropping parameters for the top, bottom, left, and right margins of the camera window.
Adjustable left or right margins in the range of [8, 300].
Adjustable top or bottom margins in the range of [8, 400].
: Restores the margin values in the camera.
Click  ,upload the music documents.
- Start testing PC performance or restore factory settings.
- After the test, the software will automatically configure the scanning speed to suit your computer's performance.