Start Scanning
After adjusting scanning settings, you can proceed with scanning the objects.
Note
- Before starting the scan, please check the preview effect in the camera window to confirm whether the placement of the object to be scanned is appropriate:
If the Laser projection function is enabled, you will see the laser points
  in the camera window, then you can determine if the distance is appropriate by checking whether the two projected laser points overlap;
If you disable this function, you can also check the black cross projected onto the object in the camera window (displayed after enabling > Cross Laser function) to adjust the placement of the object until the black cross is clearly visible.
 - It is recommended that you enable the Stability Check function in Settings >
 Fixed Scan Settings, then it can monitor the scanner's stability in real time and give prompts to adjust.
 - After entering the scanning process, the software wll automatically determine whether to heat the engine based on the current temperature; it is recommended that you wait until the device reaches the preset temperature before performing the scan to ensure its scanning accuracy.
Dual-Axis Turntable
Note
- Before scanning with the dual-axis turntable, you need to perform camera calibration.
- If the camera has been calibrated and the turntable or scanner has not been moved since the last calibration, you can proceed directly to scanning.
Caution
After enabling the dual-axis turntable, switching align modes will not be supported, and the default will be turntable alignment. Additionally, all functions related to markers, such as marker size, real-time recognition, and automatic cutting planes, will not be supported.
-
Use fixtures to secure the object in the center of the turntable.
-
After setting the turntable speed, click on
 Start Scanning or press the button on the front of the turntable.
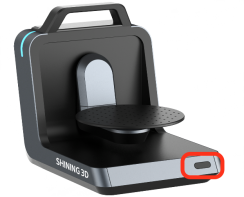
Caution
During the scanning process, please ensure that the position of the object and the device has not changed.
-
If you need to scan other poses of the object, you can flip the object and click Scan for more + to repeat steps 1-2.
Add-Scan
If the scan data is incomplete, please click Add-Scan →. You can perform multiple Add-Scans.
Caution
Add-Scan doesn't support opened, removed or aligned projects. Please re-scan the object if Add-Scan is needed.
-
Auto Add-Scan: Suitable for scenarios that require multi-angle scanning, such as holes.

- Hold down Shift+Left Button, and select one or more add-scan areas on the model. For more operations, see Data Editing.
- Click on
 Add-Scan or press the button on the front of the turntable to start scanning.
-
Manual Add-Scan: Suitable for missing scans on a single plane.

- Move the scanning model within the software to the angle that needs an Add-Scan.
- Click on Add-Scan or press the button on the front of the turntable to start scanning.
Switch Scanning Status
You can switch the scanning status by clicking the buttons in the right side bar.
For the project with large volume of point cloud data, you can manually adjust the display ratio using the Sampling Display function in the context menu; additionally, if the project does not have high accuracy requirements, you can also reduce the sampling resolution.
| Icon | Function | |
|---|---|---|
 |
Scan | Scanned data will be stored.  Note Note
|
 |
Pause | After starting scanning, click this button to pause the scanning. |
| Stop & Delete | When scanning with the turntable, click this button to end the current scanning and delete the scanned data. |
Note
- If markers have been placed but no data can be collected, please check the condition of the placed markers (there should be at least 4 markers within each scanning area, and at least 4 common markers between adjacent scanning areas) or switch the align mode.
- If there is already a large amount of scanning data in the current project, the software will pop up a window to prompt you to sample the display of the data.
Global Optimization
When you finish the scan, click ![]() Global Optimization in the right-side function bar to optimize and align the data, and generate the point cloud.
Global Optimization in the right-side function bar to optimize and align the data, and generate the point cloud.
Support setting optimization mode in ![]() Settings > Fixed Scan Settings:
Settings > Fixed Scan Settings:
- Global Optimization (default): Perform global optimization of markers and point cloud to improve the quality of the generated point cloud data.
- Use Markers Only: Only perform markers optimization, please ensure that there are at least 4 markers within each scanning area, and at least 4 common markers between adjacent scanning areas.
- Point Cloud: Only perform point cloud optimization.
Note
If you are not satisfied with the optimization effect of the current optimization mode, you can switch the optimization mode and then perform a global optimization again.
Click  to confirm the global optimization, and proceed with project alignment or model mesh; and you can also click
  to exit the current interface and continue scanning or re-optimize.
Note
- You can edit the scanned data before global optimization.
- The larger the amount of scan data is and the lower the computer configuration is, the longer the global optimization will take.