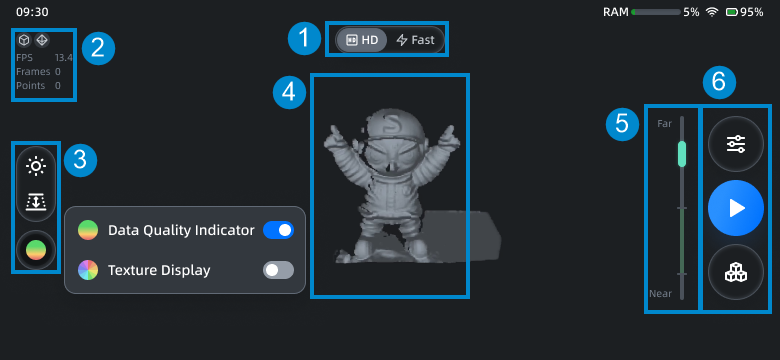
Scan Preview
After powering on the device, you can enter the interface of scan preview.
Note
If this is your first time to enter the interface of scan preview, you will be automatically directed to the User Tutorial interface:
Tap![]() button to enter the next step of the tutorial, tap
button to enter the next step of the tutorial, tap![]() button to return to the previous step of the tutorial; in the final step, tap Start calibration to enter the actual calibration process. You can also tap Skip to quit the tutorial, which can be checked again through Personal Center > Help Center.
button to return to the previous step of the tutorial; in the final step, tap Start calibration to enter the actual calibration process. You can also tap Skip to quit the tutorial, which can be checked again through Personal Center > Help Center.
Interface Overview

Note
For the introduction to the top status bar, see status bar.
① Scan Mode
Tap buttons to switch the scan mode of the current project:
: HD scan (default), which is used for small objects or objects with fine geometric details.
-
: Fast scan, which is used for medium to large objects and offers a higher scanning efficiency.
Especially, to scan medium to large objects:
Type Settings Lack of geometric and texture features - Marker alignment
- Scanning distance: 350 mm ~ 800 mm
With rich irregular geometric features - Feature alignment
- Scanning distance: 350 mm ~ 1000 mm
With irregular texture features, such as painting or drawing - Texture alignment
- Scanning distance: 350 mm ~ 1000 mm
The scene with rich irregular geometric features and existing in both near and far range, such as environment filled with many objects - Feature alignment
- Scanning distance: 350 mm ~ 1500 mm
② Project Information
Display the data information (fps, frames and points) and parameter settings of the current project:
Note
You can tap ![]() Advanced Settings button in the right-side function bar to adjust parameter settings of the project.
Advanced Settings button in the right-side function bar to adjust parameter settings of the project.
/
: Object / Portrait scan mode.
: Feature alignment mode.
: Texture alignment mode.
: Markers alignment mode.
③ Scan Settings
Set camera view,
scanning distance (also called DOF),
data quality indicator and
texture display. For more, see scan settings.
④ Model Preview
Display the model's pre-scanning effect; if Markers alignment mode is enabled, the identified markers
![]() will appear on the model.
will appear on the model.
Note
In the scan preview state, operations such as scaling, translating, and rotating the model are not supported.
⑤ Distance Indication
Green indicates that the distance is appropriate, red indicates that the distance is too near, blue indicates that the distance is too far.
Note
If it prompts that "![]() The distance is too close / too far" or "
The distance is too close / too far" or "![]() Unable to collect data", please adjust the distance.
Unable to collect data", please adjust the distance.
⑥ Function Buttons
![]() : The entrance to Advanced Settings.
: The entrance to Advanced Settings.
![]() : The button to start scanning.
: The button to start scanning.
![]() : The entrance to file list.
: The entrance to file list.