Control Center
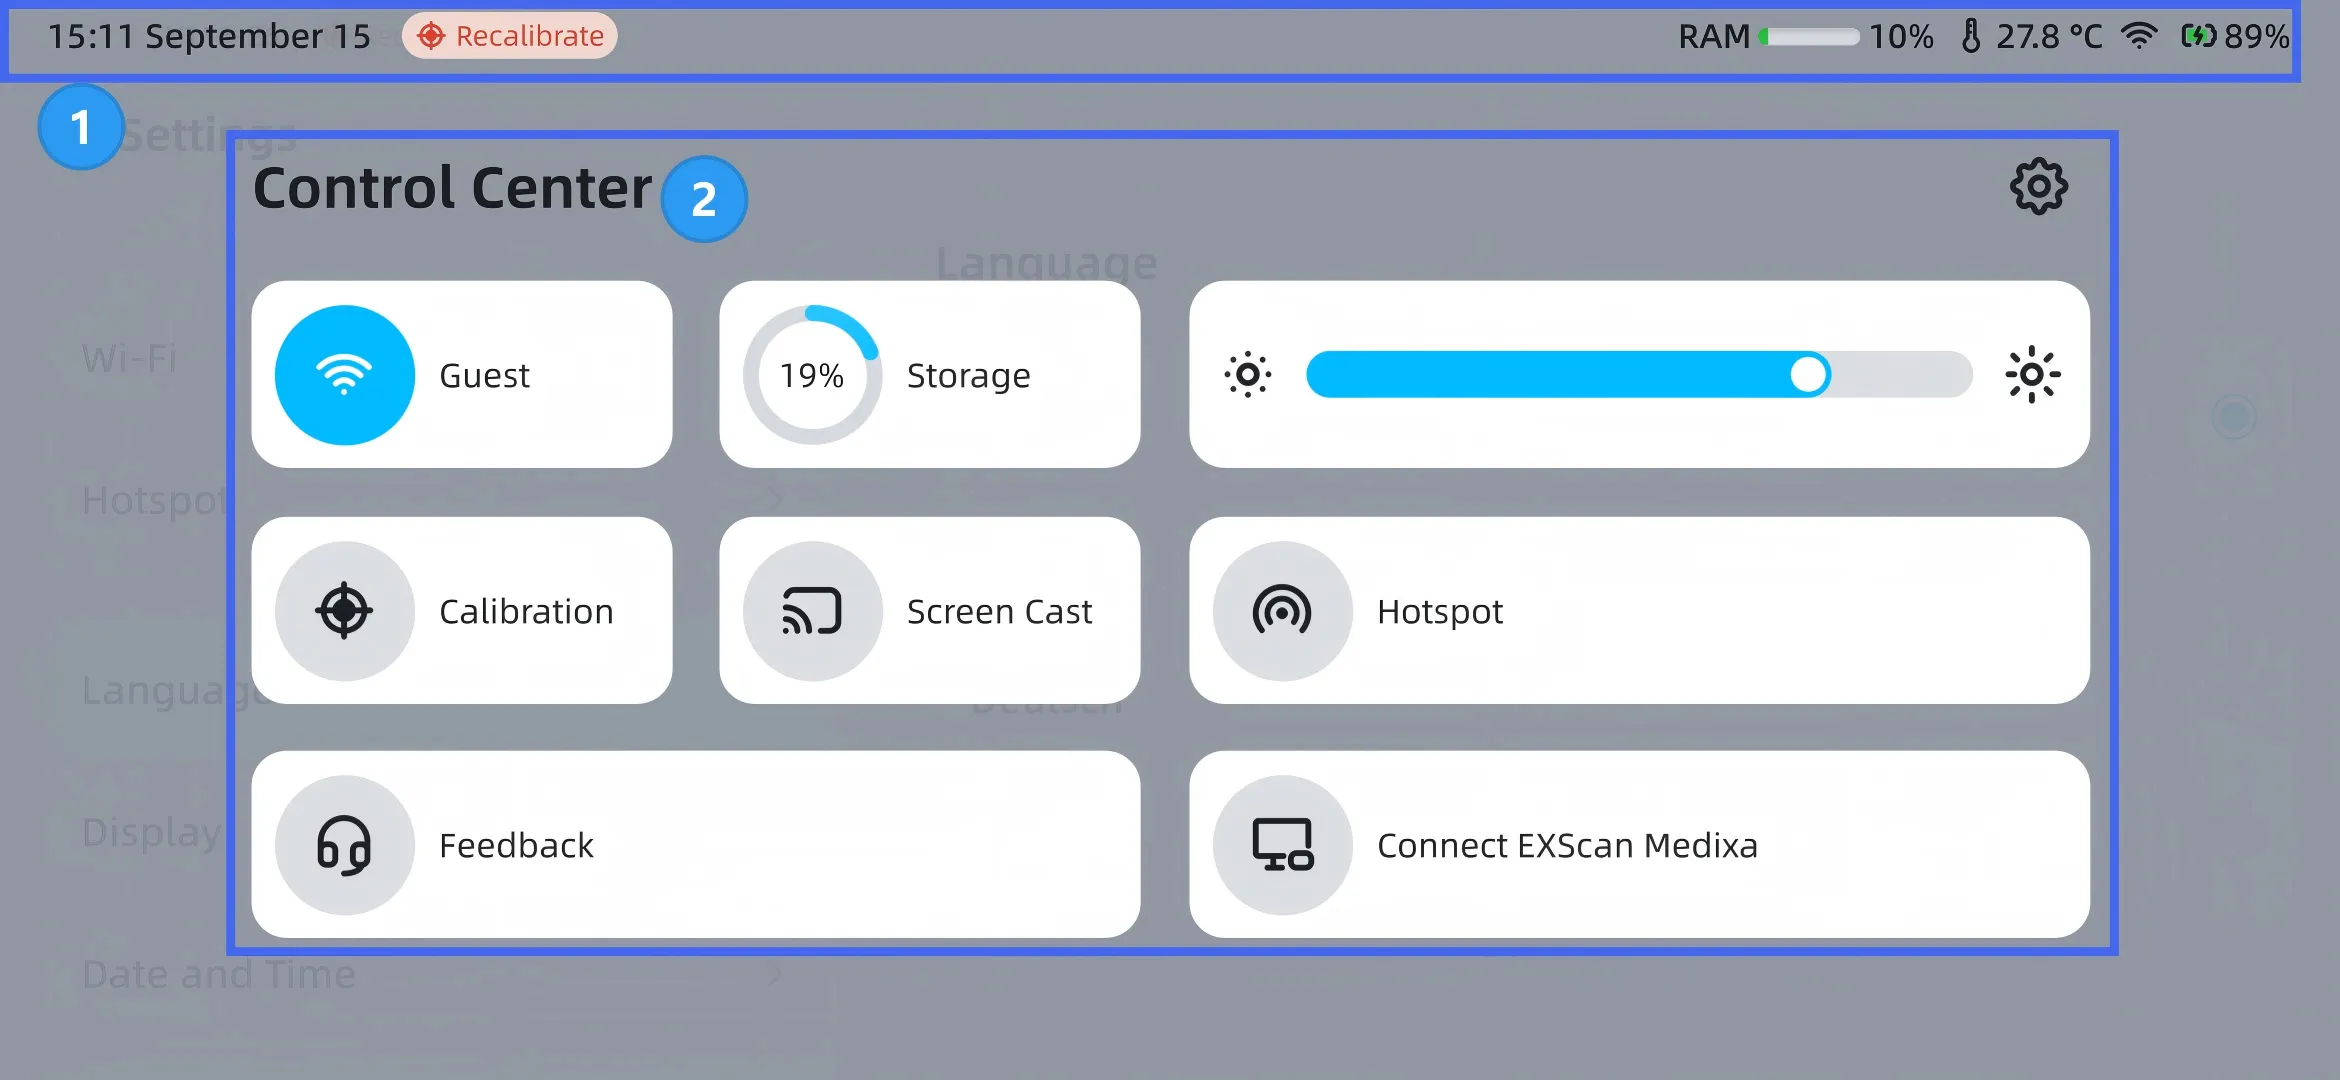
You can swipe down from the top of the screen to bring up the control center.
Overview
Note
- Swipe up to close the Control Center.
- If the Control Center is invoked during scanning or calibration, tapping buttons within the control center will not trigger the corresponding page navigation.
① Status Bar
| Status | |
|---|---|
| Time | The format is hh:mm, and it is displayed in the 12-hour format by default; You can enable 24-hour format in Settings > Date and Time. |
| Calibration Reminder | Tap to enter the calibration process; if it's the first calibration, it will enter the Help interface.  : It has been 7 days since the last calibration.  : It has been 14 days since the last calibration. |
 Screen Cast |
The scanner is currently in casting. |
| RAM | Indicates the used memory space of the scanner.  Note When it shows  , it means that memory usage has exceeded 70%. Please pay attention to the remaining memory space to avoid the scanning experience being affected by insufficient memory during scanning. |
 Hotspot |
The scanner's wireless hotspot is currently enabled. |
| Temperature | Displays the current temperature of the device. |
| Wi-Fi | The current network connection status of the scanner. |
| Battery | Displays the current battery level of the scanner. Note If the battery level is below 20%, please replace the battery in time or use the accompanying USB-C cable and power adapter to charge. |
② Function Panel
| Function | |
|---|---|
 |
Tap to enter the Settings interface. You can set Account, Software Update, Calibration, Wi-Fi, Hotspot, Language, Display, Date and Time, Storage, About, etc. For details, see the content below. |
-
Account
Tap here to view your account information and scanner's name.
If you are not logged in
- Tap Log in to enter the passort login interface.
- Tap Device Name to modify the scanner's name in the pop-up.
If you are logged in
- Your passport account and name information will be displayed.
- Tap Device name to modify the scanner's name in the pop-up.
- Tap Switch account to enter the passport login interface.
- Tapping Log out will prompt a confirmation dialog box.
Note
Switching accounts does not affect the files already in the scanner.
-
Software Update
Tap Check for Update to automatically check if the current software is the latest version.
- If an update is detected, tap Download the update file to initiate the download process; if you do not wish to update at this time, tap
 to cancel the download.
- After the download is complete, tap Install Now to proceed with the software installation.
- After the update (download and installation) is complete, the scanner will automatically restart.
Note
- During the download process, you can leave the current interface, and the update process will complete in the background, displaying as
 at the top of the interface.
- Ensure the scanner has sufficient battery to avoid shutdown during the update process.
- If prompted "download update interrupted", please follow the instructions.
- Do not operate the scanner during installation.
- Software updates can not be performed if the batteries are not installed.
- If an update is detected, tap Download the update file to initiate the download process; if you do not wish to update at this time, tap
-
Calibration
-
If you are using the scanner for the first time, please bind the calibration board included in the box; after successful binding, the calibration board number will be displayed here.
-
Tap the corresponding button in the calibration status to enter the respective calibration process; if it is your first calibration, you will first enter the Help interface.
-
-
Wi-Fi
-
Wi-Fi is enabled by default; for the use of the Available Networks section, please refer to Connect to Network.
-
If you are connected to the network but the network status is abnormal, tap Network Diagnosis to open a pop-up, then tap Start diagnosis to diagnose the network connection.
-
-
Hotspot
Disabled by default. When enabled, the scanner will display the hotspot icon
in the status bar; the hotspot name is fixed as "EinScanMedix_xxx" and the password is fixed as "EinScanMedixa".
-
Language
You can switch the current interface language to Simplified Chinese, English, Deutsch or français.
-
Display
Supports adjusting the screen brightness.
-
Date and Time
- Set time and date automatically: After connecting to the network and enabling it, the scanner will automatically synchronize the time of the time zone.
- Time zone: You can manually select the time zone; after that, the time displayed in the upper left corner of the scanner will be the time of selected time zone.
- 24-hour system: When enabled, the scanner will display the time in 24-hour format.
-
Storage
Displays the scanner's disk space usage, including used amount, total storage capacity, and percentage.
-
About
Displays basic information such as scanner's name, serial number, warranty status, software version, RAM, storage, WLAN address, privacy policy, contact us, etc., along with certification information and the Factory Reset option.
Note
- You can modify the scanner's name and view the specific content of the warranty status and privacy policy.
- Tapping Factory Reset will prompt a secondary confirmation pop-up; tapping Confirm will start the reset process (non-cancellable).
| Function | |
|---|---|
| Wi-Fi | Tap the icon to quickly enable  or disable  the wireless network connection. |
| Storage | Percentage of used memory space on the scanner. Tap to enter Settings > Storage. NoteWhen this icon  , appears, the used memory exceeds 70%. Monitor remaining storage space and clean up unnecessary project files promptly. Insufficient memory during scanning may degrade the scanning experience. |
| Screen Brightness |  : Decrease brightness.  : Increase brightness. |
| Calibration |  : Tap to start the calibration process. For first-time calibration, the Help screen for calibration will open.  : The calibration entry is unavailable. This may occur during scanning or calibration. |
| Screen Casting |  : Screen casting is currently unavailable during scanning or calibration.  : Screen casting is enabled. Tap to open the screen casting application interface. |
| Hotspot | Entry to Wireless Hotspot Settings. Tap the icon to quickly enable  or disable  the hotspot. |
| Feedback | Tap  to open the page, where you can view the contact phone number or export logs. |
| Connect EXScan Medixa | Tap  to open this module for the device's Wired Connection or Wireless Connection. |