Mesh Edit
After mesh, in the  Mesh interface, you can
  clip the mesh,
  process the mesh,
  map the texture and
  measure the model.
Interface Overview
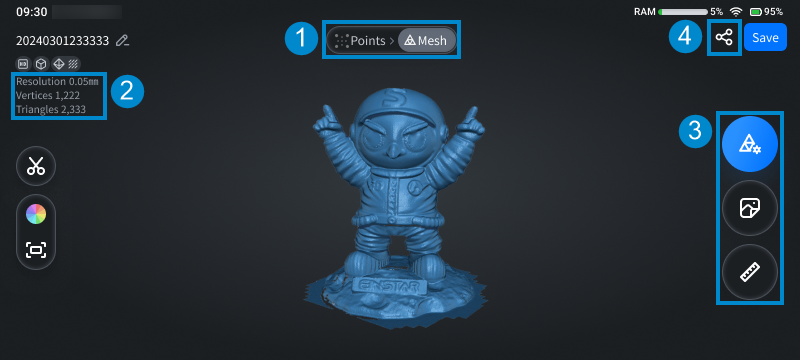
Note
- For mesh clipping, Select Through can be enabled (by default), and only visible data can be selected when disabled; for more introduction to the clipping function, please see data clipping.
- For the introduction to other information in this interface, please see interface overview.
| Function | Description | |
|---|---|---|
| Switch data | Tap to switch the displayed data of the model to  Points or Mesh. Points or Mesh. |
|
| Project information | Display the data information (resolution, vertices and triangles) of the current project; for more, see project information. | |
| Function buttons | : Mesh edit. Tap this button and the window of Mesh Processing will appear in the right, where you can use  Texture Adjustment: Texture Adjustment:Drag the slider  to adjust the brightness, contrast, color temperature and saturation (the default value is 0 and the range is -100 ~ 100); the texture adjustment effect can be previewed in real time, and you can tap Complete to save the settings. to adjust the brightness, contrast, color temperature and saturation (the default value is 0 and the range is -100 ~ 100); the texture adjustment effect can be previewed in real time, and you can tap Complete to save the settings. Note Note
: Texture mapping.Note
 : Measure. : Measure. |
|
 Share Share |
Share the mesh model to SHINING 3D Cloud; for more, see save and share. |
 Cannot adjust, the model doesn't have texture".
 Texture Display is always enabled and can not be disabled.