Settings
You can adjust the scanning settings for the current project in the scan interface.
Laser Scan
Align Mode
| Align Mode | Supported Marker Size | |
|---|---|---|
| Markers Alignment | Completes alignment using markers, suitable for objects with distinct geometric features, flat areas with minimal geometric features, and scenes requiring accuracy. | |
| Global Markers | Completes alignment using markers, suitable for objects lacking rich and variable geometric features and requiring high accuracy. | |
| Feature Alignment | Automatically completes alignment using the geometric features of the scanned object's surface, suitable for objects with rich geometric features or those that cannot have markers pasted. |
Note
- Markers and features can be used together for alignment.
- Acquire Texture cannot be enabled in Feature Alignment mode.
Warning
- When scanning with feature alignment, ensure the scanner's remaining battery is greater than 25%.
-
Projects that include feature alignment cannot be saved in the same project group with projects using only marker or global marker alignment.
Project A / Project B Features Alignment Features + Markers Alignment Markers Alignment Features Alignment ✓ ✓ ✗ Features + Markers Alignment ✓ ✓ ✗ Markers Alignment ✗ ✗ ✓
Resolution
You can adjust the resolution in real-time by dragging the slider or fill in the value before scanning or after pausing the scan.
Note
- If a project group contains more than one project, this function is not available for the second or later projects.
- It is recommended that you enable the data quality indicator and rescan the areas with lower quality (yellow areas) after changing the resolution.
Light Source Mode
| Light Source Mode | Description |
|---|---|
| 38 Lines | This mode is suitable for rapid scanning. |
| 7 Lines | This mode is suitable for detailed scanning. |
Scan Target
It supports scanning of both normal objects and reflective objects. When scanning reflective objects, select Reflective to improve the scanning effect.
Brightness
The red dots in the camera window indicate overexposed areas. To improve scanning quality, it is recommended that you lower the camera brightness when there are large overexposed areas, or increase the camera brightness when the camera window is too dark.
Note
When scanning textures, if the light is too dim, click  on the texture camera window to turn on the texture fill light.
Acquire Texture
Once enabled, real-time texture mapping can be applied to the scanned data.
Note
This function cannot be enabled when the alignment mode is Feature Alignment.
Data Quality Indicator
When enabled, it will differentiate scan quality in colors: blue represents high-quality scanned data and yellow represents insufficient scanned data that requires further scanning.
Note
This function is unavailable when scanning global markers.
Outdoor Mode
To scan normally in the glare environment such as outdoors.
Caution
Please avoid direct sunlight when scanning.
Local Enlarged View
When the function is enabled, the scanning interface only displays the local perspective of the scanned object, which can be used for supplementary scanning of small holes.
Note
When the resolution is less than 0.2 mm, it is recommended that you enable this function.
View Lock
When the function is enabled, the view will be locked during scanning and not follow the scanning path, which can be used for scanning data from the locked view.
IR Scan
-
Camera Window
Preview the actual scene during scanning. Parameters can be adjusted accurately through the camera window.
-
Brightness
The red dots in the camera window indicate overexposed areas. To improve scanning quality, it is recommended that you lower down the camera brightness when there are large overexposed areas, or increase the camera brightness when the camera window is too dark.
Note
- Click
 to enable auto exposure so the scanner can adjust the brightness automatically according to the actual situation.
- When scanning textures, if the light is too dim, click on the texture camera window to turn on the texture fill light.
Col
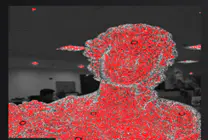
Brightness is too high
Col
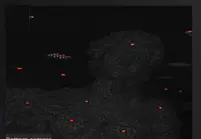
Brightness is too low
Col
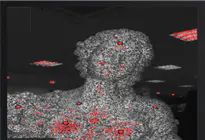
Brightness is proper
- Click
-
Working Distance Adjustment
Drag the slider to adjust the working distance and the scanner scans only within the set distance. This function can effectively filter out unnecessary noise data.
-
Plane Detection
When enabled, it can reduce the possibility of misalignment.
Note
- If you need to scan flat or featureless objects, it is recommended that you place markers to assist with alignment.
- If this function does not work well, you can try using Auto Cutting Plane.
-
Data Quality Indicator
When enabled, it will differentiate scan quality in colors: blue represents high-quality scanned data and yellow represents insufficient scanned data that requires further scanning.
Note
Show the color only before generating the point clouds.
-
Auto Cutting Plane
When enabled, it will automatically identify the base plane and mask the scanned data below it during scanning; you can effectively filter out unnecessary noise data through this function, improving data processing efficiency.
Note
The marked plane during the scanning preview process can change in real-time and the last marked plane at the end of the scanning preview will be the final plane.
-
Adjust Resolution
You can adjust the resolution in real-time by dragging the slider or fill in the value before scanning and after pausing the scan.
Note
- If a project group contains more than one project, this function is not available for the second or later projects.
- It is recommended that you enable the data quality indicator and rescan the areas with lower quality (yellow areas) after changing the resolution.
-
Camera Window
Preview the actual scene during scanning. Parameters can be adjusted accurately through the camera window.
-
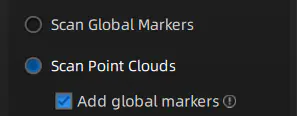
Scan Mode
Col
In Global Markers mode, scan the global markers first before scanning the point cloud.
Col
Note
- Click
 Open global markers file to import global markers files.
- The Add global markers cannot be ticked during the scanning.
- If the Add global markers is ticked before scanning the point clouds, new markers recognized during the scanning process will be added, but the newly added markers will not be saved to the opened global markers file.
- Click
-
Brightness
The red dots in the camera window indicate overexposed areas. To improve scanning quality, it is recommended that you lower down the camera brightness when there are large overexposed areas, or increase the camera brightness when the camera window is too dark.
Note
- Click to enable the auto exposure and the scanner can adjust the brightness automatically according to the actual situation.
- When scanning textures, if the light is too dim, click on the texture camera window to turn on the texture fill light.
- Click
Col
Brightness is too high
Col
Brightness is too low
Col
Brightness is proper
-
Working Distance Adjustment
Drag the slider to adjust the working distance and the scanner scans only within the set distance. This function can effectively filter out unnecessary noise data.
-
Data Quality Indicator
When enabled, it will differentiate scan quality in colors: blue represents high-quality scanned data and yellow represents insufficient scanned data that requires further scanning.
Note
Show the color only before generating the point clouds.
-
Auto Cutting Plane
When enabled, it will automatically identify the base plane and mask the scanned data below it during scanning; you can effectively filter out unnecessary noise data through this function, improving data processing efficiency.
Note
The marked plane during the scanning preview process can change in real-time and the last marked plane at the end of the scanning preview will be final plane.
-
Adjust Resolution
You can adjust the resolution in real-time by dragging the slider or fill in the value before scanning and after pausing the scan.
Note
- If a project group contains more than one project, this function is not available for the second or later projects.
- It is recommended that you enable the data quality indicator and rescan the areas with lower quality (yellow areas) after changing the resolution.
Real-Time AI Isolation
Real-Time AI Isolation is supported only for IR scanning and can be used in both Portrait and Object modes. When enabled, the software automatically identifies the subject to keep and retains only the subject area during scanning, which is suitable for scanning scenes where the background or extra objects need to be excluded.
Caution
Only supported on NVIDIA GeForce RTX 3060 or higher discrete graphics cards. If the current graphics card is not supported, the switch is unavailable after entering the scan interface.
Note
Real-Time AI Isolation is not supported when the alignment mode includes markers or when Global Markers is used.
Enable the Function
-
In the pause scanning state, turn on the Real-Time AI Isolation switch in the Scan Settings panel on the left.
Note
Each time you enter the scan interface, the switch is off by default; it cannot be switched after scanning starts, so pause scanning first.
-
After enabling, if the camera window is collapsed, the software expands it and displays both the monochrome camera window and the texture camera window; you can collapse them manually.
Note
- The texture camera window is used to select areas to keep or remove and does not affect texture acquisition or texture alignment; the window brightness and fill light can be adjusted as usual.
- In the pause scanning state, the camera window does not display the image and areas cannot be selected; enter scan preview before making a selection.
Select Areas to Keep
In the texture camera window, select areas to keep or remove by clicking:
- Left-click the subject area to keep.
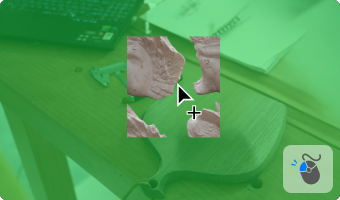
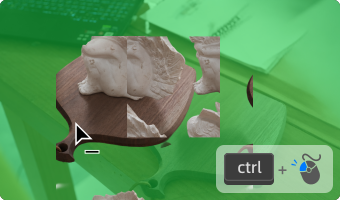
- Right-click the area to remove, or hold Ctrl and left-click the area.
- Click
 to clear the current selection; no data is retained in the current view.
Note
After clicking, the areas to be removed are immediately displayed as a green semi-transparent mask, while the areas to be kept retain their original color.
Start Scanning
When scanning starts, the software uses the current selection as the area to keep; during scanning, you can still click or clear the selection in the texture camera window, and changes are applied immediately to subsequent scanned data.
Note
- The software remembers the last selection used by the current project; when scanning is paused or Real-Time AI Isolation is turned off and then turned on again, the selection is restored.
- The selection is no longer retained after deleting the current project data, switching projects, or closing the project.
- Only the part not covered by the mask is retained in the scanned data; after the function is turned off, subsequently scanned data is no longer segmented.