Interface
After the device is powered on, it defaults to the home page (except for first use), where you can view all project groups and the device status.
Home Page

-
Calibration
Displays the date of the most recent calibration. Tap to enter the calibration interface.
 -
Status Bar
Displays information about the current device network, temperature, remaining battery, disk space, and system memory usage.-
 : USB drive recognized.
 -
 : Network connection status. A weak Wi-Fi signal will affect wireless transmission speed.
 -
 : Hard drive used space and total space. When remaining space is less than 10 GB, the icon will turn red, suggesting to clean up local project group files and clear the cache.
  : Memory usage ratio. When the ratio > 95%, the icon will turn red, indicating that data processing requires a large amount of memory, and it is recommended to create a new project for scanning.
 : Device temperature. Red indicates that the temperature is too high. Pause scanning if the temperature exceeds the limit. Before calibration, warm the device.
 : Warming up. Displayed while the device is in the preheating phase. Once warming up is complete, the icon reverts to the standard device temperature icon.
 : Calibration Recommended. In a non-warming-up state, this icon appears if the current temperature deviates from the calibration temperature by the set threshold.
 : Remaining Battery Level. The icon turns red when the charge level is ≤ 20%, indicating that charging or a battery replacement is recommended. Click the icon to view detailed battery bay status.
 : Energy saving mode. The device is currently in energy-saving state, and will automatically enter this state when the device temperature is too high. At this time, the device's data processing rate will decrease.
-
-
Project Groups
Displays the names, creation times, and occupied space sizes of all project groups. -
Settings
In the settings, you can complete calibration, network settings, and general device settings. -

Tap to create a new project group. -
Use Template
Refer to Scan Template. -
Select
When there are project groups, you can tap Select to manage the project groups.
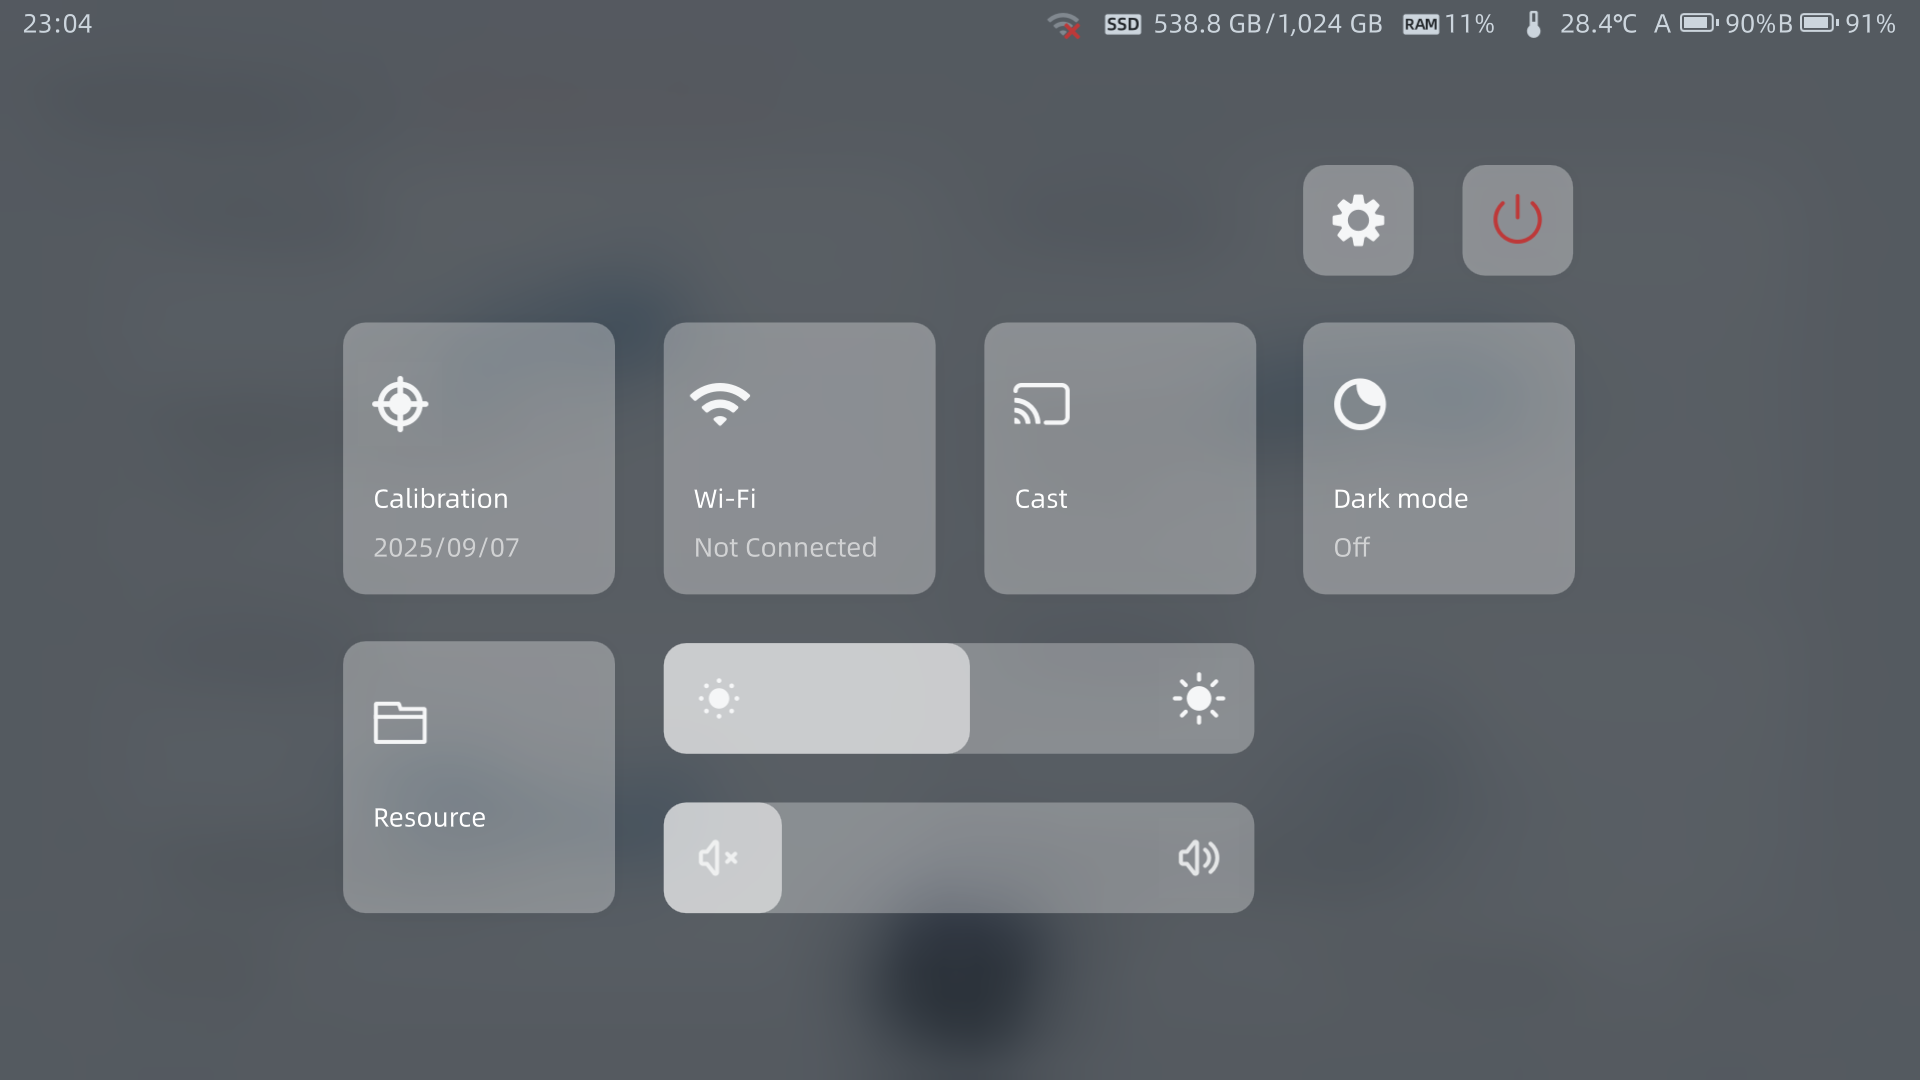
Control Center
Pulling down from the top of the screen will display the control center. Through the control center, you can quickly access device calibration and other settings.
-
Account Information After activation, it shows the Shining3D Pass username and email.
-
Settings
Tap to enter system settings. -
Shutdown
Taping will pop up a secondary confirmation menu, allowing for restart, reset and shutdown operations. -
Shortcuts
 : Tap to enter the calibration interface. The calibration date will be displayed after successful calibration.
 : Tap to enter Settings > Network Settings to manage Wi-Fi.
 : Tap to enter Settings > General > Cast to select the mirroring device.
 : Tap to switch between dark and light themes.
 : Tap to enter the Resource Center.
 -
Screen Brightness Adjustment
Drag the slider to adjust the screen brightness. -
Volume Adjustment
Drag the slider to adjust the media volume.
Settings
Tap Settings on the home page or the control center's ![]() to enter the Settings interface.
to enter the Settings interface.
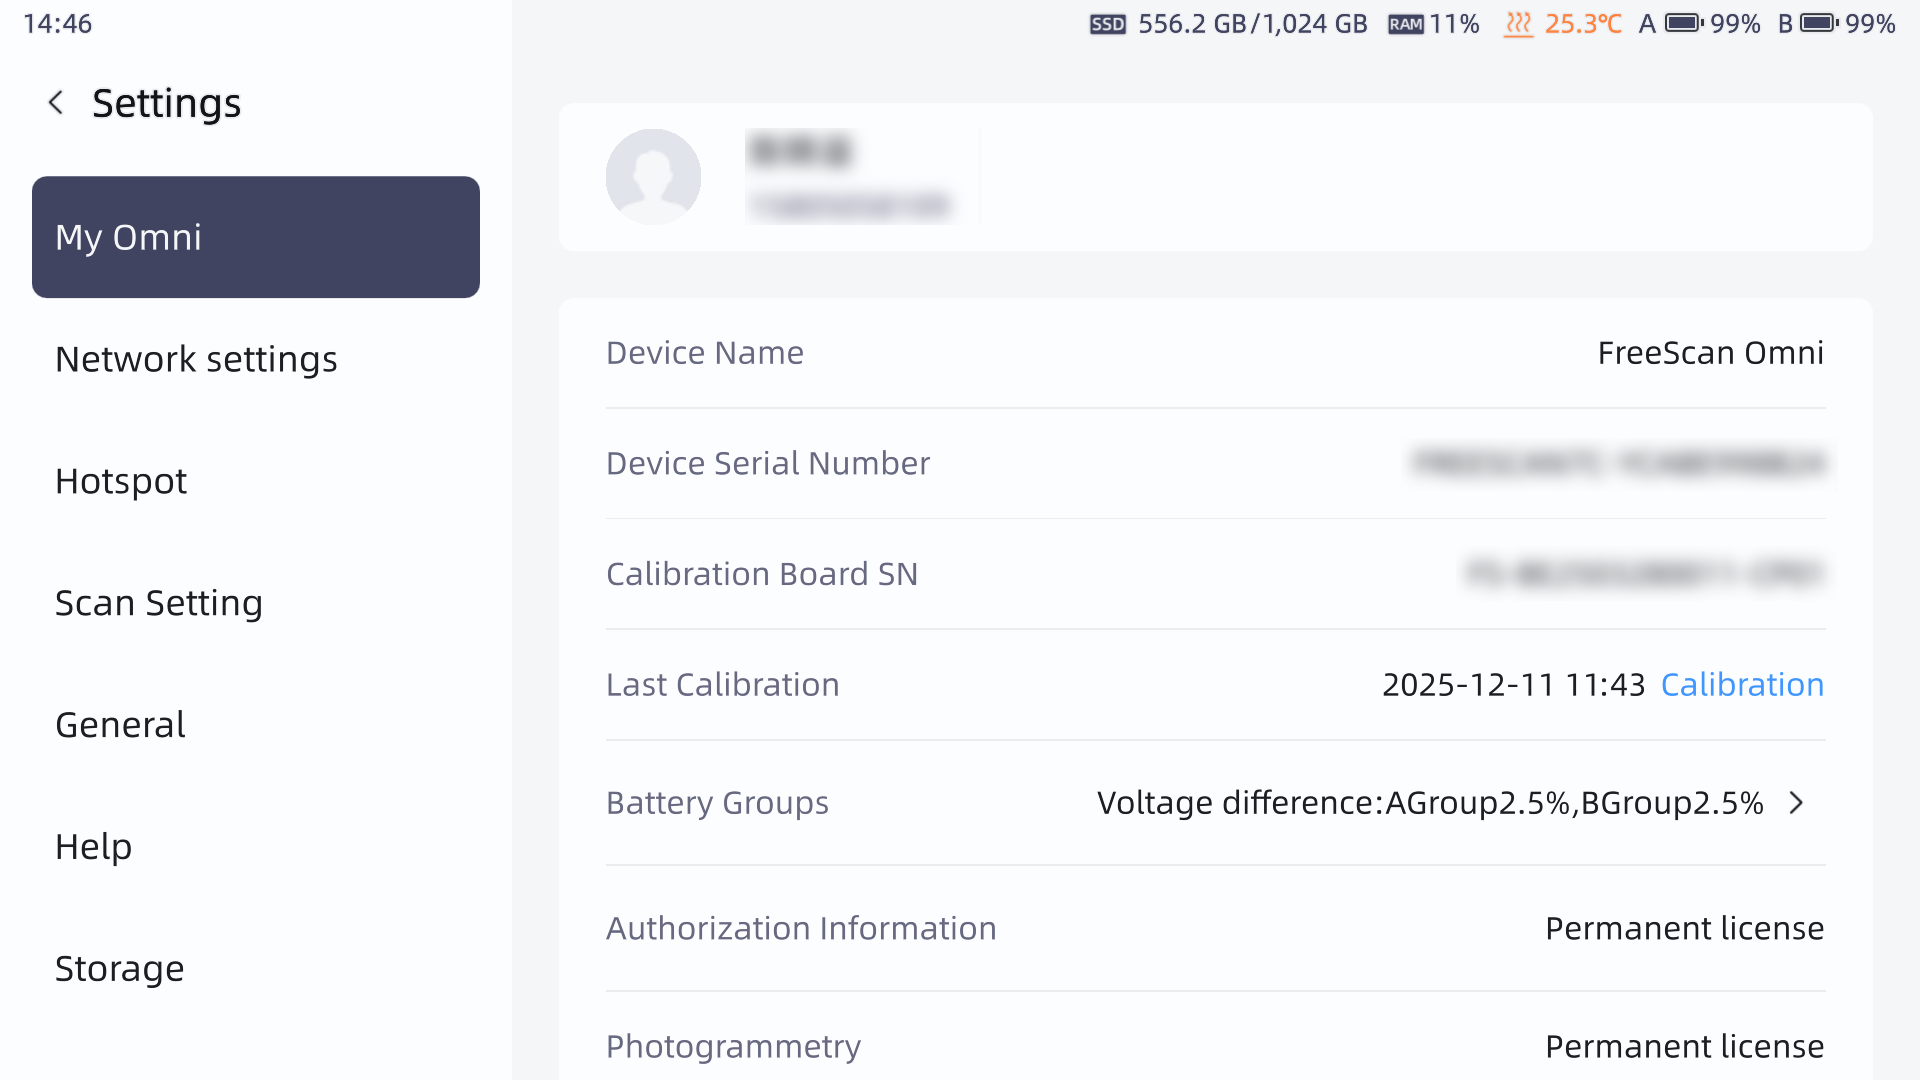
My Omni
Used to display user and device-related information.
User Information
After successful login, it shows the user avatar, name, and email.
Device Information
-
Device Name
The model name of the device. -
Device Serial Number
The device serial number is the unique identifier for the device, which needs to be provided for after-sales service or technical support. -
Calibration Board SN
Used for calibration-related operations. -
Last Calibration
Displays the last calibration time of the device. You can tap the Calibration on the right to enter the calibration function interface and complete recalibration. -
Battery Compartment Information
Displays voltage difference for A and B battery compartments. Tap to view the temperature and voltage of each battery.
-
Authorization Information
Displays the device authorization status and expiration date. -
Photogrammetry
Displays the authorization status and expiration date for Photogrammetry. -
AI Feature Recognition
Displays the authorization status and expiration date for AI Feature Recognition. -
Auto Inspect
Displays the authorization status and expiration date for Auto Inspect.
Network Settings
Used to manage the device's Wi-Fi connection status and available network list. Through this page, you can view the currently connected network, change the Wi-Fi connection status, and select other available networks.
Hotspot
Through the hotspot, other devices can join the same network for casting or scanning via the FreeScan software.
Scan Settings
-
Temperature Control
When enabled, the device remains in a warm state during sleep to keep accuracy.Caution
Incomplete warming does not affect the use of calibration and scanning functions, but accuracy may be impacted.
-
Real-time Resolution Display
When enabled, the scan data will have higher resolution, but may take longer processing time. -
Scanning Distance Indication Method
Choose the method of distance indication, which can be either Histogram or Laser Line Indicator. -
Local Resolution Circle
The circle refers to the scan area in local resolution mode. Changing the circle size changes the size of the scan area. -
Minimum Number of Marker Splices
Default is 4 markers, can be switched to 3 markers. -
Shape Detection Optimization
This feature improves scanning precision in 93-line (crossed lasere lines) scanning mode. It can be enabled before project creation, but may reduce scanning speed.Caution
- After scanning global markers and moving to the scanning phase, additional markers cannot be added while this feature is active.
- Scan data editing is disabled during scanning pauses; modifications can only be made during post-processing.
- The feature is automatically disabled when switching to partial resolution scanning or AI feature recognition modes.
-
Auto-Create Clipping Plane
Use Magnetic encoding dots to automatically create cutting planes during scanning.
General
-
Language
Tap to change the device language. -
Time Zone
Tap to change the device time zone. -
Auto Screen off
If the device has not processed data or has not been operated for the set duration, it will automatically turn off the screen. -
Sleep Mode
After the screen turns off, if the idle time reaches the set sleep duration, the device will enter sleep mode to reduce power consumption and extend standby time.Note
The device will not enter general sleep mode under the following conditions:
- When charging on the AP charging dock
- When processing data (e.g., installing updates, restoring factory settings, generating global markers, meshing, exporting, calibrating, clearing cache, etc.)
- When connected to PC software
-
Cast
The screen mirroring function supports wirelessly transmitting the content on the scanner's screen to supported devices, such as smart TVs or computer monitors, using Wi-Fi or a hotspot.Caution
- When using Wi-Fi for wireless connection, the mirroring device and the scanner must be connected to the same Wi-Fi; if using a wireless connection, the hotspot will be automatically enabled, and the mirroring device should connect to this hotspot.
- If the dock is connected to the PC, and the scanner is connected to the dock's hotspot, then the dock and the PC are on the same local network, and the scanner can also mirror to the PC.
-
Warm Up
After you turn it on, the device will start warming up. This process helps the scanner stay accurate and stable. You can set the allowed temperature difference between calibration and scanning. If the temperature changes too much, will appear in the status bar.While warming up, you can choose fast warm-up mode. In this mode, the device projects laser lines to speed up the process and save time.
Caution
- Do not look directly at the laser source while the lasers are on.
- The device will automatically exit fast warm-up mode if you start calibrating or if you create or open a project.
-
Scan and Identify Calibration Board Code
When enabled, you need to scan the calibration board barcode before calibration. This prevents the use of incompatible calibration board. -
DHCP
When enabled, the device will automatically assign network configuration parameters when connecting to PC software. -
Auto-Connect Dock WiFi
Once turned off, the device won't automatically connect to the smart dock's WiFi when docked for charging. -
Volume
Tap to turn the device volume on/off or drag the bar to adjust volume. -
Dark Mode
Tap to choose between light theme or dark theme.
Help
You can view the QR code for this user manual and find the contact information.
Storage
-
Storage
Displays the used storage space and remaining storage space of the device. -
Cache
The cache consists of local logs, images, and other temporary data generated during device use.
Tap Clear to permanently delete cache data.Note
Clearing the cache will not affect normal use.
Factory Default
Restoring factory default will reset the settings parameters and clear personal information and project data on the device. Please confirm whether you need to clear the data before proceeding.
Note
- If you choose Restore Scan Settings, the current settings parameters will be reset to their initial state.
- If you choose Factory Default, the current logged-in account and settings parameters will be reset to their initial state.
- All project group files can also be selected for synchronization clearing. Please ensure that important data is backed up.
About
In the About interface, you can view the current software version and firmware version of the device, and the Privacy Policy and User Experience Program.