Assisted Feature Creation
Support assisted feature creation through  CAD auto create,
  fit and
  from features.
Note
After completing the feature creation, you can right-click on that feature group in the left-side tree view and select Set as datum, and the created feature can be set as datum in measuring parallelism or perpendicularity in GD & T.
CAD Auto Create
Create features by directly clicking on the CAD model to select geometric shape features (line, single plane, circle, sphere, cone, cylinder, etc.)
Note
- Before creating geometric features using the CAD auto creation method, please import a reference model.
- This method can only create reference features.
- If you need to extract features to generate feature pairs, please import at least one measured model.
The steps for creating features through CAD Auto creation as well as extracting measured features are as follows:
- SelectCAD Auto Create in the Assisted Feature Creation toolbar to enable the tool.
- Click on the highlighted geometric feature of the model in the 3D scene to create, and click Apply in the window of CAD Auto Create to save the reference geometric feature, and the reference geometric object (
 point,
  line,
line,  plane,
  circle,
  sphere,
  cone,
cone,  cylinder, etc.) will be displayed in the
 feature module in the left-side tree view.
 - Right-click on that geometric feature group in the left-side tree view, select Extract Measured Features and determine the measured model on which the feature will be extracted.
- In the pop-up window, select an align mode, edit parameters including max distance and boundary exclusion distance, as well as set eliminate noise, and click Apply to create the corresponding measured geometric feature.
Fit
Create features by fitting geometric shapes through selecting points on the mesh model.
Note
- Before creating geometric features using the fit method, please import a reference model or a measured model (meshed).
- This method can only create reference features.
- If you need to extract features to generate feature pairs, please import at least one measured model.
The steps for creating features through fit are as follows:
Col
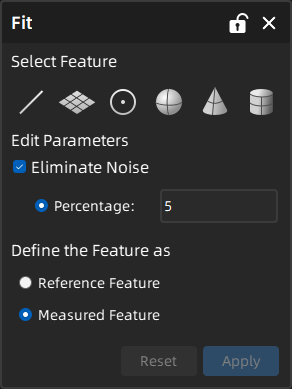
- SelectFit in the Assisted Feature Creation toolbar to open the corresponding window.
- Select feature, edit parameters including eliminate noise, as well as define the feature as reference feature or measured feature (default).
- After completing relevant settings, you can select tools in the toolbar under the 3D scene, and select areas to be fitted on the model; Then click Apply to save the feature, which will be displayed in the feature module in the left-side tree view.
Col
Note
If you define the feature as the reference feature, then you can extract measured feature.
The introduction to toolbar as well as shortcuts is as follows:

| Icon | Name | Description |
|---|---|---|
 |
Sphere | Select mesh vertices on the surface of the mesh model to choose the fitting region. Note NoteAfter enabling this function, other selection tools or the select through function can not be used. |
 |
Magic Wand | Automatically select adjacent regions on the surface of the mesh model based on curvature.Note After enabling this function, other selection tools or the select through function can not be used. |
 |
Select Through | Disabled by default, which means only visible surfaces can be selected; It can be enabled to select both the front and back regions of the model. |
 |
Rectangle | Select / Deselect the data area in the form of  rectangle. rectangle. |
 |
Polygon | Select / Deselect the data area in the form of  polygon. polygon. |
 |
Lasso | Select / Deselect the data area in the form of  lasso. lasso. |
 |
Brush | Use brush (support brush adjusting) to select / deselect the data area. |
| Function | Shortcut |
|---|---|
| Select | Shift+left-button |
| Deselect | Ctrl+left-button |
| Delete | Use left-button to select and press Del |
| Adjust the size brush | Shift+left-button |
Note
For more shortcuts, please refer to  > Shortcut Instructions in the top right corner of the interface.
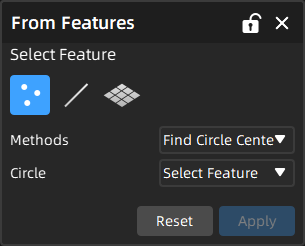
From Features
Create new features based on existing features, including creating point features from the center of a circle / sphere, creating line features based on the axis of a cylinder / cone, and creating surface features using face averaging.
Note
- Before creating geometric features using this method, please import a reference model or a measured model, and ensure that there exists at least one created feature.
- This method can create reference features or measured features, but the feature created from the measured feature can only be measured feature.
- If you need to extract features to generate feature pairs, please import at least one measured model.
The steps for creating features from features are as follows:
Col
- SelectFrom Features in the Assisted Feature Creation toolbar to open the corresponding window.
- Select feature to be created as point or line, and select method as well as a created feature; Or select feature to be created as plane, and select method as average.
- (Optional) If you select the feature to be created as plane, you need to click on the model to select the plane.
- Click Apply to save the feature, which will be displayed in thefeature module in the left-side tree view.
Col