Track Mode
In this mode, the tracker and the scanner need to be online and used together, making it suitable for scanning medium to large-sized objects.
Note
- In Track Mode, scanning of 6 mm and 12 mm markers is supported.
- In Track Mode, the tracker and the scanner must be online simultaneously; when scanning, make sure the scanner is within the visible range of the tracker.
- Before starting the scan, please ensure the computer is connected to a power source or that High-Performance mode is enabled; for how to enable and check the status of High-Performance mode, please refer to the FAQ chapter.
| Scanning Scenario | |
|---|---|
| Single-station Scanning | Suitable for medium-sized scanning scenarios. You can scan directly in Scan Point Cloud mode without applying markers. |
| Standard Station Transfer scanning | Suitable for medium to large-sized scanning scenarios. You need to first scan markers in Scan Global Markers mode or first import a global markers file, and then scan in Scan Point Cloud mode. |
| Hybrid Leapfrog | Suitable for extra-large scanning scenarios. You need to first scan markers in Scan Global Markers mode, and then scan in Scan Point Cloud mode. At least 4 common markers are required for each station transfer. |
| Scan Mode | |
|---|---|
| Scan Global Markers | Only markers on the object surface can be scanned in this mode. By capturing the markers, the object's reference marker data can be quickly obtained. Note Note |
| Scan Point Cloud | Scans directly to generate point cloud data. |
| Local Resolution | Save scanning time and get an ideal scanned data in this way. |
Single-station scanning
It is recommended to choose single-station scanning to quickly obtain the 3D data of the object through Scan Point Cloud mode when scanning medium-sized objects which is inconvenient to apply markers.
Note
During single-station scanning, no markers need to be applied, but make sure that the tracker and the scanned object do not move at all.
Scan Point Cloud
In the settings on the left side of the scanning interface, select Track Mode > Single-station Scanning, and the scanner will automatically switch to Scan Point Cloud mode.
Note
If texture data is required, check Acquire Texture and adjust the texture camera brightness.
-
(Optional) Click
 on the right side of the interface, or lightly press the scan key on the scanner, to enter preview scan mode, where you can adjust scan settings based on the preview effect.
Note
- The data scanned at this time is not automatically saved; it is used only for viewing the scan effect.
- You can turn off the Scan Preview function via
 in the upper-right corner of the interface; after turning it off, the preview scan step can be skipped during scanning.
-
Click
 on the right side, or lightly press the scan key on the scanner, to begin scanning.
 - During scanning, watch the image data on the screen in real time, adjust the scanning distance in time, and move the scanner slowly and steadily until the object to be scanned is fully scanned, that is, after enabling the quality color map, the scanned data appears blue.
- Click
 or lightly press the scan key on the scanner to pause scanning.
 - Check the data integrity through operations such as rotating and zooming.
- (Optional) If the data is incomplete, click again or lightly press the scan key on the scanner again to continue scanning.
Note
If the scanned object is too large, it is recommended to create multiple sub-projects to scan different parts of the object one by one; for sub-project management and feature descriptions, please refer to the Project Settings chapter; for alignment of each project, please refer to Project Alignment.
After the scan is complete, click  to save the scan data, or click
  to mesh the data for post-processing, measurement, and other operations; you can also switch to Local Resolution mode for fine scanning of detailed areas.
Local Resolution
-
After obtaining object data through Scan Point Cloud, you can enable Local Resolution.
Note
- You can directly import a project with point cloud data and use Local Resolution, or follow the steps above to first scan data using Scan Point Cloud mode and then use Local Resolution.
- After Local Resolution is enabled, the light source mode will automatically switch to parallel lines; you can also switch the light source mode to cross lines or a single line based on actual conditions.
-
Select the Local Resolution mode (Standard Resolution or High Resolution). Before any scanning is performed, you can freely switch between resolution modes. Once data has been scanned using either resolution mode, you cannot switch to another Local Resolution for scanning.
Note
- Standard Resolution: After switching to Standard Resolution, the point distance will change to half of the original project point distance. Using this mode requires the project point distance to be greater than 0.2 mm.
- High Resolution: After switching to High Resolution, the point distance will change to one quarter of the original project point distance. Using this mode requires the project point distance to be greater than 0.4 mm.
-
Review the scanned object data and confirm the area that needs fine scanning.
Note
Click
 to view the data model from different angles and confirm the area that needs fine scanning; you can also rotate the data model by holding down the left button or pan the data model by holding down the middle button to confirm the area that needs fine scanning.
 -
(Optional) Click
on the right side of the interface, or briefly press the scan button on the device, to enter preview mode. Based on the preview status, you can adjust scan parameters.Note
- The data scanned at this time is not automatically saved and is only used for viewing the scanning effect.
- You can disable the scan preview function by clicking in the top-right corner of the interface. Once disabled, you can skip the preview step when scanning.
-
After adjusting the scan parameters, click
on the right, or briefly press the scan button on the device, to start fine scanning.Local Resolution Mode Model Quality Indicator Display Color
(Ideal Data)Model Quality Indicator Display Color
(Insufficient Data)Standard Dark Blue Yellow High Purple Yellow -
After scanning, you can use the bottom editing toolbar to edit the data.
Caution
If you need to switch resolution modes, click
 to delete all data in the current project; after re-scanning the point cloud data, switch to another resolution mode for Local Resolution scanning.
 -
Click
to mesh and optimize the data.Note
The point distance of Local Resolution takes effect only after meshing and optimization.
-
After optimization, you can click
to save the data or continue with operations such as post-processing and measurement.
Standard Station Transfer
When scanning medium to large-sized objects and data accuracy is required, it is recommended to choose Standard Station Transfer, first scan markers in Scan Global Markers mode or import a global markers file, and then scan in Scan Point Cloud mode.
Scan Global Markers
Select Track Mode > Standard Station Transfer, and the scanner will automatically switch to Scan Global Markers mode.
Note
- In Track Mode, the tracker must be used to scan markers.
- If markers need to be imported, import a file with more than 4 markers of 12 mm in p3, txt, asc, or dgm format; otherwise, you cannot enter Scan Point Cloud mode to continue scanning.
-
(Optional) Click
on the right side of the interface to enter preview mode. You can adjust scan parameters based on the preview effect.Note
The data scanned at this time is not automatically saved and is only used for viewing the scanning effect.
-
Click
on the right to start collecting markers. -
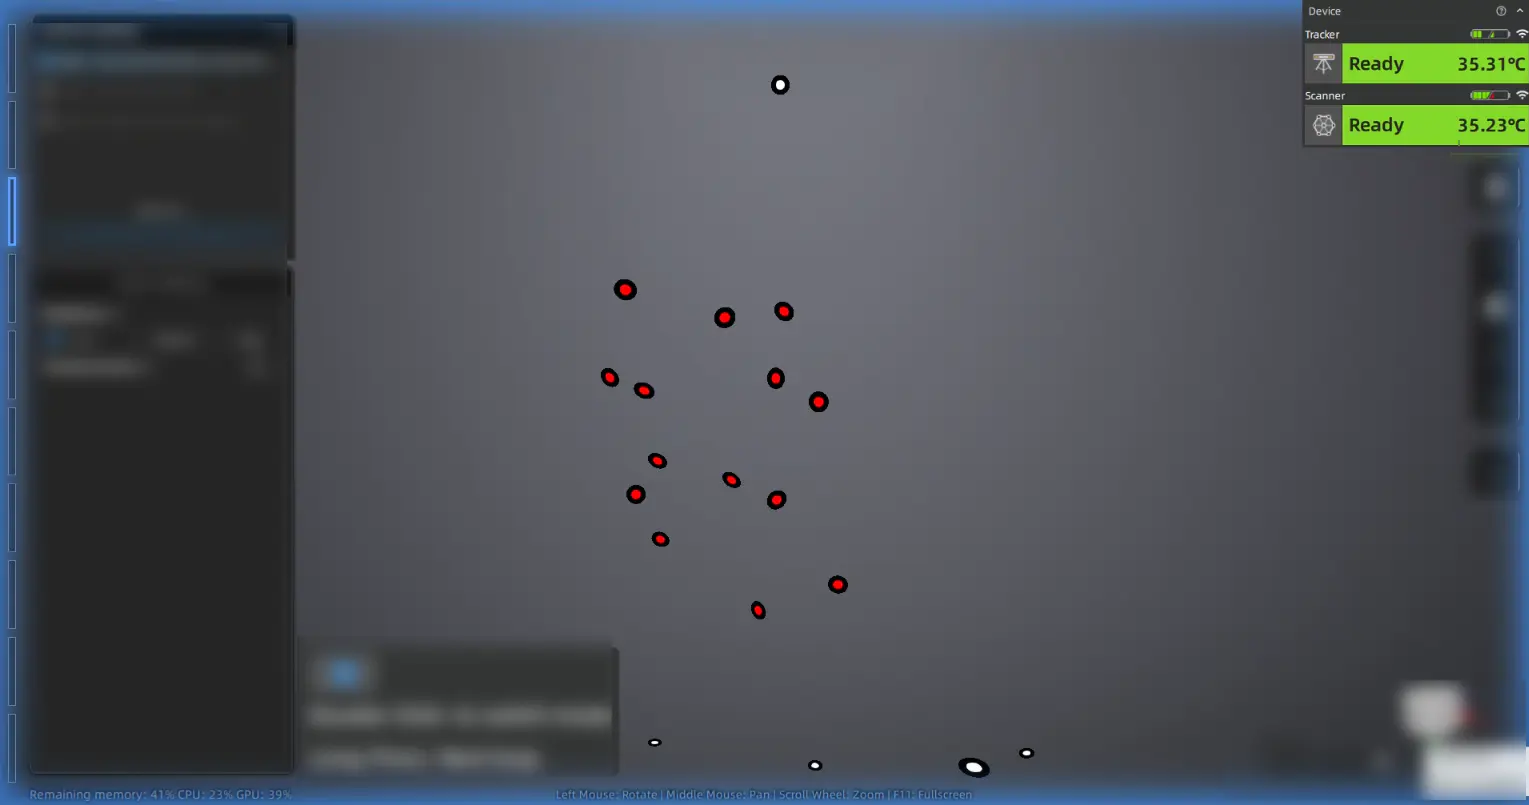
During scanning, adjust the scanning distance based on the color indicator box at the edge of the scanning interface and the on-screen distance indication:
- Blue indicates that the scanning distance is too far.
- Yellow indicates that the scanning distance is too close.
- No color indicates that the scanning distance is appropriate.
-
After scanning, click
again to pause scanning.Note
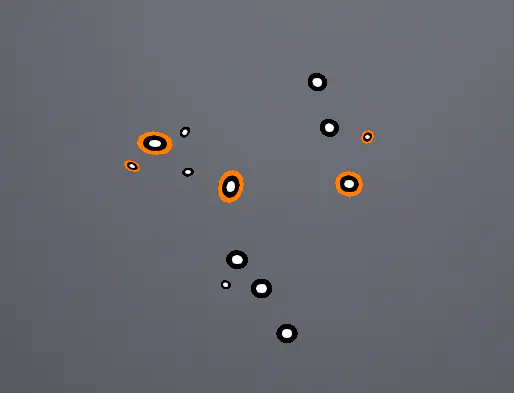
After scanning and obtaining the global markers, color indications may appear around the outer ring of the markers; after the global markers are generated, the color indication disappears.
Col
- If no other color appears around the outer ring of the markers, it indicates that the quality of the scanned markers is normal.
- If orange appears around the outer ring of the markers, it indicates that the quality of the scanned markers is low; low-quality marker data may disappear or be displayed abnormally after data processing.
Col
-
Click
 on the right to optimize the markers.
 -
Click
to save the scanned data, or switch to Scan Point Cloud mode to continue scanning.
Scan Point Cloud
Press and hold the bottom-right button of the scanner  or switch the scanning mode to Scan Point Cloud in the scanning interface.
Note
- When scanning in Track Mode, the tracker and the scanner must be online simultaneously.
- If texture data is required, check Acquire Texture and adjust the texture camera brightness.
-
(Optional) Click
on the right side of the interface, or lightly press the scan key on the scanner, to enter preview scan mode, where you can adjust scan settings based on the preview effect.Note
- The data scanned at this time is not automatically saved; it is used only for viewing the scan effect.
- You can turn off the Scan Preview function via in the upper-right corner of the interface; after turning it off, the preview scan step can be skipped during scanning.
-
Click
on the right side, or lightly press the scan key on the scanner, to begin scanning. - During scanning, watch the image data on the screen in real time, adjust the scanning distance in time, and move the scanner slowly and steadily until the object to be scanned is fully scanned, that is, after enabling the quality color map, the scanned data appears blue.
- Click or lightly press the scan key on the scanner to pause scanning.
- Check the data integrity through operations such as rotating and zooming.
- (Optional) If the data is incomplete, click again or lightly press the scan key on the scanner again to continue scanning.
Note
If the scanned object is too large, it is recommended to create multiple sub-projects to scan different parts of the object one by one; for sub-project management and feature descriptions, please refer to the Project Settings chapter; for alignment of each project, please refer to Project Alignment.
After the scan is complete, click to save the scan data, or click to mesh the data for post-processing, measurement, and other operations; you can also switch to Local Resolution mode for fine scanning of detailed areas.
Local Resolution
-
After obtaining object data through Scan Point Cloud, you can enable Local Resolution.
Note
- You can directly import a project with point cloud data and use Local Resolution, or follow the steps above to first scan data using Scan Point Cloud mode and then use Local Resolution.
- After Local Resolution is enabled, the light source mode will automatically switch to parallel lines; you can also switch the light source mode to cross lines or a single line based on actual conditions.
-
Select the Local Resolution mode (Standard Resolution or High Resolution). Before any scanning is performed, you can freely switch between resolution modes. Once data has been scanned using either resolution mode, you cannot switch to another Local Resolution for scanning.
Note
- Standard Resolution: After switching to Standard Resolution, the point distance will change to half of the original project point distance. Using this mode requires the project point distance to be greater than 0.2 mm.
- High Resolution: After switching to High Resolution, the point distance will change to one quarter of the original project point distance. Using this mode requires the project point distance to be greater than 0.4 mm.
-
Review the scanned object data and confirm the area that needs fine scanning.
Note
Click
to view the data model from different angles and confirm the area that needs fine scanning; you can also rotate the data model by holding down the left button or pan the data model by holding down the middle button to confirm the area that needs fine scanning. -
(Optional) Click
on the right side of the interface, or briefly press the scan button on the device, to enter preview mode. Based on the preview status, you can adjust scan parameters.Note
- The data scanned at this time is not automatically saved and is only used for viewing the scanning effect.
- You can disable the scan preview function by clicking in the top-right corner of the interface. Once disabled, you can skip the preview step when scanning.
-
After adjusting the scan parameters, click
on the right, or briefly press the scan button on the device, to start fine scanning.Local Resolution Mode Model Quality Indicator Display Color
(Ideal Data)Model Quality Indicator Display Color
(Insufficient Data)Standard Dark Blue Yellow High Purple Yellow -
After scanning, you can use the bottom editing toolbar to edit the data.
Caution
If you need to switch resolution modes, click
to delete all data in the current project; after re-scanning the point cloud data, switch to another resolution mode for Local Resolution scanning. -
Click
to mesh and optimize the data.Note
The point distance of Local Resolution takes effect only after meshing and optimization.
-
After optimization, you can click
to save the data or continue with operations such as post-processing and measurement.
Hybrid Leapfrog
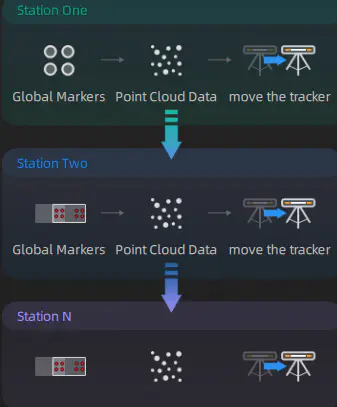
When the object or scene to be scanned is large and there are fewer markers in the scanning scene, it is recommended to use the hybrid leapfrog scanning method. Scan markers in Scan Global Markers mode first, then scan in Scan Point Cloud mode, and repeat the two scanning modes to achieve station transfer scanning.
Select Track Mode > Hybrid Leapfrog, and the scanner will automatically switch to Scanning Markers (Scanner) mode.
Note
After switching to Hybrid leapfrog, a new project will be automatically created with the project name: Original Project Name_s1; when scanning the next station, a new project will be created with the name: Original Project Name_s2, Original Project Name_s3, and so on.
- Click on the right, or briefly press the scan button on the scanner, to scan using Scan Global Markers (Scanner) mode.
-
During scanning, adjust the scanning distance based on the color indicator box at the edge of the scanning interface and the on-screen distance indication:
- Blue indicates that the scanning distance is too far.
- Yellow indicates that the scanning distance is too close.
- No color indicates that the scanning distance is appropriate.
-
After clicking
on the right, or briefly pressing the scan button on the scanner, to pause the scan, long press the bottom-right button of the scanner or click the Scan Point Cloud mode on the interface to switch to Scan Point Cloud mode.Note
-
During scanning and when the scan is paused, you can adjust the scanning object and scanning brightness again based on the scanning effect; for more scan settings, please refer to the Scan Settings section.
-
During scanning, only the data obtained in the current leap supports model quality indicator display. Based on the indicator colors, you can further scan insufficiently scanned areas (yellow areas) until the data turns blue.
- After completing each leap of scanning, it is recommended to pause the scan to review the scanning effect and edit the data. Returning to the previous leap to supplement markers or point cloud data is not supported.
-
-
Move the tracker (optional), and long press the bottom-right button of the scanner
/ click Next Leap on the left side of the interface / create a sub-project through the project list, to perform the next leap of scanning.Note
The current project only supports one point distance. Different projects can have different point distances.
-
Use Scan Global Markers (Scanner) mode again to scan markers. When the current leap successfully aligns with the previous leap's markers, the software interface will prompt "Aligned successfully".
Note
In the overlapping area to be aligned between the current scanning leap and the next scanning leap, at least 4 markers need to be scanned for subsequent alignment of data between leaps.
-
After clicking
on the right, or briefly pressing the scan button on the scanner, to pause the scan, long press the bottom-right button of the scanner or click the Scan Point Cloud mode on the interface to switch to Scan Point Cloud mode for point cloud scanning. -
Repeat steps 4-6 for leapfrog scanning until all scanning is completed.
Note
If the markers between two leaps are not successfully aligned, point cloud scanning for the next leap cannot be performed.
-
Pause the scan and edit the scanned data.
- Click for mesh processing. The software will automatically align the leapfrog data and optimize the data.