Business
This document introduces some operational questions and matters needing attention when using the Dental Cloud Platform.
-
Account Related
How to change the account name and password on the Dental Cloud Platform?
-
Message Related
-
Institution Related
What is a temporary institution?
How to perform uniqueness verification? (only suitable for user in China)
How to join or create an institution?
How to invite other accounts to join the current institution?
-
Members Related
How to set member permissions?
How can an administrator promote a member to an administrator role?
How can an administrator demote another administrator to a member?
-
Cases Related
-
Connection Related
How to change the account name and password on the Dental Cloud Platform?
Steps:
-
Click the account
 on the top navigation bar. Then click
  Account Settings in the dropdown list. This will navigate you to the Personal information.
 -
Enter the new name in the Name field.
-
Click Save.
Steps:
-
Click the account
on the top navigation bar. Then click  Change password in the drop-down list. This will navigate you to the Account information.
 -
Click Change in the Change password. Enter the old password and new password in the prompted dialog.
-
Click Confirm to apply.
How to bind a phone number or email account?
Steps:
-
Click the account
on the top navigation bar. Then click Change password in the drop-down list. This will navigate you to the Account information. -
In the Phone Binding or Email Binding section, click Bind. Enter the phone number or email account in the pop-up dialog, and complete the verification.
-
Click Confirm to complete the binding.
Note
For binding third-party account, please refer to Sign in.
How to change the bound phone number or email account?
Steps:
-
Click the account
on the top navigation bar. Then click Change password in the drop-down list. This will navigate you to the Account information. -
In the Phone Binding or Email Binding section, click Change binding/Unbind. Enter the phone number or email account in the pop-up dialog, and complete the verification.
-
Click Confirm to complete the binding.
How to enable or disable message notifications?
Steps:
-
Click the account
on the top navigation bar. Then click  Notification in the drop-down list. This will navigate you to the Notification.
 -
Do any of the following:
- Change work case setting.
- Turn notification of case, message, connection and member on or off.
Why am I not receiving SMS notifications for order updates?
Reason
-
You do not have the authorization to operate.
-
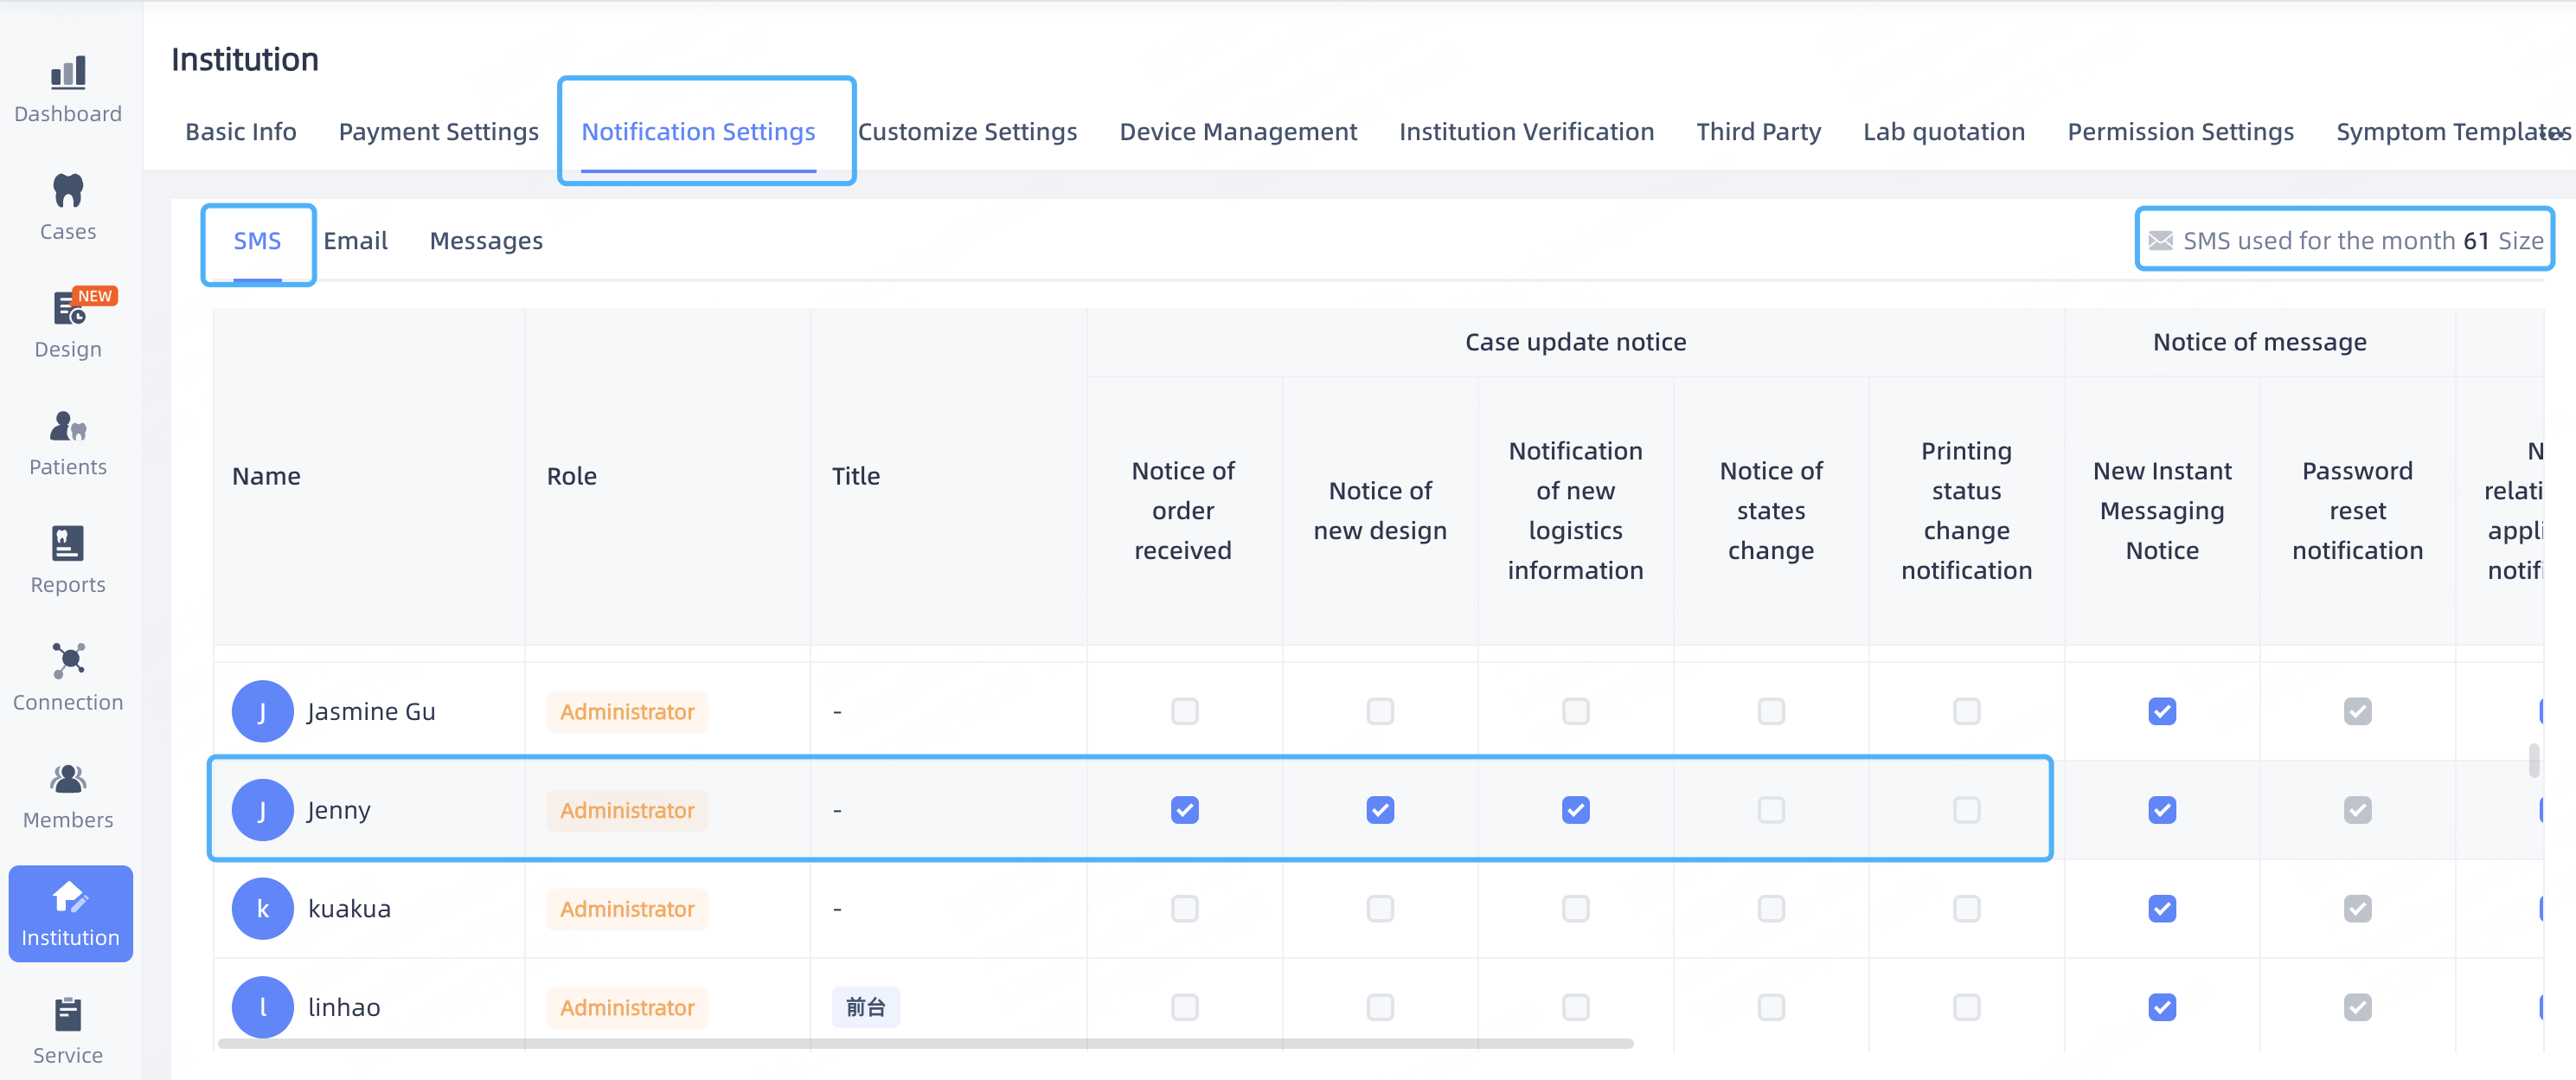
SMS notifications for orders are categorized into Notice of order received, Notice of new design, Notification of new logistics information, Notice of order states change and Printing status change notification. The desired SMS notifications for the specific order types have not been enabled.
Solution One:
Please contact your institution administrator to assist you in enabling SMS notifications.
Operating steps:
-
Click on the Institution menu in the left navigation bar.
-
At the top of the page, click Notification Settings > SMS.
-
For the corresponding member account, enable the desired order notifications.
Solution Two:
If you still do not receive SMS notifications after completing the above steps, please check your personal account settings.
Operating steps:
-
Click on the top right corner of the page
Account Settings. -
Click Notification in the left-side bar.
-
Enable SMS notifications for the corresponding order types.

What is a temporary institution?
To facilitate training for newly added members, the Dental Cloud Platform has set up temporary institutions.
When logging in for the first time, if you select a role and click Join in the institution, a Join Temporary Institution entry will appear at the bottom of the pop-up dialog.
To join a temporary institution, please note the following rules:
-
Temporary institutions are not limited by institution type.
-
Joining a temporary institution does not require approval from the institution administrator. Submitting the application will automatically join the institution.
-
While being a member of a temporary institution, if you successfully create or join another institution, you will automatically exit the temporary institution.
-
When exiting a temporary institution, all data within that temporary institution will be invalidated.
-
The trial period for a temporary institution is 3 days. After the trial period expires, your account will automatically exit the temporary institution. To ensure continuous product experience, please create or join another institution as soon as possible.
-
An account can only join a temporary institution once, and once you exit, you cannot join again.
How to perform uniqueness verification? (only suitable for user in China)
Steps:
-
Go to the
 Institution and click the Uniqueness Verification tab.
 -
Follow the on-screen instructions to upload your Business License . The system will automatically recognize and fill in the institution name, unified social credit code, and address.
-
Upload your Practicing License of Medical Institution or Clinic legal Certificate as prompted on the interface. The system will automatically recognize and fill in the institution name and registration number.
-
Upload the Declaration Letter. Before uploading, please download the declaration letter template, print it, check the relevant information and affix the official seal, take a photo or scan it and upload it, where the declarant refers to the institution/company name, and the Shining 3D Dental Cloud Platform account refers to the email address/mobile phone number at the time of registration.
-
Click Application Verification to submit your unique verification application. After the verification is passed, the verification logo will be displayed anywhere on the cloud platform where your institution name is displayed. If you have any objection to the verification result, you can apply for manual review.
Note
- Please ensure that the uploaded business license and declaration letter have the same name, are clear and complete, and are genuine and valid.
- After successful institution verification, the institution name will be updated to match the business license name.
How to choose a role?
Regarding the permissions of different roles, please refer to the Functions and Permissions. Based on your specific situation, please follow the steps below to select a role:
If you are a first-time user :
-
After successfully logging in, a pop-up window will appear. Choose Lab Administrator , which refers to creating an administrator account and creating an institution, or choose Designers and other staff , which refers to creating a member account and joining an institution.
-
Enter the institution name in the pop-up window and click Submit to complete the role selection.
-
After submitting the application to create an institution, the institution will be successfully established. At the same time, a new row will be added to both the institution information list and the member list, recording the relationship change between your account and the newly created institution. If you submit an application to join an institution, a new row will be added to both the institution information list and the member list, recording the relationship change between your account and the target institution.
If you are not a first-time user :
-
Click the account
on the top navigation bar. Then click the Account Settings in the drop-down list, which will take you to the Personal information. -
Click
 Institution information > Create/Join institutions, and select Lab Administrator to create an administrator account and create an institution, or choose Designers and other staff to create a member account and join an institution.
 -
Enter the institution name in the pop-up window and click Submit to complete the role selection.
-
After submitting the application to create an institution, the institution will be successfully established. At the same time, a new row will be added to both the institution information list and the member list, recording the relationship change between your account and the newly created institution. If you submit an application to join an institution, a new row will be added to both the institution information list and the member list, recording the relationship change between your account and the target institution.
Note
-
Once the institution name is submitted, it cannot be changed. Therefore, please double-check before clicking Submit.
-
If the role type of an account changes, the icons on the left navigation bar will also change accordingly.
-
The name of the dental laboratory must be unique.
-
When creating an institution, if you receive the prompt "Name already existed, please enter other names", it means that the institution already exists, and you cannot submit a creation application. If you click to join at this point, you will be redirected to the page for joining an institution, and your role will change from an administrator to a member.
-
When joining an institution, if you receive the prompt "Didn't find the Clinic name you want to join", it means that the institution does not exist, and you cannot submit a join application. If you click Create Lab at this point, you will be redirected to the page for creating an institution, and your role will change from a member to an administrator.
-
-
After submitting an Join in Institution application, the status column of that row will change from "Pending Review" to "Confirmed," indicating that the administrator of the target institution has approved the join request, and you can exercise member permissions. If your application is not approved for a long time, please contact the administrator of the target institution.
How to join or create an institution?
Please refer to Role Permissionsto understand the different permissions associated with each role. Then, based on your requirements, decide whether you need to join an institution as a member or create an institution as an administrator.
How to exit an institution?
Steps:
-
Click the account
on the top navigation bar. Then click Account settings in the drop-down list. This will navigate you to the Personal information. -
Click
Institution information. Then click  on the Actions column.
 -
A confirmation dialog will pop up for you to enter the reasons for exit and confirm.
-
Click Confirm.
Note
- Exiting an institution does not require the approval of the administrator.
- After exiting, your account can reapply to join the same institution as a member.
- Once you have exited an institution, you will no longer have access to any information within that institution.
- Each institution must have at least one administrator. If there is only one administrator in the institution, that administrator cannot exit the institution.
How to establish a connection?
Steps:
-
Go to the
 Connection, click + New.
 -
Enter the name of the clinic you want to establish a connection with.
-
From the search list, select the desired clinic.
-
Click Submit to send a connection establishment request to the administrator of the target clinic.
-
A new row will be added to the connection list, recording the change in relationship between your current institution and the target clinic.
-
The status of that row will change from To be confirmed to Confirmed , indicating that the administrator of the target clinic has approved the request to establish a connection.
Note
Only institution administrators can establish a connection.
How to invite other accounts to join the current institution?
Steps:
- Go to the
 Members, then click + Add. A window will pop up for you to add member.
 - Enter the phone number or email address of the member you want to invite. You can choose to set them as a member (default) or an administrator.
- After verifying the input, click Submit to send the invitation as the current institution's administrator.
- A new row will be added to the member list, recording the information of the invited account, with the status column showing To be confirmed .
- Once the invited account agrees to join, the status column of that row will change to Confirmed, indicating a successful invitation.
Note
- Only institution administrators can establish a connection.
- An account can belong to more than one institution.
- If the entered account does not exist, this account will be automatically created. The invited account will need to complete verification, set a password, and upon logging into the platform, can accept or reject the invitation.
How to set member permissions?
Steps:
-
Go to the
Institution, then click Permission settings tab. -
Click the Function Permissions column, and check the box of various permissions.
-
Click Submit to apply.
Note
Only institution administrators can set member permissions.
How can an administrator promote a member to an administrator role?
Go to the ![]() Members, then click
Members, then click ![]() Change role to administrator on the Actions column.
Change role to administrator on the Actions column.
How can an administrator demote another administrator to a member?
Go to the ![]() Members, then click
Members, then click ![]() Change role to ordinary member on the Actions column.
Change role to ordinary member on the Actions column.
How can an administrator remove a member?
Go to the ![]() Members, then click
Members, then click ![]() Delete on the Actions column.
Delete on the Actions column.
Note
- Each institution must have at least one administrator. If there is only one administrator in the institution, that administrator cannot exit the institution.
How to print case details?
Steps:
-
Go to the
 Cases, then click Case Number to navigate to the detail page.
 -
Click Print
 to print the case.